A 3-way switch wiring is required whenever you want to have multiple switches for controlling an electrical gadget from different locations. For example, you have a staircase light, and you want to control it from the bottom of the staircase as well as the top of the staircase. Therefore, you will require two different switches with 3-way switch wiring.
Generally, an electrical gadget with one switch only requires single-pole switch wiring. In comparison, a 3-way switch wiring has complicated structure than conventional single-pole switch wiring. In this article, we will illustrate how to wire a 3-way light switch.
Tools Requirements –
There are the tools you need to wire a 3-way light switch.
- 4-in-1 screwdriver
- Wire stripper
- Voltage tester(non-contact)
- Needle-nose plier
- Electrical tape
- Utility knife
In terms of material, you will need two 3-way switches as well as 12-3 cables or 14-3 cable.
How 3-Way Switch Works?
Instead of 2 terminal screws and a ground screw, 3-way switch has 3 terminal screws and a ground screw. Two out of these three terminals have same color while the remaining terminal called the common terminal generally has a darker color.
The white wire from the power source goes directly to the light fixture. The ground wire goes to the grounding screws. When it comes to the hot wire or the charged wire from the power source goes through the switches. The light switch is to barge in the hot wire when the switch is turned off.
There are three wires that connect to the two switches and they are two black wires and a common wire. When you switch on the light, any of these wires get hot as per configurations.
How To Wire 3-Way Switches?
There are basically three different ways you can set up three-way switches to control the connected light. Depending on the power entering the circuit as well as the placement of switches and lights, here are the possible ways.
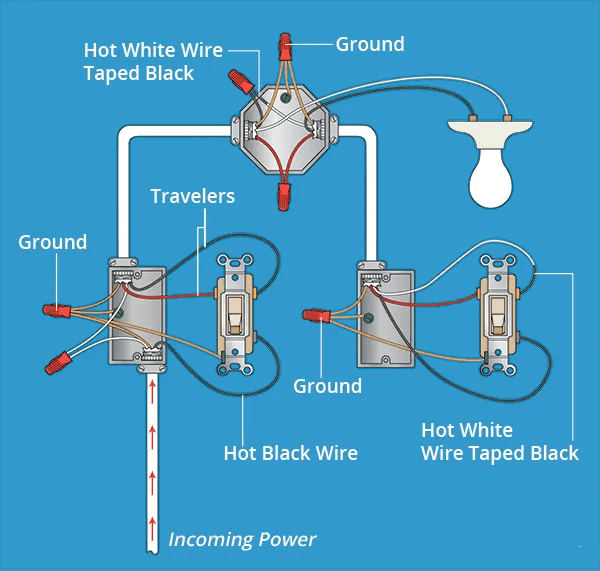
1. The Power Source Wires Enter One Switch Box
In this setup, it is the first switch that is connected to power. The wire then passes onto the light. In doing so, it terminates at the other switch.
- For the basement 3-way switch, an electrical box is required. It has to be large that makes it accommodate extra wires.
- Feed the cable which has insulated conductors between the two boxes.
- Using ground screws connect the wires to the 3-way switches.
- Wrap black electrical tape around the white wire and ends.
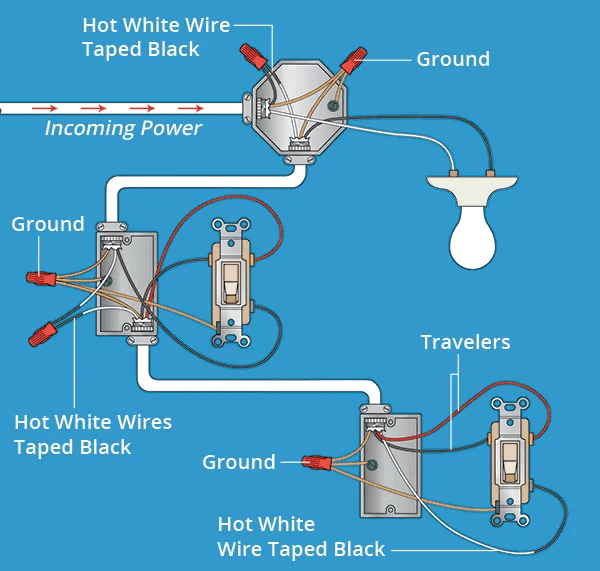
2. The Power Source Wires Enter the Light Fixture Box
In this configuration, the power source enters the light fixture box first. The power source will travel from one switch and connect to another switch.
- The inbound white wire and the black wire passes through the first switch box.
- The wire connects to the 2nd switch’s common terminal.
- Even the black and red travelers connect on both switches.
The red wire leads to the fixture from the common terminal of the first switch.
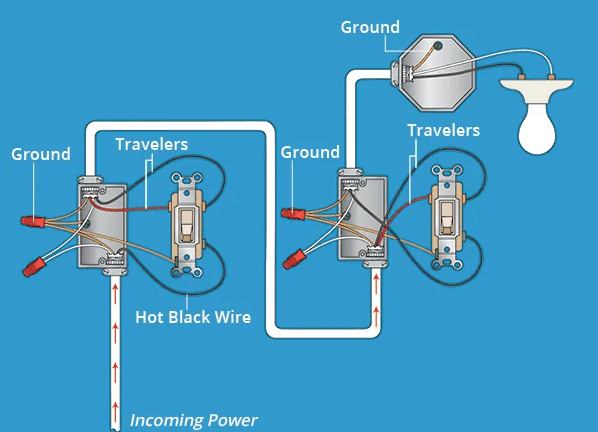
3. The Power Source Wires go From Switch to Switch
The first switch gets the power and then it is placed on the second switch.
- The white wire which has wire nuts will stay continuous.
- The black wire will connect to the first switch’s common terminal and carry it to the second switch.
- The second switch will send the incoming black wire to the common terminal.
- The light fixture will receive power at the switch traveler terminals.
Conclusion –
Setting up 3-way switch wiring is slightly complicated and there are three different ways you can set it up as per requirements. We have provided all the necessary steps and diagrams you need for perfect setup. The colors of the wires and other components can vary from one model to another and therefore, you have to be 100% sure before configuring and wiring properly.

One Response
It’s nice explanation