Just like most other laptops on the market, MacBooks are also prone to throw some errors and bugs every now and then. While the issues with a MacBook are usually not as severe as other laptops, a few mishaps can easily affect your daily usage. One such problem which is commonly detected on MacBook is sound issues. And since there aren’t many options available on a MacBook for troubleshooting the problem, like 3rd party software available with Windows, it can get difficult to find the core reason behind the problem and fix it.
Today, we will discuss the many users’ low volume problem on MApple MacBooks. As the name suggests, this problem suddenly reduces the sound output of the MacBook. As you can, this can be a really frustrating problem as it can hamper your workflow or cause trouble with your entertainment. In this guide, we will check the main reasons behind this problem and some proven solutions which have worked out for many users in the past.
Why My Mac Volume Is Low?
 There can be several reasons behind low volume on a Mac. And if you wish to fix your problem quickly, you need to first find what has caused the issue in your case. Only then can you choose the perfect solution which will work in your case. Here are some common reasons behind low volume problems on an Apple MacBook.
1. Audio Output Muted
The audio output may sometimes be accidentally muted or set to a very low volume. As you can imagine, going through multiple different solutions to find out that the audio was muted from the system property would be a bad idea. So, we suggest you check the system sound output settings before checking other solutions. To check this, look at the menu bar at the top of the screen and click on the speaker icon. Ensure the volume slider is not set to the lowest level or muted.
2. Sound Settings Problem
It’s also possible that the sound settings on your Mac are not configured optimally. To troubleshoot this, go to the Apple menu and select “System Preferences,” then click on “Sound.” Check the output volume and balance settings to ensure they are appropriately adjusted. In many cases, improper balance settings can also cause lower audio output.
3. Wireless Audio Output
If you are using wireless speakers or headphones, there might be connectivity issues or interference causing the low volume. Ensure that the audio device is properly paired and within the recommended range. Additionally, try adjusting the volume settings on the wireless device itself, as it may have separate volume controls. In most cases, the problem usually occurs in the connected device instead of the system. There can be several reasons behind this such as improper connection, low device charging, or batteries of the wireless sound device running out of power.
4. Headphone Port Problem
If you are experiencing low volume, specifically through the headphone port, there might be an issue with the port itself. Check if there is any debris or lint inside the port that could be obstructing the connection. Try using different headphones or speakers to see if the issue persists. If the problem persists, it may require professional assistance to fix or replace the headphone port. While you are at it, check the condition of the audio port on the connecting cable and see if there is any damage to the cable itself. Just like the ports, a damaged cable can also result in lower audio output or no output at all.
5. Maintenance Scripts
Occasionally, Mac systems can accumulate temporary files or caches affecting system performance, including audio output. Running maintenance scripts or clearing system caches using specialized software or built-in macOS utilities like Disk Utility can help resolve such issues and potentially improve the volume levels. However, it may not work out in all cases, especially if there is physical damage to the internal or connecting parts that maintenance cannot fix. scripts.
How to Fix Macbook Volume?
Now that you have understood what can cause the low audio output problem in your Apple MacBook, let us try some quick fixes to see if any of these solutions can fix the problem. If a software issue causes the problem, we assure you that one of the solutions presented below will work out for you. And if not, you can pretty much guarantee that it is caused by a hardware issue that requires a repair or replacement of the part.
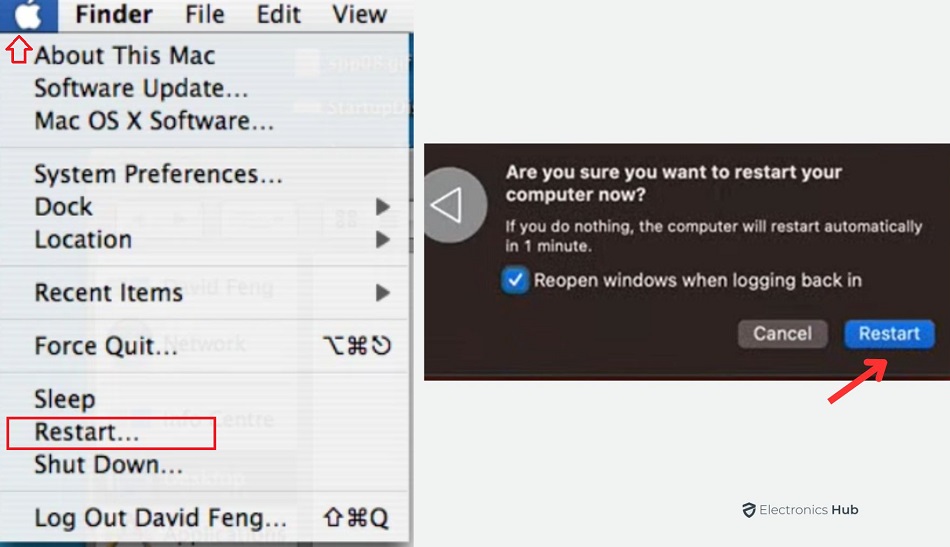
1. Reboot Your Mac
If the audio problem is caused by a newly installed program or software, we will suggest restarting your system for the changes to take effect. Sometimes, a simple restart can fix a lot of software-related issues affecting the volume. So, restarting your system will reset the problematic program settings to default and result in the original sound output. It is possible because rebooting your Mac refreshes the system and can help restore proper audio functionality.
To reboot a MacBook, follow these steps:
- Click on the Apple icon in the top-left corner of the screen.
- A drop-down menu will appear.
- Select the “Restart” option from the menu.
- A pop-up window will appear, asking for confirmation.
- Click on the “Restart” button in the pop-up window.
This will initiate the reboot process for your MacBook.
2. Use External Speakers or Headphones
Sometimes, the low sound issue can also be caused by problems with the built-in speakers of the MacBook. To see if that’s the issue, you simply need to connect any external speaker system or speaker to your MacBook. Suppose you are not finding any problem with the external sound device. In that case, it is guaranteed that the problem lies with the configuration of the speaker drivers or the physical drivers themselves. If the built-in speakers are not producing adequate volume, connecting external speakers or headphones can provide a louder and clearer audio output for the time being. Simply plug the speakers or headphones into the appropriate audio port on your Macbook. And as for the built-in speakers, you should try other troubleshooting methods or contact customer support.
3. Test with Different Apps
In many cases, you will notice that the low audio problem is only observed with a certain application or a set of certain types of applications, such as music players or media players. While it can also depend upon the type of media you are playing, it can be an issue with the program itself. To verify the state of the issue, we will recommend trying audio output from different applications or media players to check if the low volume issue persists across all apps. If the problem is specific to a particular app, check the audio settings and ensure they are properly configured. It can also help to uninstall and reinstall the application to reset its configuration.
4. Ensure the Correct Selected Sound Output
In this case, the output device you select for audio output can also be the culprit. If you have accidentally chosen some other sound hardware or a program that mimics the properties of sound hardware, like a virtual speaker, you can end up with a low volume problem. Verify that the correct audio output device is selected in the Apple settings to address this problem. To do this, go to the Apple menu, select “System Preferences,” and click on “Sound.” Go to the “Output” tab, and choose the desired audio device from the list.
5. Disconnect Bluetooth Headphones
If you have previously connected Bluetooth headphones to your Macbook, make sure they are disconnected before you are playing any audio stream. Sometimes, the Macbook might still be directing audio output to the Bluetooth headphones even if they are not in use. It is recommended to turn OFF the Bluetooth connectivity option in the laptop as well as your wireless device to confirm whether the issue is caused by a Bluetooth device or not.
6. Make Sure the Headphone Jack is Empty
If you recently used headphones or external audio devices with your Macbook, ensure the headphone jack is empty. Sometimes, a faulty connection or debris in the jack can cause low volume or no audio output. If any conducting elements are inside the debris, the MacBook may detect it as an audio output source and cause the audio to be delivered improperly. To thoroughly clean the audio port of your laptop, or any other port for that matter, you can check out the variety of laptop cleaning tools available on the market. These tools are specially designed to clean out the debris from ports and reduce the chances of errors and hardware failures caused by residue dust and dirt.
7. Use an Equalizer
Macbooks also come with built-in equalizer settings that allow you to adjust the sound frequency levels. So, you can customize the sound output from the equalizer and set the preferences as per your liking. This will allow you to get personalized sound output from your MacBook based on the content or audio stream you are watching. To do that, simply open the “Sound” settings in “System Preferences” and click on the “Output” tab. Click “Equalizer” and experiment with different preset options or manually adjust the sliders to enhance the audio output.
8. Reset Core Audio
Core Audio is the underlying audio technology in macOS. You can also consider it as the core program in your MacBook that renders the audio output and passes it to the audio hardware for output. So, resetting the core audio settings can help resolve this or any other audio-related issues. To reset Core Audio, open the “Terminal” application (found in the utility folder), and enter the command “sudo killall coreaudiod“. Press Enter and provide your admin password if prompted. This will restart the Core Audio service and clear any problems that occurred in the service during runtime. You can also try resettings the parameters of the core audio if simply restarting the service does not solve your issue.
9. Check for Software Updates
Sometimes, there can be an error in a certain software upgrade pushed by Apple, which can create certain bugs in the system, such as audio rendering issues. However, Apple’s software support team is quite efficient with such problems, and most of these issues would be fixed sooner than you would expect. So, keeping your Macbook’s operating system up to date is crucial for optimal performance. Check for any available software updates by going to the Apple menu, selecting “System Preferences,” and clicking on “Software Update.” Install any pending updates as they may include bug fixes or improvements related to audio performance.
10. Resetting NVRAM
NVRAM (Non-Volatile Random Access Memory) stores various settings on your Macbook, including audio preferences. Resetting the NVRAM can sometimes resolve issues with volume control. To reset NVRAM, shut down your Macbook, turn it back on and immediately press and hold the Option + Command + P + R keys simultaneously until you hear the startup sound for the second time. This will reset the NVRAM and probably resolve audio issues if a problematic NVRAM state causes it.
11. Apple Support
Lastly, Suppose you have tried all the above steps and are still experiencing low volume on your Macbook. In that case, you should seek assistance from Apple Support or visit an authorized service provider with your MacBook. If none of the solutions mentioned above has worked out for you, there is a fair chance that the audio problem is the result of hardware failure, which requires repair from a professional. Apple’s authorized service center can provide further guidance and help diagnose any hardware or software-related problems that may be affecting the audio output. Keep in mind that it is always a good idea to take your laptop to an authorized service center instead of attempting to fix the hardware issues on your own. MacBooks, like many other Apple products, are unsuitable for DIY repair tasks and may end up permanently damaged if such an action is attempted.
Also Check: Best Free Windows Emulator for Mac
Why is My Mac Volume So Low-FAQs
Ans: If the volume keys on your Mac keyboard, specifically the F11 key, are not working, there could be a few reasons for this issue. It’s possible that the keyboard settings on your Mac have been modified, causing the volume keys to behave differently or not function at all. To check the settings, go to the Apple menu, select “System Preferences,” and click on “Keyboard. In some cases, the volume keys on the keyboard itself may be physically damaged or malfunctioning. Inspect the keyboard for any visible damage or debris obstructing the key’s movement.
Ans: On a Mac keyboard, the Fn (Function) key is typically used in combination with other keys to access additional functions, such as adjusting volume or brightness. However, suppose you want to increase the volume without using the Fn key. In that case, press the Volume Up key (usually represented by an upward arrow) on an extended keyboard layout. You can also adjust the volume directly from the System Preferences menu. Go to the Apple menu, select “System Preferences,” and click on “Sound.” In the Sound window, go to the “Output” tab and use the volume slider to increase or decrease the volume level.
And if you are a MacBook Pro user, you can utilize the touch-sensitive strip located above the keyboard. You should see a volume icon on the Touch Bar when you are in an application that supports Touch Bar controls. Simply tap or slide your finger on the volume icon to increase the volume.
Ans: If the volume control is not showing on your MacBook Pro’s Touch Bar, there could be a few reasons for this issue. It’s possible that the volume control has been disabled or removed from your Touch Bar settings. To check and modify the Touch Bar settings, go to the Apple menu, select “System Preferences,” and click on “Keyboard.” Then, click on the “Keyboard” tab and choose “Customize Control Strip.” Ensure that the volume control is included in the list of available options. If it’s not present, you can drag and drop it from the list of available items to add it back to the Touch Bar.
Some applications have the ability to customize the content displayed on the Touch Bar based on their own settings. So, it’s possible that the application you are currently using has disabled the volume control in its Touch Bar settings. You should also ensure your MacBook Pro runs the latest macOS version. Software updates often include bug fixes and improvements, which could potentially address issues related to the Touch Bar functionality.
Ans: To adjust the volume on your MacBook precisely, you can use the dedicated volume keys on the keyboard. Press the Volume Up (F12) or Volume Down (F11) keys to increase or decrease the volume. Each press of the keys typically adjusts the volume in small increments. The volume control is also conveniently accessible from the menu bar at the top-right corner of the screen. Look for the speaker icon, click on it, and a volume slider will appear. You can drag the slider up or down to adjust the volume precisely.
Conclusion
In this conversation, we discussed various aspects of a MacBook’s volume issues. We explored reasons behind low volume, troubleshooting steps to fix volume problems, alternative methods to increase volume without using the Fn key, and ways to adjust volume precisely on a MacBook. Remember that the solutions provided are general guidelines, and results may vary depending on individual circumstances. If you encounter persistent volume issues or if none of the troubleshooting steps works, it is advisable to seek assistance from Apple Support or visit an authorized service provider for further guidance. It is also recommended to refer to official documentation and consult reliable sources for the most current information.
