Got stuck with the red light on the motherboard issue? Well, this time your computer is not going to resolve it on its own. It needs your help.
If you’re completely clueless about what the problem is or where to begin, don’t worry. This detailed guide will help you in the whole process.
Let us begin by knowing what problem you’re actually facing.
What Does Red Light On Motherboard Mean?
The motherboard is the central hub for all the circuits. This is why even a little error can cause chaos to the whole machine. However, the motherboard is also equipped with powerful troubleshooting capabilities to eradicate every possible threat. Among all this, the most common way for a motherboard to indicate an error is by displaying LEDs. It is visually appealing and you immediately start looking for the problems.
In the earlier versions, the motherboard only had a single LED to indicate various hardware issues. Now, undoubtedly these moments were like fighting an uphill battle. A single LED for so many hardware took a long time to detect what’s wrong with the whole system.
Fortunately, with the advancement in technology, the conditions have improved a lot. Nowadays, every motherboard comes with multiple LED lights that represent specific hardware only. The process becomes much simpler and you switch immediately in the problem-solving approach.
However, still, this isn’t child’s play. If you’ve never dealt with motherboards and stuff before, chances are, it might look like alien technology to you.
Also Read: What Is Yellow Light On Motherboard
Different Red Lights On Motherboard
The guide mentioned here will help you to know about the different red lights on the motherboard. Let’s have a look at it.
CPU Red Light
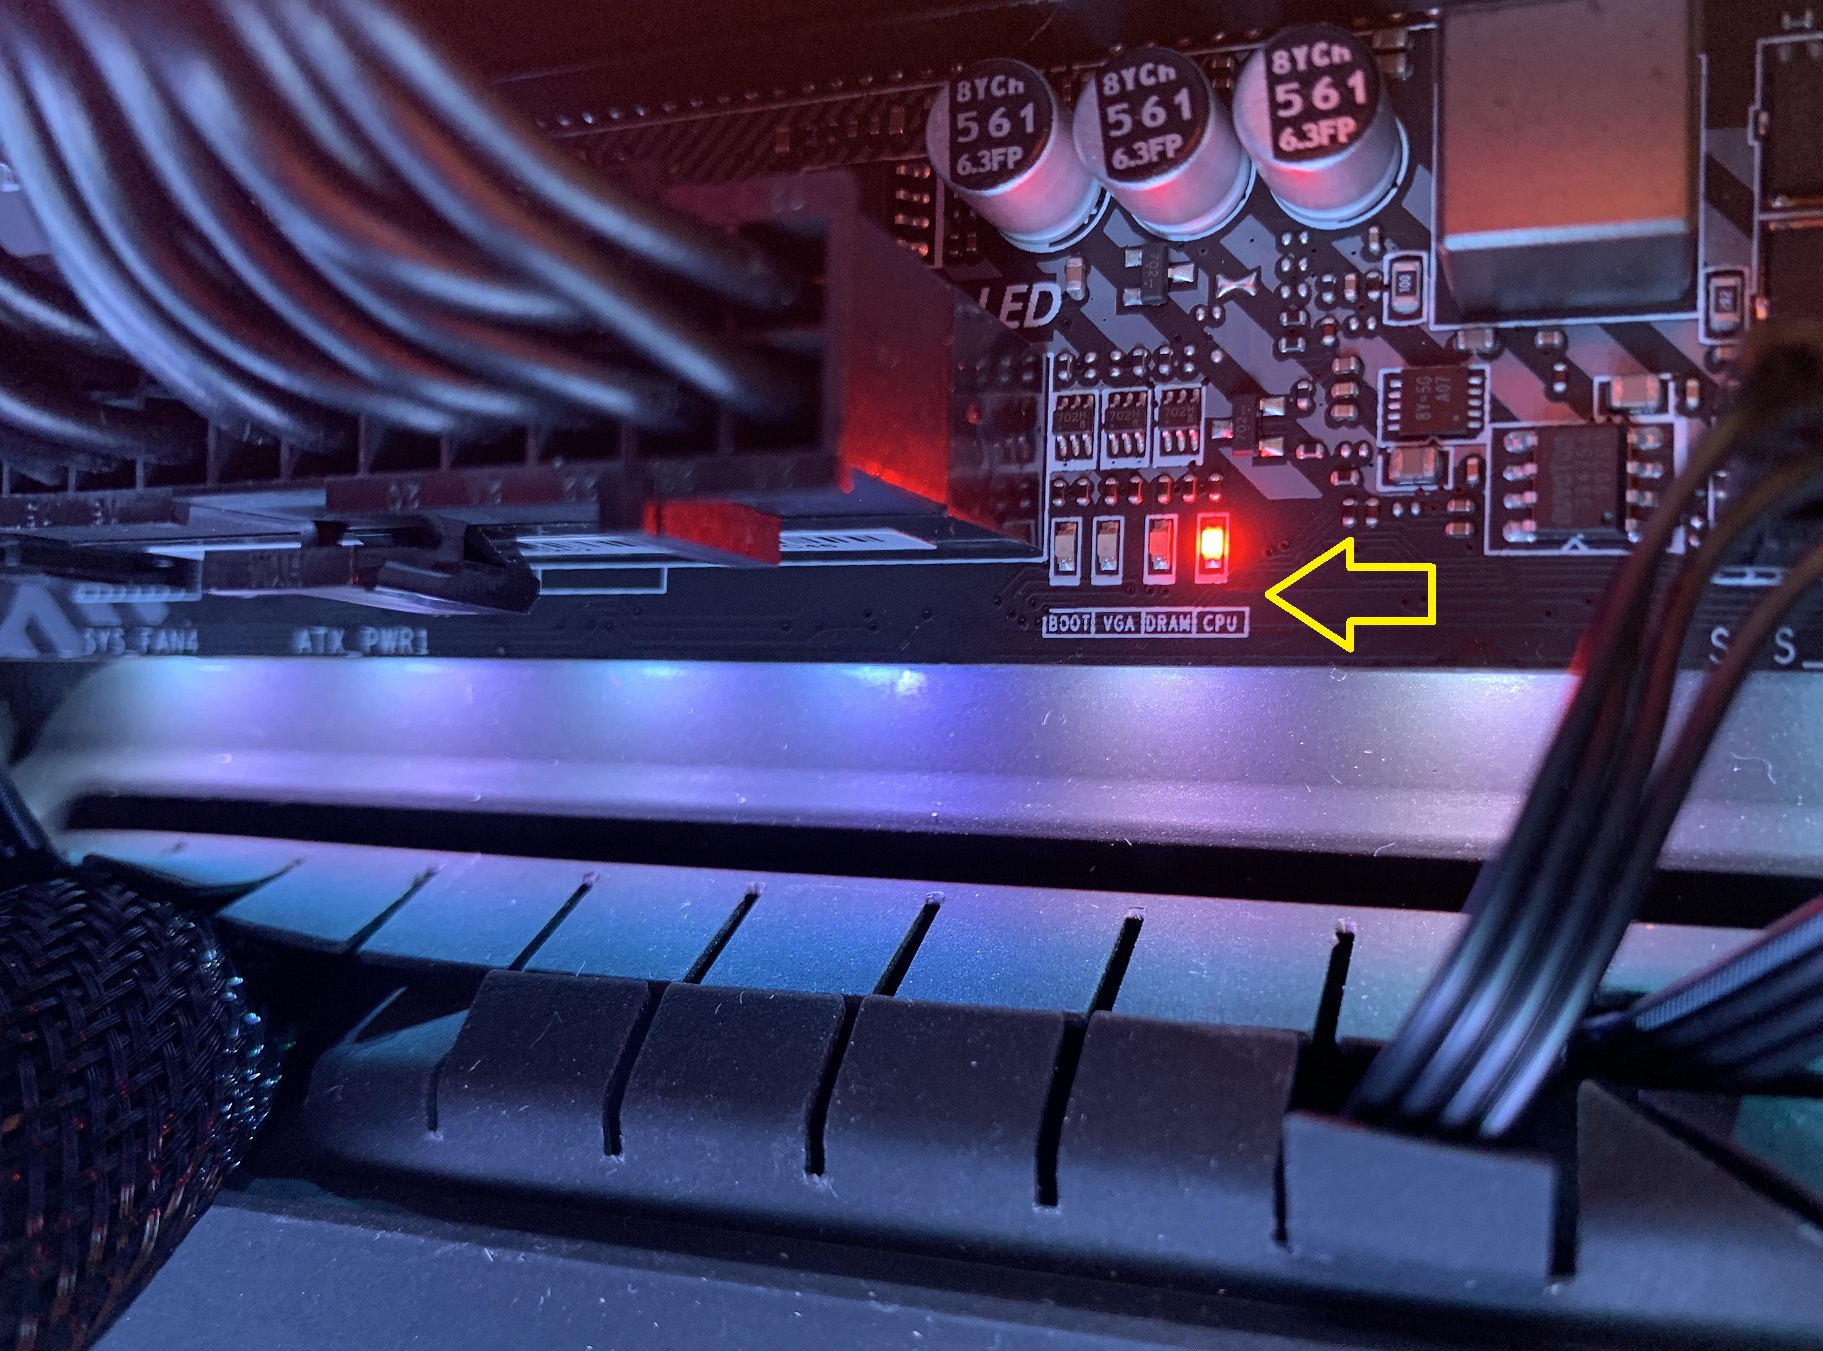
Starting with the most common, red light for CPU. The CPU light is the direct indication of the malfunction of the processor. And usually, you’ll notice that the system isn’t even trying to start.
Now, many things can indicate the motherboard to warn us by emitting red light. Maybe your CPU is not connected properly with the socket, or there’s a defect in the pin of the socket. Both of these issues will not allow the motherboard to establish a firm connection with the CPU.
Another major reason might be the fan failure. The disconnection of the fan or irregular fan work might seem a small thing to us, but it’s not the same for the motherboard. The foremost thing a motherboard takes care of is, there should be proper heat ventilation throughout the computing time. A computer emits a lot of heat while working, and if the heat will be not passed, serious hazards can occur.
Finally, you should have a look at the CMOS battery as well. The main work of the CMOS battery is to power the CMOS Chip of the computer which contains the BIOS firmware of the computer. There are chances that the battery has not charged properly. Thus, resulting in a red light warning.
DRAM Red Light
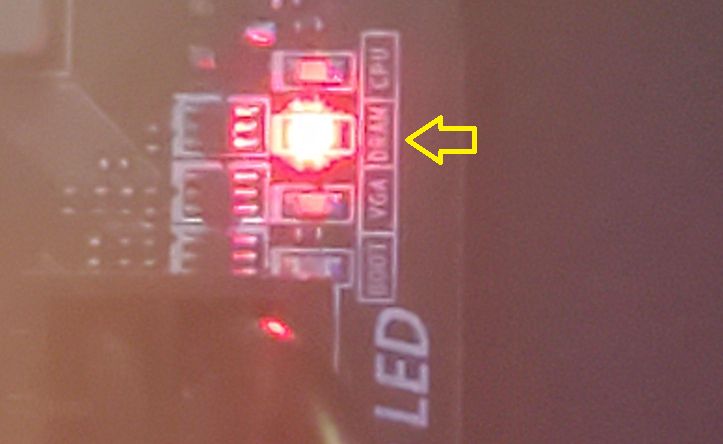
DRAM red light on Motherboard is related to the RAM of the computer, the most important memory of all. Whenever you see a red light glowing in this area, something quickly needs to be done.**. Also, the RAM (Random Access Memory) is one of the building blocks in the functionality of the computer. Here too, you’ll notice that the computer isn’t starting at all.
The most basic reason for the DRAM red light here is, the RAM is not installed correctly or it is corrupted. As a first step, you should immediately take the RAM chip out from the socket. Now, try to install it again after cleaning it with a dry cloth. There might be a reason that this thing has occurred due to the dust deposition on the RAM.
You should aim to plug the RAM correctly. Try to insert the RAM chip until and unless you hear a click sound. This will be an indication that you’ve properly installed the RAM. Doing so will most possibly stop the blinking of the red light.
If you’re still experiencing the same issue, you might need to change the RAM. Possibilities are, your RAM has been corrupted.
Also Read: Reasons For DRAM LED on a Motherboard is Turned On
GPU Red Light
The blinking of Red light of the GPU or VGA is related to the video card issues. As the GPU is also a chip, the problems here are similar to the RAM. Mostly the GPU gets loosened over time or it has got corrupted with overburden.
Cross-check whether the GPU is plugged properly or not. Also, pay attention to the connectors, they might’ve gotten loosened as well. Try plugging it again after cleaning all the dust with a dry soft cloth.
You’ll notice that the red light has stopped blinking. But what if it is still there? Unfortunately, this is a sign of GPU corruption.
Boot Error
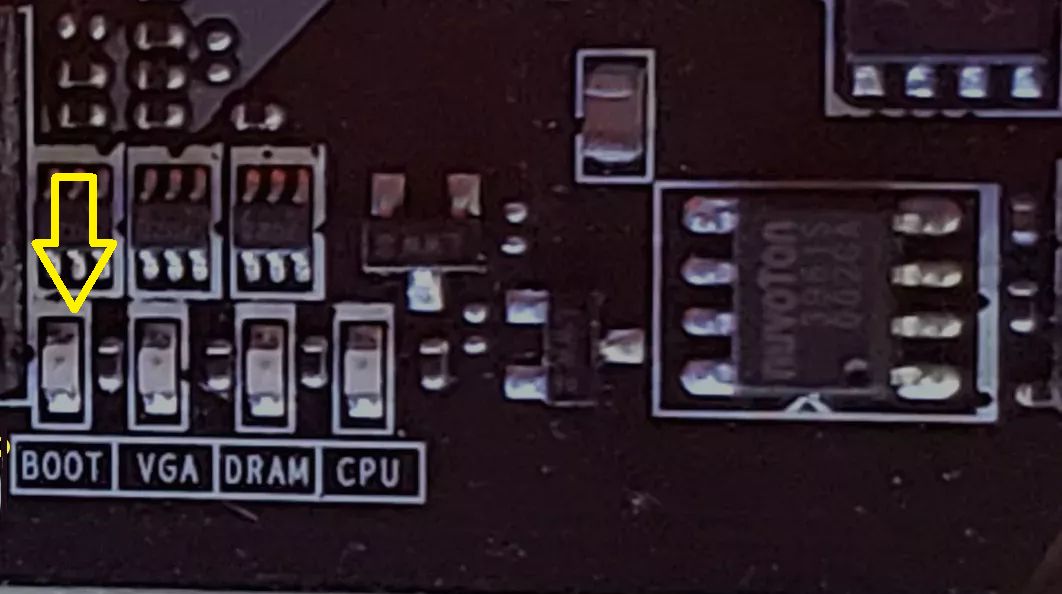
The last LED light indication is devoted to the boot related issue. As the boot device helps the OS to launch smoothly, there’s no doubt why it’s so important for the smooth functioning of the computer.
Generally, the LED starts blinking when the motherboard is unable to identify the boot device. There are also chances, the boot device is corrupted or has loosened its connections.
To deal with such issues, you should cross check the power connectors and main plug of the device. If the issue still persists, chances are your boot device has corrupted on motherboard.
Also Read: EZ Debug LED Lights On Motherboards
How Can I Fix the Red light on the motherboard?
It’s obvious that knowing about the issue is not enough. Some of the ways to deal with this issue are already mentioned in the above section(playing with RAM or GPU). But, there are several other attempts that you can conduct to fix this issue. And the instruction provided below will help you to reach back to normal. Among these, some of them are easy to perform while others will demand to replace components if needed. Let us go through the fixes for Red light issues on Motherboard.
Reset BIOS
Resetting BIOS is one of the most effective and easiest ways to begin. Chances are you’ll get your work done in this step only.
The BIOS stands for basic input/output system and is an advanced program every machine needs for smooth starting. Even a simple change here can bring distinct results (such as blinking red light).
But how to reset the BIOS? Simple, you just need to take out the CMOS battery. And again plug it in after five minutes. Another way of resetting the BIOS would be CMOS jumper. This three- pin jumper is located at the side of the CMOS battery. In general, it is placed on either two of the pins (1 and 2, or 2 and 3). Plug the jumper to the other two pins for five minutes and plug it back to its actual position.
You’ll now experience a smooth starting process.
If the red light is still there, pick another method.
Remove Hardware
This is the time to free up the motherboard completely and inspect. Remove all the attached hardware from the motherboard, and unplug every connection too.
Now, before inspecting go for the easiest task. Clean the motherboard properly with a dry smooth cloth. Dust deposition is one of the forms of any machinery, and the same thing goes here as well.
Next, you should inspect every piece of hardware thoroughly. Check whether everything is in its shape or not, and finally clean each of them,
It’s time to look at all the connectors and sockets. Try to clean all the dirt formed in the ends or pins of these connectors. Also, look for any ill-shaped components. If you find something like that, don’t panic. Resolving or pushing it with the help of a small screwdriver can make things work again.
Replace CMOS
What if the blinking of the red light didn’t stop even after resetting the BIOS? In such a case there could be something wrong with the CMOS battery. This can especially happen if you’re having an old computer and this is your first time encountering this issue.
Try to replace your CMOS battery with a new one to eradicate this issue. However, don’t waste your money until and unless you’re sure the problem belongs to here only.
Storage Device Check
You might need the help of your friends in this process. You should check the booting process again by replacing your storage device. There is a problem in the main system, and its cause can be anything, even a storage device.
Borrow a storage device from your friend and check whether the computer has started working or not.
Disconnect all Peripherals and Connectors
This is the last solution to your problem, and there’s a high probability that your work will be done. Here, you need to remove all the external connectors and peripheral devices. Whether it’s a keyboard, mouse, or speakers, detach it.
Also, remove all the cables as well except the power and display cable. Now, switch on the computer. Did the system start booting? If yes, start connecting the cables and peripherals one by one. By doing so, you’ll get to know which was the faulty connection among them.
Also Check:
- Motherboard Sizes
- Motherboard HDMI Not working
- What motherboard do I Have?
- Motherboard Installation
- How to Enable Motherboard HDMI
Conclusion
I hope the above information will help you to resolve this issue. The red light on the motherboard issue is kind of an age-old issue. Don’t get worried about it, your PC will be just fine. Although, you do need a calm mind to test multiple methods one by one. And, suddenly you’ll notice that the LED is not blinking anymore.
However, what if the problem has not been resolved yet? This would be the perfect time to ask a computer expert. You can also visit the authorized dealer of your computer.
Also Read: White Light Issues On Motherboard
FAQs: Red Light On Motherboard
What is the difference between red light and yellow light on Motherboard?
A red light usually indicates a more severe or urgent issue compared to a yellow (or amber) light. While a yellow light may suggest a warning or minor issue, red typically signals a critical error that needs immediate attention.
Why is there a red light on my motherboard but no issues?
A red light on the motherboard typically signals an error or problem with a specific component (CPU, RAM, GPU, etc.). However, it’s possible that the system is still running without noticeable issues due to a minor or non-critical issue that the motherboard detects but doesn’t impact performance.
Can a failing motherboard itself cause a red light?
Yes, if the motherboard is faulty, it may display a red light to signal that it’s not functioning properly. This is rare but can happen due to manufacturing defects, electrical issues, or physical damage.
Why is there a red light after I installed new hardware?
A red light after installing new hardware could indicate that the component (such as new RAM, GPU, or CPU) is not compatible with the motherboard or is not seated properly. Double-check all connections and ensure the hardware is compatible.
Can incompatible RAM cause a red light on the motherboard?
Yes, if the installed RAM is incompatible with the motherboard (due to speed, capacity, or technology differences), it can trigger a red light, usually in the DRAM section. Verify that your RAM is compatible with your motherboard by checking the manual or manufacturer’s website.
