Sharing files on Google Drive is supposed to be easy, but many people find it confusing. The options can be overwhelming, and it’s frustrating when your friend or colleague can’t access the files you shared.
If you’ve ever struggled with setting permissions or figuring out the right way to share a document, you’re not alone. In this guide, we’ll walk you through the steps to ensure your files are shared correctly and securely every time.
How Does Google Drive Sharing Actually Work?
Google Drive is a cloud storage service provided by Google, which allows you to store, share, and access files from any device with an internet connection. It is widely used for both personal and professional purposes, thanks to its integration with other Google services like G Suite (now known as Google Workspace), which includes Gmail, Google Docs, Google Sheets, and more. Google Drive offers a seamless way to manage and collaborate on files, making it a valuable tool for individuals and organizations alike. It includes two primary areas for storing your documents: My Drive and Shared Drive.
- My Drive is your personal storage space where you can upload and organize files and folders. It is ideal for individual use, and you have complete control over the files stored here. You can share specific files or folders with others when needed.
- Shared Drive (formerly known as Team Drive) is designed for collaborative work. Files and folders in a Shared Drive belong to the team rather than an individual. This setup is particularly useful for organizations where multiple people need access to the same files. In a Shared Drive, permissions are managed at the folder level, making it easier to control who can access what within a team.
When you decide to share files from Google Drive, you have a couple of methods at your disposal:
- Share With People And Groups (Through Email) – This method allows you to grant access to specific individuals. You can invite them via their email addresses to view, comment on, or edit a document. This is ideal for targeted sharing where specific collaboration is needed.
- Get Shareable Links – By creating a link, you grant access to anyone who possesses the link. Depending on the permissions you set, people can view, comment, or edit the file. This method is suited for broader sharing where specific email addresses are not required.
Additionally, Google Drive provides different levels of access permissions:
- Viewer: Individuals with this permission can only view the file. They are unable to make changes or share the file further.
- Commentator: These users can add comments and suggestions but cannot alter the content or share the file.
- Editor: Editors have the most freedom, as they can make changes, accept or reject suggestions, and share the document with others via email.
Each of these sharing options and permissions allows you to control how your files are accessed and used by others, making Google Drive a flexible tool for file management and collaboration.
How To Share Your Google Drive Files And Folders?
Sharing files and folders on Google Drive allows you to collaborate and work with others easily. Whether you’re sharing a document for review or giving access to a folder for a project, Google Drive provides simple ways to share. You can share with specific individuals through email or generate a shareable link that can be sent to anyone.
Share Your Google Drive Through Email
Sharing your Google Drive files through email is a direct way to collaborate with specific individuals. You can select files and folders, choose who to share them with, and set the appropriate permissions. Here’s how you can do it step by step:
- Open And log In To Your Google Drive Account: Start by heading over to Google Drive (drive.google.com) and logging in using your Google account credentials.
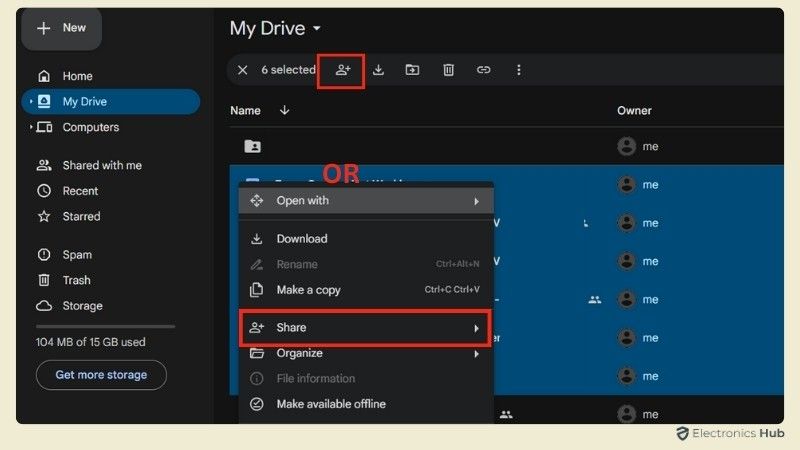
- Select The Files Or Folders You Want To Share: Navigate to the location of the files or folders you wish to share. Click to select individual files or hold the Ctrl (or Cmd on Mac) key to select multiple files at once.
- Right-Click And Choose “Share”: Once you’ve selected the files or folders, right-click on them and a menu will appear. From the options, select “Share.” Alternatively, you can also click the “Share” button located in the top menu of Google Drive.
- Enter The Email Addresses Of Recipients: A share window will appear. In the text box labeled “Add people and groups,” enter the email addresses of the people you want to share the files with. You can share with one or multiple people at once.
- Set Notification Option: If you want to notify the recipients that you’ve shared the files, check the “Notify people” box. This will send them an email notification with a link to the shared files.
- Edit Access Controls: Next to each email field, you will see an access dropdown menu. Click on it to assign the appropriate permissions: Viewer, Commentator, or Editor.
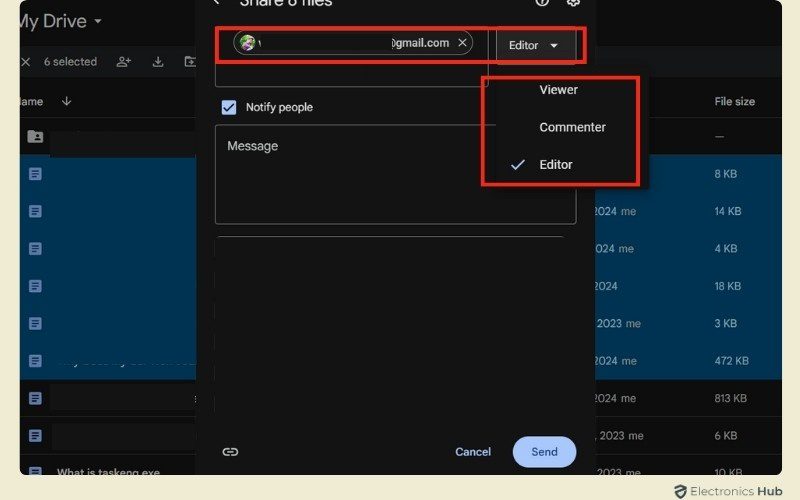
- Click “Send”: After configuring the access permissions, click the “Send” button to share the files. Your recipients will now have access to the files according to the permissions you’ve set.
Share Your Google Drive Through Link Sharing
Link sharing is another convenient way to provide access to your Google Drive files and folders. This method allows you to generate a link that can be shared with anyone, without the need to enter specific email addresses. It’s especially useful when you need to share files with a larger audience or when you’re unsure who exactly will need access. Here’s a step-by-step guide on how to share your Google Drive through a link:
- Select The Files Or Folders You Want To Share: Begin by opening Google Drive and selecting the files or folders you want to share.
- Open The Share Menu: Right-click on the selected files or folders, and choose the “Share” option from the context menu. This will open the sharing settings window.
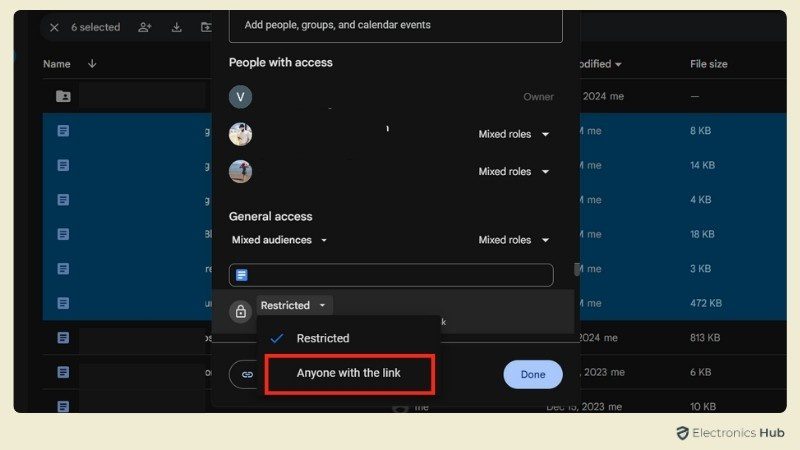
- Access Link Sharing Options: In the Share window that appears, instead of entering email addresses, navigate to the “General access” section at the bottom. By default, the access is set to “Restricted,” meaning only specific people can access the files.
- Change Access To “Anyone With The Link”: Click the drop-down menu next to “Restricted” and select the “Anyone with the link” option. This allows anyone who has the link to access the files.
- Set Access Permissions: Next, you’ll want to set the appropriate access level for those who will receive the link. Click the drop-down menu next to the “Viewer” option to choose whether the recipients should be Viewers, Commentators, or Editors.
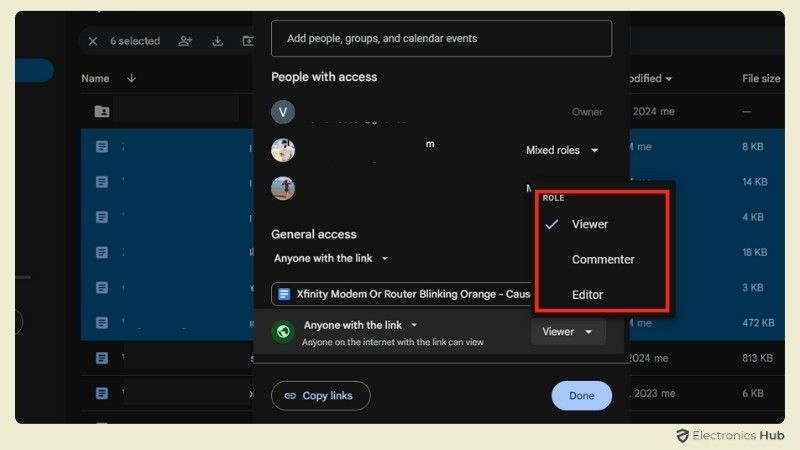
- Copy The Shareable Link: Once you’ve configured the access level, click the “Copy Link” button. This action copies the generated link to your clipboard.
- Share The Link: You can now paste the link into an email, message, or any other communication medium to share it with others. Anyone who has the link will be able to access the files based on the permissions you’ve set.
Note: You can change the access controls or disable the link at any time if needed, providing flexibility in how you manage shared content.
How To Share Your Entire Google Drive Account To Another Account?
Sharing your entire Google Drive account with another account isn’t something Google allows directly due to privacy concerns and data security. However, there are workarounds that you can use to achieve this. These methods might require more time and effort, but they can help you transfer or share all the contents of your Google Drive with another account.
Share Your Entire Google Drive With Share Option
While Google doesn’t offer a direct way to share your entire Google Drive account with another account, you can effectively share all your files by using the Share Option. Here’s how you can do it:
- Log In To Your Google Drive Account: Start by logging into the Google Drive account that you want to share with another account.
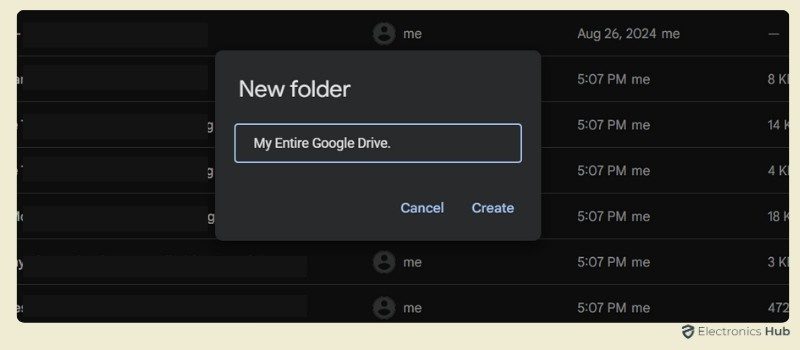
- Create A New Folder: Once logged in, create a new folder by clicking on the “+New” button located at the top left corner of the Drive interface. From the drop-down menu, select “New folder.” Name this folder something descriptive, like “My Entire Google Drive.”
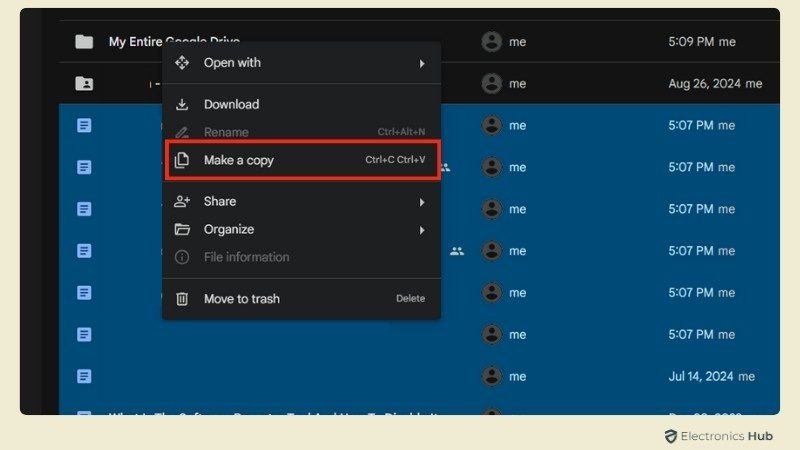
- Move Or Copy All Files And Folders To The New Folder: Now, start moving or copying all the files and folders from your Google Drive into this new folder. This includes everything—audio files, videos, documents, spreadsheets, etc. You can do this by dragging and dropping the items into the new folder or by right-clicking on them and selecting “Move a copy” in the drive.
- Share The New Folder: Once all your content is in the new folder, right-click on the folder and select “Share” from the menu.

- Share Through Email Or Link: You can now choose to share the folder either by entering an email address or by generating a shareable link. Follow the steps mentioned earlier to manage permissions and share the folder with others.
- Complete The Process: After setting the appropriate permissions, click the “Send” button (if sharing via email) or “Copy Link” (if sharing via link). The recipient will now have access to all the files and folders within that shared folder.
Share Your Entire Google Drive Through Download And Upload
This method involves downloading all your files from your old Google Drive and uploading them again to a new Google Drive account. It’s more time-consuming and requires more data, so make sure to connect to a stable and fast Wi-Fi network. Despite the effort, this is a reliable way to transfer all your files without depending on sharing settings.
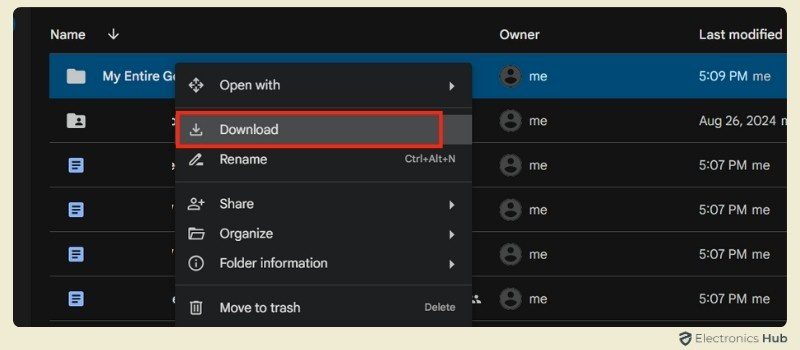
- Download Files From Your Old Google Drive: After moving all your files and folders to a new folder in your old Google Drive account, right-click on the folder and choose “Download” from the menu. This action will compress the folder into a ZIP file, and the download will begin. Depending on the size of your files, this process could take a while.
- Wait For The Download To Complete: Be patient while the download completes. The time required will depend on the amount of data you’re downloading.
- Log In To Your New Google Drive Account: Once the download is finished, log in to the Google Drive account where you want to store your files.
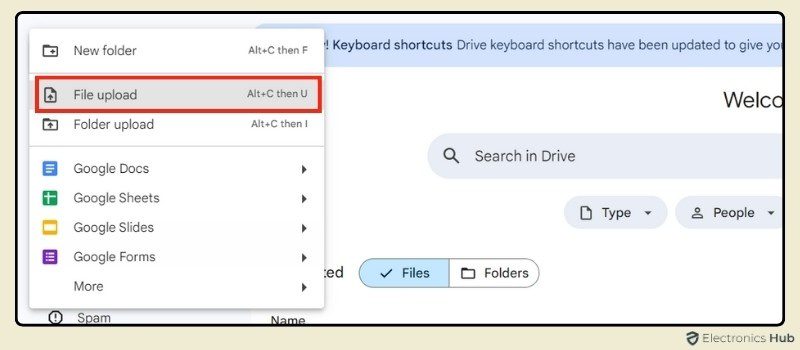
- Upload The Files To The New Account: Navigate to “My Drive” in your new Google Drive account. Click on the “+New” button located above the left-side menu, then select “File Upload” from the drop-down menu.
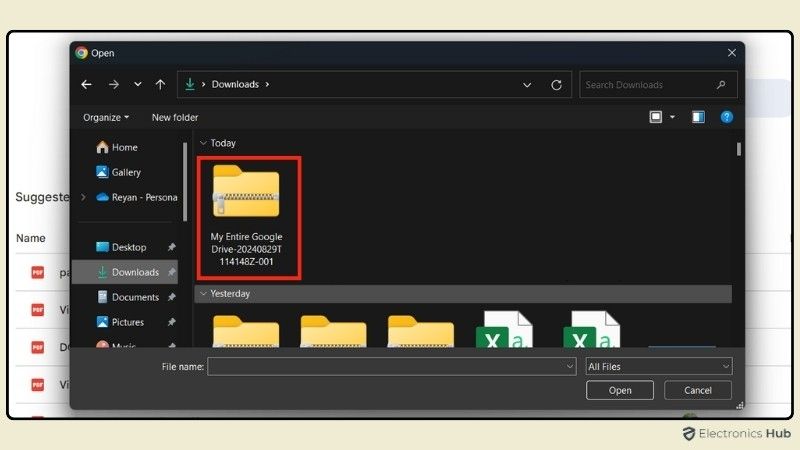
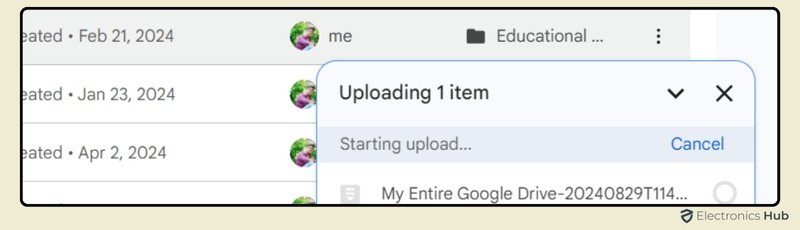
- Select The Downloaded Files For Upload: Choose the downloaded ZIP file from your device, and the upload will begin. Again, the time it takes will depend on the size of the files.
- Wait For The Upload To Complete: Once the upload is finished, all your files and folders will now be available in your new Google Drive account.
Additionally, apart from these two methods, you can use third-party tools or software to automate the process, but this comes with its own set of risks and limitations.
Also Check: How To Backup From Google Drive?
My Drive Vs. Shared Drive – What’s The Difference
As we discussed earlier, Google Drive provides two primary storage options: My Drive and Shared Drive. Each serves distinct purposes based on your file management and collaboration needs. While My Drive is designed for personal use, Shared Drive is structured to facilitate teamwork, with files belonging to the team instead of one individual. Below is a detailed comparison of the features:
|
Feature |
My Drive |
Shared Drive |
|
Ownership |
Files are owned by the individual user. |
Files are owned by the team. |
|
Accessibility |
Only the owner can share files. |
Anyone on the team can access the files. |
|
File Location |
Files are stored in the user’s personal space. |
Files are stored in a centralized location for the team. |
|
When a User Leaves |
Files remain with the user. |
Files stay accessible to the team. |
|
Collaboration |
Limited to the owner’s shared files. |
Encourages collaboration across the team. |
|
Storage Quota |
Uses the user’s individual storage quota. |
Uses the team’s shared storage quota. |
|
Files Restore |
Yes, available to the user. |
Only specific roles (Administrator, Contributor, Content Manager) can restore files. |
|
Mobile-Friendly |
Yes |
Yes |
|
Long Do Deleted Files Stay in Trash |
30 Days, can be deleted earlier. |
30 Days, can be deleted earlier. |
|
Cost |
Free |
Requires a Business G-Suite edition. |
|
Sharing Limits |
Can share with 200 users per file. |
Can share with up to 600 users per file. |
|
File Visibility |
Only visible to the owner and those shared with. |
Visible to all team members with permissions. |
|
Transfer Ownership |
Yes, to another user. |
No, ownership is always with the team. |
How To Create A Shared Google Drive?
Creating a Shared Google Drive is a great way to collaborate with your team and manage files collectively. However, to create a Shared Drive, you must have a Google Workspace or G Suite account, as this feature is not available for personal Google accounts. Here’s how you can create a Shared Google Drive:
- Sign In To Google Drive: Use your Google Workspace account to sign in.
- Access The Shared Drives Section: In the sidebar on the left, navigate to the “Shared drives” section.
- Create A New Shared Drive: Click on the “+ New” button at the top left of the page. A pop-up window will appear.
- Name Your Shared Drive: Enter a name for your new Shared Drive in the window that appears, then click “Create.”
- Add Files To The Shared Drive: Once your Shared Drive is created, you can move files from your My Drive into the Shared Drive or upload new files directly to it.
- Manage Members: Open the Shared Drive, then click on its title and select “Manage members” from the menu.
- Invite Members: A window will appear where you can add people or groups. Set access permissions for each new member (Administrator, Content Manager, Contributor, etc.) from the dropdown menu.
- Finalize: Once you’ve added the necessary members and set their permissions, click “Done” to complete the process.
Also Check:
- How To Move Photos From Google Drive To Google Photos?
- How To Share Files And Folders In OneDrive?
- How To Delete Files From OneDrive?
FAQs:
Google Drive doesn’t allow scheduling for sharing. You need to manually share when ready.
If you delete a shared file from Google Drive, others will lose access unless they made a copy.
You can share files with any email address by entering it in the sharing settings, regardless of the email provider.
‘Restricted’ means that only people you invite directly can access the file or folder, preventing anyone else from viewing it.
Google Drive offers up to 15 GB of free storage per account, which includes all files and folders. Additional storage can be purchased if needed, with options ranging from 100 GB to 30 TB depending on your subscription plan.
Yes, within the ‘Share’ settings, change the ownership by selecting ‘Make owner’ next to the chosen person’s email address.
Conclusion
In conclusion, sharing your Google Drive files is a breeze! Whether you’re collaborating on projects or simply want to share your work, Google Drive offers a simple and secure way to do so. With a few clicks, you can grant access to specific individuals or groups, ensuring your files are shared only with the right people.
