CPU, or Central Processing Unit, is the brain of your computer. It’s responsible for executing instructions from all the programs and processes running on your system. CPU usage refers to the percentage of your CPU’s capacity that is being used at any given moment. When CPU usage is too high, it can cause your computer to overheat, slow down, or even crash. High CPU usage means your processor is struggling to keep up with the demands being placed on it.
When you see high CPU usage detected or your CPU usage is 100%, it means your system is being pushed to its limits. This can happen for several reasons, ranging from software issues to hardware malfunctions.
In this post, we’ll explore the common causes of high CPU usage and offer practical fixes to lower the processor usage in Windows to help you restore your computer’s performance.
What Causes High CPU Usage:
High CPU usage can be caused by a variety of factors. Here are some common culprits:
- Too Many Background Applications: Running multiple programs or too many background processes can quickly overload your CPU. Some processes, like automatic updates, cloud syncing, or even idle applications, may be quietly using up valuable CPU power. These background apps may not be visible but can heavily impact your system’s performance.
- Resource-Intensive Applications: Certain tasks such as video editing and rendering, 3D modeling or CAD, code compilations, and gaming are notorious for consuming large amounts of CPU power. These applications need a lot of processing power to complete complex tasks, which can lead to high CPU usage.
- Viruses Or Malware: Malicious software is another common cause of high CPU usage. If your system is infected, a virus or malware could be using your CPU resources without your knowledge. Scan your computer for malware and viruses regularly to ensure this isn’t the root cause.
- Outdated Drivers And BIOS: Keeping your drivers and BIOS updated is essential for smooth performance. Outdated drivers or BIOS can cause compatibility issues, leading to higher CPU usage. The CPU might have to work harder to handle tasks because the hardware and software aren’t communicating efficiently.
- WMI Provider Host (WmiPrvSE.exe): The WMI Provider Host is a Windows service that helps manage and monitor the system. However, it can occasionally cause WMI provider host high CPU usage if it encounters errors or malfunctions. When this happens, the WMI Provider Host keeps trying to process the same requests over and over, leading to excessive CPU usage. This is often caused by outdated drivers or malfunctioning services and can be fixed by updating or restarting the service.
- Outdated Software: Older software that isn’t optimized for modern systems can lead to unnecessary strain on your CPU. Some programs may not have been updated to work with newer versions of your operating system, causing them to use more CPU resources than necessary.
- Improper Hardware Configuration: If your hardware, such as your RAM or storage, isn’t configured correctly, it can bottleneck your CPU, causing it to work overtime to compensate for the deficiency. This misconfiguration can result in CPU power usage surging and creating a performance bottleneck.
- Dirty Fans (And Overheating CPU): Dusty or clogged computer fans can lead to louder than usual and overheating, which forces your CPU to throttle itself to avoid damage. This can make your CPU work harder to stay cool, leading to higher CPU usage. Regularly cleaning your fans and ensuring proper airflow can help mitigate this issue.
However, high CPU usage can stem from a variety of causes, ranging from too many open applications to outdated software and drivers.
How To Lower CPU Usage In Windows?
High CPU usage can significantly slow down your computer. Here are effective methods to minimize CPU processor usage in Windows:
1. Check The Current CPU Usage
Before attempting to lower your CPU processor usage, it’s important to determine how much of your CPU is currently being used and what processes are consuming those resources. On Windows, the most convenient way to do this is by using the Task Manager.
To access the Task Manager, press ‘Ctrl + Shift + Esc’ on your keyboard. Once opened, click on the ‘Performance’ tab. Here, you’ll see a detailed breakdown of your CPU’s performance, including real-time data about usage percentage, speed, and the number of active processes. This will give you a good overview of whether your CPU is under heavy load.

The Task Manager also shows which specific applications or processes are contributing to high CPU usage. Under the Processes tab, the CPU column shows the percentage of CPU power each task is using. This allows you to check CPU usage for individual programs and identify resource-heavy applications.
If you’re running a full-screen application like a game, the Task Manager might be hidden behind the program’s window. To prevent this, go to the top menu bar of the Task Manager, click ‘Options’, and select ‘Always On Top’. This setting ensures that the Task Manager remains visible, even when other applications are open in full-screen mode.
2. Reboot Your Computer/PC
One of the simplest and necessary ways to lower CPU usage is to reboot your computer. Sometimes, after prolonged use, your system might be running multiple processes or services in the background that could be slowing down the performance. A reboot clears out temporary files, closes unused processes, and gives your CPU a fresh start.
To reboot your PC, click on the ‘Start’ menu, select the ‘Power’ button, and choose ‘Restart’. This will shut down all running processes and reload the operating system. After the reboot, your CPU will have fewer tasks to handle, which often results in improved performance.

A reboot also helps resolve minor software glitches and memory leaks that could be affecting your CPU. If your CPU usage is too high after using the computer for several hours or days without a break, a reboot can restore balance and reduce strain on your processor. This quick and simple action should be your first step whenever you notice your CPU working overtime.
3. Close Unused Background Running Programs
Closing unused background programs is another effective way to decrease CPU usage. Many programs, even after being closed, continue to run in the background and consume valuable CPU resources. These background tasks can include anything from cloud services to automatic updates, and while they may seem harmless, they can significantly slow down your system over time.
- To stop these unnecessary processes, Go to the ‘Processes’ tab in Task Manager and lLook for processes that are using a high percentage of CPU under the CPU column. Focus on programs you don’t need open.
- Click on the program that’s using up resources, then right click and select ‘End Task’ from the drop-down menu
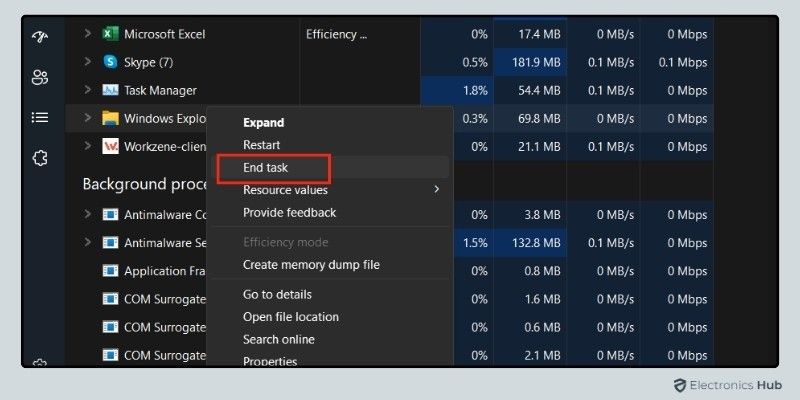
- Be cautious not to end system processes or unfamiliar services, as they might be important for your system’s stability.
- Continue closing any other unnecessary programs. This should free up CPU resources and lower CPU usage effectively.
- Once done, monitor your CPU usage in the Performance tab to see if there’s an improvement.
It’s also worth checking your ‘Startup’ programs. Many applications are set to automatically launch when you start your computer, even if you don’t use them right away. In the Task Manager, go to the ‘Startup’ tab and disable any programs that don’t need to run every time you boot your system. This will help lower CPU usage and improve your computer’s performance.
4. Update Drivers And BIOS
Keeping your drivers and BIOS up-to-date is crucial for maintaining optimal CPU performance. Drivers are software components that allow your operating system to communicate with your hardware, while the BIOS (Basic Input/Output System) is the firmware that initializes and manages your computer’s hardware during the boot process. Outdated drivers or BIOS can cause compatibility issues, which may lead to high CPU usage.
Updating Drivers
Drivers should be regularly updated to ensure that your hardware components, like your graphics card, network adapter, and sound card, are functioning efficiently. Outdated or corrupted drivers can cause your CPU to work harder than necessary, leading to higher usage.
To update your drivers, follow these steps:
- Open ‘Device Manager’ by right-clicking the Start menu and selecting Device Manager.
- Browse through the list of devices and expand the categories to find the hardware you want to update.
- Right-click on the device and select ‘Update driver’.
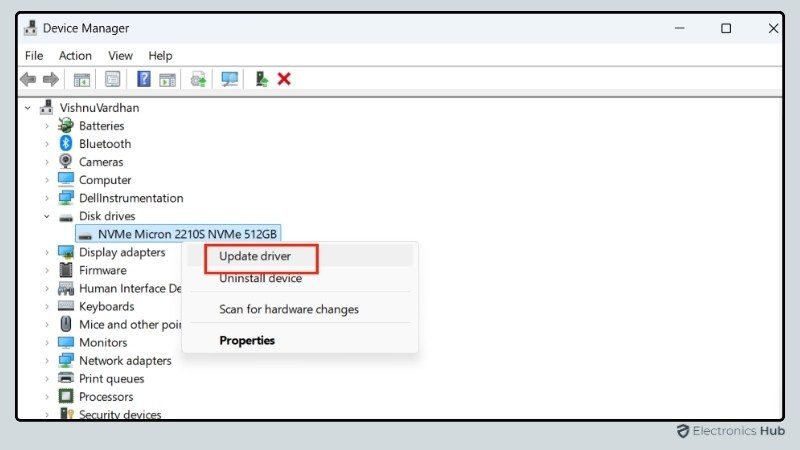
- Choose ‘Search automatically for updated driver software’. Windows will search for the latest driver available and install it.
Alternatively, you can visit the manufacturer’s website to download and install the latest drivers manually.
Also Check: How To Install Drivers On New PC?
Updating BIOS
Updating the BIOS is a bit more complex but can make a significant difference in CPU power usage. An outdated BIOS might not fully support newer hardware or software features, leading to inefficiencies.
To update your BIOS:
- Identify your current BIOS version by typing ‘System Information’ in the Start menu’s search bar and pressing Enter. Look for the ‘BIOS Version/Date’ entry.

- Visit your motherboard manufacturer’s website and search for the latest BIOS update for your model.
- Follow the manufacturer’s instructions carefully to download and install the update.
Be sure to follow the instructions precisely, as an incorrect BIOS update can lead to system instability.
By keeping your drivers and BIOS updated, you ensure that your CPU is working in harmony with your system’s hardware, which can help lower CPU usage and improve overall performance.
Also Check: How to Update BIOS Without CPU?
5. Check Your Computer Is Overheated
An overheated computer can lead to high CPU usage as the system struggles to operate efficiently. Heat affects electronic components over time, causing the CPU to throttle itself to lower temperatures, which can reduce performance and increase CPU load. It’s important to monitor your system’s temperature to ensure it’s not the root cause of high CPU usage.
You can check for overheating by feeling the exterior of your PC or laptop for excessive heat, particularly around the ventilation areas. For a more accurate measure, use software tools like HWMonitor or SpeedFan, which display real-time temperature readings of your CPU and other critical components.
If you find that your system is overheating, consider the following steps:
- Clean The Fans: Dust and debris can clog the air vents and fans, restricting airflow. Cleaning these can help improve ventilation.
- Improve Ventilation: Make sure your computer has enough space around it for air to circulate. Avoid placing it in tight compartments.
- Replace Thermal Paste: The thermal paste between the CPU and its cooler can dry out over time. Replacing it can improve heat transfer.
- Upgrade Cooling System: Consider adding or upgrading fans, or switch to a liquid cooling system for more efficient heat management.
By keeping your computer cool, you can prevent issues like excessive CPU usage caused by thermal throttling.
Also Check: How To Clean Thermal Paste Off CPU?
6. Scan Your Computer For Malware And Viruses
Malware and viruses are among the most common causes of high CPU usage. These malicious programs can run in the background, consuming your CPU’s resources without your knowledge. They often disguise themselves as legitimate processes, making it difficult to detect them using simple monitoring tools. Malware can also replicate itself, spread to other files, and create new processes, further straining your CPU.
To safeguard your system, it’s important to regularly scan your computer for malware and viruses. You can use a reputable antivirus program or the built-in Windows Security to perform full system scans. Windows Security (formerly known as Windows Defender) offers reliable protection and is integrated directly into the operating system, providing real-time monitoring and manual scan options. You can easily access it by searching for “Windows Security” in the Start menu.

If any malicious files are detected, follow the prompts to quarantine or delete them. After cleaning your system, you should notice an immediate improvement in CPU performance. Additionally, consider using a secondary tool, like Malwarebytes, for a more thorough scan. Sometimes, a single antivirus program may not catch every threat.
Regularly updating your antivirus software or Windows Security ensures it can detect the latest threats. Keeping your system clean from malware not only helps lower CPU usage but also protects your data and personal information from potential breaches.
7. Change Power Plan Settings
Your computer’s power plan can have a direct impact on CPU usage. Power plans determine how your system manages energy, which can affect performance. If your CPU is frequently running at high levels, changing your power plan settings can help lower CPU usage and improve efficiency. Many systems default to balanced or power-saving modes, which may not be optimized for performance. To change your power plan settings:
- Open the Control Panel and go to Power Options.
- You’ll see a few preset options like Balanced, Power Saver, and High Performance.
- Select High Performance if your goal is to maximize CPU power and performance. If you want to reduce CPU power usage, consider staying with Balanced or customizing a power plan.
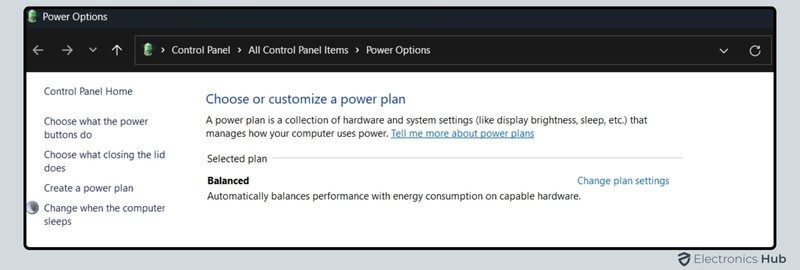
For more control, click on Change plan settings next to the plan you’ve chosen. Then, click on Change advanced power settings to open a more detailed menu.
- In the advanced settings, scroll down and find Processor Power Management. Expand this option and then click on Maximum processor state.
- By default, this is set to 100% for both On Battery and Plug-In. You can reduce this to 90% for both options. This adjustment limits the maximum amount of CPU power your system uses, which can help reduce CPU usage while maintaining good performance.

After making these changes, open Task Manager and monitor your CPU usage under the Performance tab to see if the adjustments have improved your CPU’s performance. These small tweaks can make a noticeable difference in reducing strain on your CPU.
8. Change Your System Environment Variables
Another method to help lower CPU usage is by adjusting your system environment variables. This can optimize your computer’s performance by disabling unnecessary visual effects that consume CPU resources.
- To make these changes, press the Windows key on your keyboard and search for ‘Edit system environment variables’. Click on the result to open the System Properties window.
- Switch to the Advanced tab, and under the Performance section, click on Settings.
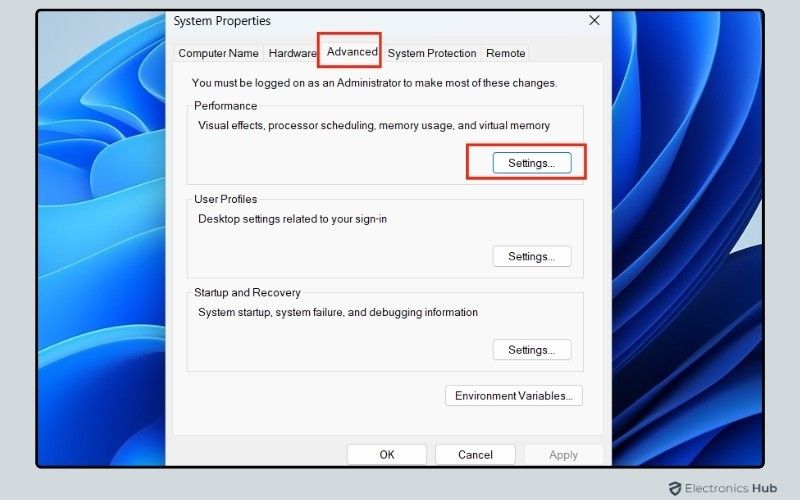
- In the Performance Options window, select “Adjust for best performance.” This option disables visual effects such as animations and transitions, which can consume CPU resources. While it may slightly alter the appearance of your Windows interface, the trade-off is improved performance and reduced CPU usage.

- Once you’ve selected this option, click Apply, then close the tab. You should notice a lighter load on your system, especially when running multiple applications.
By adjusting these settings, you give your CPU more breathing room to focus on essential tasks, which can result in better overall system performance.
9. Check For System Updates
Keeping your system updated is important for reducing CPU usage and ensuring smooth performance. Software updates often include fixes for bugs, security vulnerabilities, and optimizations that can improve how your system handles processes. Outdated software can lead to inefficiencies, forcing your CPU to work harder than necessary, which results in higher usage.
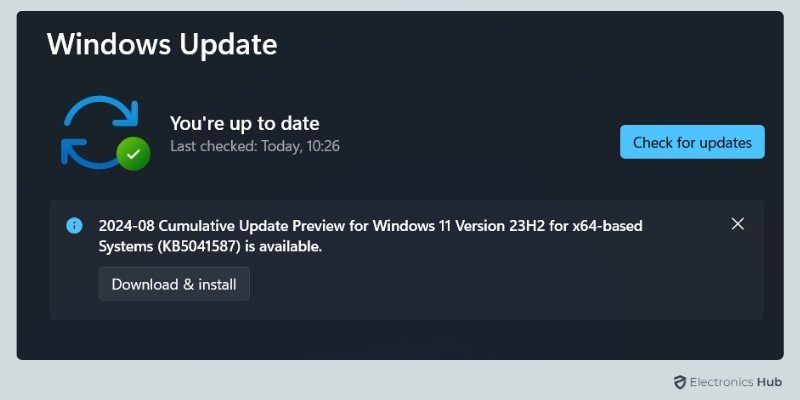
To check for system updates, open the Settings menu by pressing the Windows key and selecting Update & Security. Click on Windows Update, then select Check for updates. If any updates are available, download and install them. These updates may include patches that help your system run more efficiently, reducing the load on your CPU. After the update is complete, restart your computer to apply the changes.
10. Turn Off P2P Sharing On Your Computer
Peer-to-Peer (P2P) sharing allows your computer to share downloaded updates with other PCs over the internet or your local network. While this feature can help distribute updates efficiently, it can also contribute to high CPU usage, as your system works to share data even when you’re not actively using it.
To turn off P2P sharing and reduce the strain on your CPU, follow these steps:
- Open Settings by pressing the Windows key+ I.
- Navigate to the Windows Update section, then click on Advanced options.

- Scroll down to find Delivery Optimization and click on it.

- Here, you’ll find the option to Allow downloads from other PCs. Toggle this setting off to disable P2P sharing.
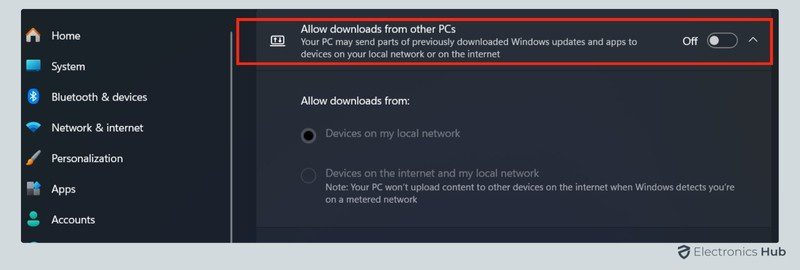
By turning off this feature, your computer will no longer use resources to share updates with other machines. This can help lower CPU usage, especially if you’re on a network with multiple devices. Additionally, disabling P2P sharing can prevent unnecessary network activity, giving your CPU more capacity to focus on other tasks
11. Restart The WMI Provider Host
The WMI Provider Host (WmiPrvSE.exe) is a critical Windows service that allows programs to request information about your system. While it typically runs in the background without causing issues, it can occasionally malfunction and start using an unusually high amount of CPU power. When this happens, restarting the WMI Provider Host can help resolve the issue and lower CPU usage.
- Press the Windows key and type “Services”, then click on the Services app that appears in the search results.
- In the Services window, scroll down until you find “Windows Management Instrumentation”.
- Right-click on “Windows Management Instrumentation” and select “Restart”.

This will stop the WMI Provider Host service and immediately restart it, helping to clear up any glitches or issues that might be causing high CPU usage. After restarting the service, check your Task Manager to see if the WMI provider host high CPU usage fix has worked.
12. Perform A System Restore
If you’re still experiencing high CPU usage after trying other solutions, performing a system restore can help by rolling your computer back to a previous state when it was functioning properly. System Restore allows you to undo recent changes that may have caused the issue, such as faulty updates, corrupted software, or misconfigured settings.
- Press the Windows key and search for “Create a restore point”. Click on the result to open the System Properties window.
- In the System Protection tab, click on the System Restore button.
- Follow the on-screen instructions to choose a restore point. You’ll see a list of available restore points based on dates when your system automatically saved them. Select a point before you started experiencing high CPU usage.
- Confirm your restore point, and allow your computer to reboot and complete the process.
During the restore, your system will revert software, settings, and drivers back to the selected date while keeping your personal files intact. Once the process is complete, check your system’s performance and monitor your CPU usage in the Task Manager. If the issue was caused by a recent change, System Restore can often resolve it, reducing the strain on your CPU.
13. Reinstall Windows On Your Computer
If you’ve exhausted all other options and are still dealing with high CPU usage, reinstalling Windows can be a more drastic but effective solution. Reinstalling the operating system will wipe your current setup and return your computer to its original state, removing any corrupted files, malware, or misconfigurations that could be contributing to 100% CPU usage.
- Backup Your data: Before proceeding with a reinstallation, make sure to back up all your important files, as the process will erase your system drive.
- Open Settings: Press the Windows key and search for ‘Reset this PC’, then click on it.
- Choose Reset: Click on ‘Reset PC’ Next to it.
- Choose Your Option: You’ll be presented with two choices: Keep my files or Remove everything. If you choose to keep your files, Windows will be reinstalled while preserving your personal data, but your apps and settings will be removed. If you opt to remove everything, all files, apps, and settings will be erased.
- Reinstall: Follow the on-screen instructions to begin the reinstallation. The process may take some time, and your system will reboot several times before it’s complete.
Once Windows is reinstalled, your system will be reset to its factory state, which often resolves high CPU usage issues. After reinstalling, monitor your CPU performance in the Task Manager to see if the problem persists.
14. Overclocking The CPU
Overclocking is the process of increasing the clock speed of your CPU beyond the manufacturer’s default settings. Essentially, it forces your CPU to run faster, which can lead to improved performance, especially in resource-intensive tasks like gaming or video editing. By raising the clock speed, you can squeeze more power out of your processor, but this comes with risks. Overclocking can lead to higher temperatures, and increased power consumption, and may shorten the lifespan of your CPU if not overclocking carefully. It can also result in high CPU usage, as the processor is pushed to handle more tasks at once.
While overclocking may seem like an appealing way to boost performance, it’s not always a solution for reducing CPU usage. If done incorrectly, it can exacerbate performance problems, including instability and overheating. Proper cooling solutions and a clear understanding of your hardware’s limits are essential when considering overclocking.
15. Consider Installing A New CPU
If your CPU is constantly running at high levels despite all attempts to reduce usage, it may be time to consider upgrading to a new processor. Older CPUs may struggle to keep up with modern applications, particularly if you regularly use resource-intensive software like video editing tools, 3D rendering programs, or modern games. Installing a more powerful CPU can significantly improve performance, allowing your system to handle more tasks without overloading.
Before upgrading, make sure to check compatibility with your motherboard and other components. Upgrading to a newer CPU can provide faster processing speeds, more cores, and better energy efficiency, which can all contribute to reducing CPU usage and improving overall system performance. While it’s a more expensive and involved solution, it can be a worthwhile investment for future-proofing your computer and ensuring smooth performance in demanding tasks.
Tips To Boost Your CPU Performance
Improving your CPU’s performance doesn’t always require hardware upgrades or drastic measures. You can implement several tips and tricks to help your CPU run more efficiently and handle tasks better. These steps can enhance system performance, reduce CPU usage, and prolong the lifespan of your hardware.
- Keep Your System Clean: Dust and debris can clog up cooling fans and lead to overheating. Regularly clean the inside of your computer to ensure proper airflow and prevent your CPU from throttling due to heat.
- Manage Startup Programs: Too many programs launching at startup can overload your CPU right from the get-go. Disable unnecessary startup programs via the Task Manager to lighten the load when you boot your system.
- Adjust Visual Effects: Disabling visual effects and animations through system environment variables can free up CPU resources. This simple change can result in noticeable performance improvements, especially on older systems.
- Use Lightweight Software: Whenever possible, choose software that is optimized for performance. Lightweight applications consume fewer resources, reducing strain on your CPU.
- Upgrade Your RAM: Increasing your system’s RAM can relieve pressure on the CPU by allowing more tasks to be handled by memory rather than processing power. This can result in smoother multitasking and lower CPU usage during demanding operations.
- Monitor CPU Usage: Regularly monitoring your CPU usage can help you identify patterns and understand when your system is being overworked. Use tools like the Task Manager to keep an eye on real-time CPU usage and determine which programs or processes are using the most resources. By catching spikes in usage early, you can close unnecessary applications or troubleshoot potential issues before they escalate.
Also Check:
FAQs: How To Fix A High CPU Usage
How to lower processor usage in Windows?
To lower the CPU usage in Windows System:
- Restart your computer.
- Close background apps manually.
- Update your drivers and BIOS.
- Scan for malware or viruses.
- Adjust Windows settings.
- Reinstall Windows if needed.
- Avoid overclocking your CPU.
- Consider upgrading your CPU.
Why my CPU usage is at 100%?
High CPU usage (100%) can be caused by several factors:
- Too many background programs running at the same time.
- Malware or viruses consuming resources.
- Outdated drivers or software.
- Heavy applications (like games or video editing software) running.
- System overheating, causing the CPU to throttle and work harder.
- Background updates or system processes like Windows updates.
- Faulty hardware or insufficient cooling.
- CPU-intensive tasks (like rendering, compiling code, etc.) running continuously.
What are the signs of high CPU usage?
Signs and symptoms of high CPU usage in Windows include:
- Slow performance or lag when using your computer.
- Applications freezing or crashing frequently.
- Overheating, with the fan running loudly or constantly.
- Slow startup and shutdown times.
- Mouse or keyboard lag, with delayed input response.
- Programs taking a long time to open or respond.
- Frequent system crashes or blue screen errors (BSOD).
- High CPU percentage in Task Manager (showing 90% or more).
Why does my web browser cause high CPU usage?
Web browsers can cause high CPU usage if you have too many tabs open, plugins installed, or if the browser needs updating.
How do I reduce CPU usage while gaming?
Lower the game’s graphical settings, close background programs, and make sure your drivers are updated to reduce CPU usage.
What is a normal CPU usage percentage?
Normal CPU usage varies, but typically, idle usage hovers around 10-30%. Under load, it can spike higher, even up to 70-80% for intensive tasks like gaming or rendering.
What are the best tools to monitor CPU usage?
Popular tools include Task Manager (Windows), Activity Monitor (Mac), and htop (Linux). For Windows, there are several third-party tools like Process Explorer and HWMonitor.
How do I know if I need to replace my CPU?
If your CPU consistently struggles with high usage even after trying fixes, upgrading or replacing it may be necessary.
Conclusion
In conclusion, to make your computer run faster, you need to reduce the strain on its processor. This can be done by closing unnecessary programs, updating your software, and sometimes even upgrading your hardware. By following these steps, you can enjoy a smoother and more efficient computing experience. Let us know in the comments if this guide is helpful.
