You open your Google chrome to find something or visit a website. But, the search engine does not display anything. Instead, it displays the message “ERR_NETWORK_CHANGED” on the screen. It can be very annoying for anyone who is using the internet.
Multiple issues can cause this problem. But fortunately, there are solutions to counter this problem. Here are some ways to counter this problem-
What Exactly does the ‘Err_network_changed’ Error Means?
The message ‘Err_network_changed’ means that you cannot reach the webpage you intend. In short, you cannot open the page on your device due to different issues, like internet connectivity or location problems.
If your browser displays the message-
“Unable to access network. ERR_NETWORK_CHANGED”,
Or “Your network connection was interrupted. A network change was detected. Check the internet connection.”, and you are facing what many people face.
What Causes This Error?
There can be different causes that lead to this error. Here are some possible scenarios-
- Each device gets an assigned IP address and it helps you to remain connected to internet. Your ISP or internet service provider assigns this Ip address. But, if the IP addresses change suddenly due to some network issues, you will not be able to connect to the intended website. Hence you get this message.
- Some websites also apply special restrictions related to special IP addresses (concerning the geographic location etc.). In such cases, even if you can open other sites, you will not be able to open that particular website. Hence, the error.
- If your internet connection is unstable, you may get this message.
How to Rectify ERR_NETWORK_CHANGED Errors in The Windows
Method 1: Restart Computer & Modem
The easiest solution to this problem is to restart your computer and internet modem. Often rebooting the computer allows you to get a fresh start, and you might be able to visit the site.
In some cases, the modem or router may need rebooting. Often some internal and technical issues prevent you from getting on a website. If you restart your internet connection, you get a fresh start minus the problems bugging you.
If you are using a modem, first unplug it and replug it to resume the internet service. First, for WiFi router users, disconnect from the network and again reconnect to check if the problem is solved. If not, it is time to get other solutions.
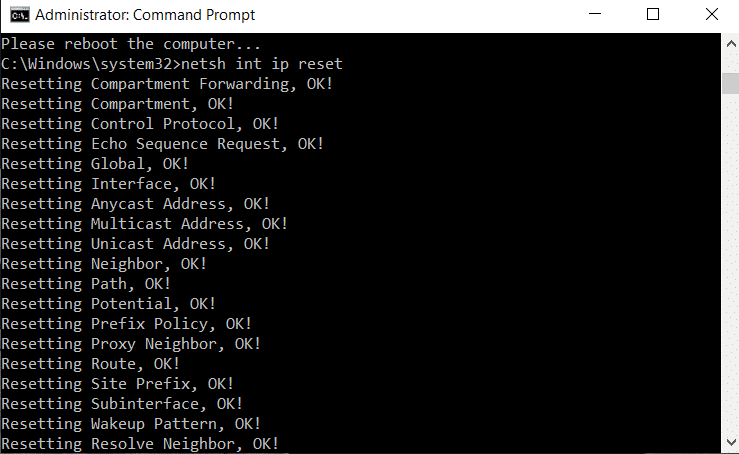
Method 2: Flush DNS & Reset TCP/IP
If the tip mentioned above has not worked and you are still getting the “ERR_NETWORK_CHANGED” message, it is time to flush the DNS and reset the TCP/IP of your device.
Internet communication uses different protocols to transfer and interpret information. These are commonly known as TCP. On top of that, the IP address of your devices keeps you connected through the internet. Hence, if there is an issue with your TCP/IP, you need to solve it.
Here is a step by step guide to changing and resetting the configuration-
- First, open the start menu on your device.
- Next, type “Command prompt” in the search bar. As you find it, click on “Run as administrator.”
- After this, type ‘netsh int ip reset, press Enter.
- Now, reset the connection using your internet browser.
Alternatively, you can also follow these step-by-step guides-
- First, press the Windows key and X key together to open the power user menu.
- From here, click on CMD (Admin)
- Now, type these commands & hit enter after typing each command-
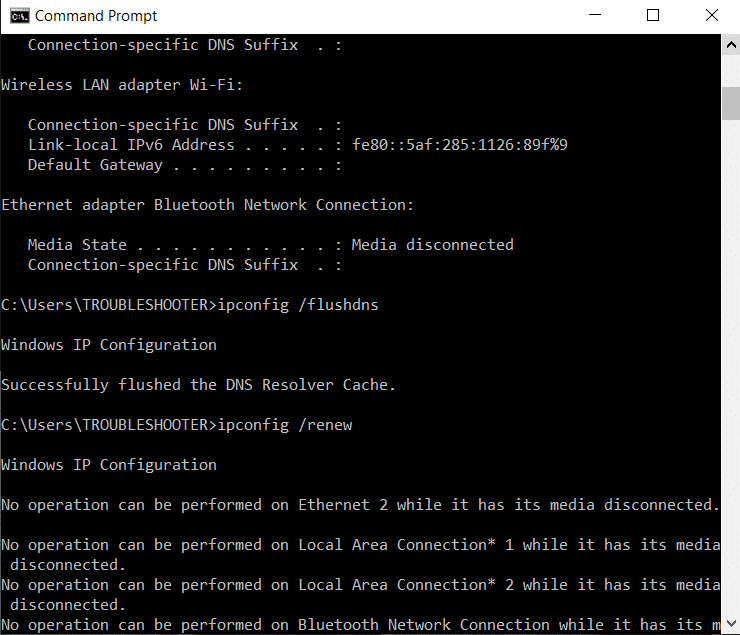
- ipconfig/release and hit enter
- ipconfig/flushdns and hit enter
- ipconfig/renew and hit enter
- Now, re-open the Command P[romopt and type these command-

ipconfig/flushdns, nbtstat – r, netsh int ip reset, netsh Winsock reset
- Now, press “Enter”
- After this, reboot your PC and resume your internet connection after the rebooting.
If the problem persists, try the hacks given below.
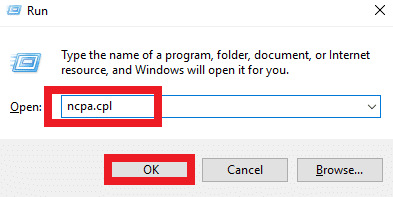
Method 3: Disable & Enable NIC (Network Interface Card)
The Network Interface Card or NIC becomes the main cause behind this error message in many situations. You can try disabling and enabling the NIC to solve this problem.
For this, follow the step-by-step guide-
- First, press the Windows home key and R key together to open the Run dialogue box.
- Next, type ‘ncpa.cpl’ in the box and click ‘OK’
- A new window will open on your screen. Now, right-click on NIC. A drop-down menu will appear.
- Select Disable and wait for a few minutes.

- Now, select Enable.

- Wait till your device receives its IP address.
- If the issue is still present, open your command prompt & type these commands-
- ipconfig/release
- ipconfig/flushdns
- ipconfig/renew
- Now, press “Enter”
- After this, restart/reboot your PC and see if you can visit the website.
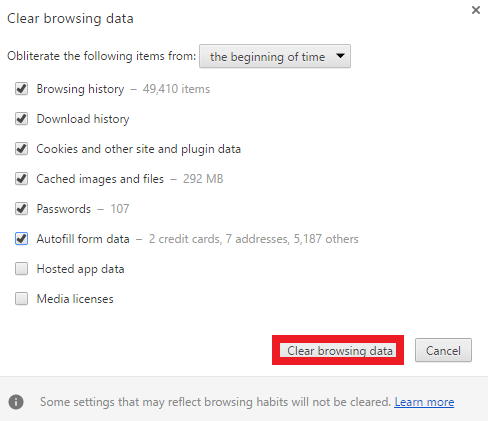
Method 4: Clear browsing the data in Chrome
In case the problem persists, you can try clearing your browsing data. Clearing the browsing data of your Google chrome allows you to get a new and fresh search engine, which may solve the error problem.
Here is how to do it-
- First, open your Google Chrome.
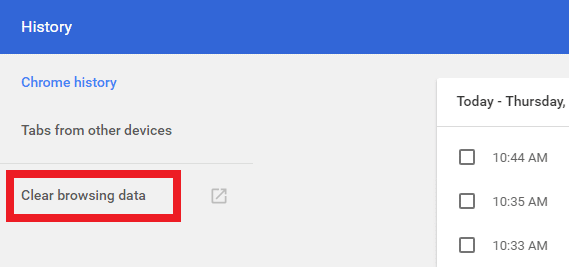
- Next, click on the three dots in the top right corner to open the dropdown menu. From here, select ‘History.‘
- Alternatively, you can use shortcut keys. If you ate using a Windows device, press ‘Ctrl+H,’ and for Mac devices, press ‘Command+Y‘ to open the history tab directly.
- A new window will open in your device with two panels.
- On the left panel, click ‘Clear browsing data. Another window will open on your device.
- Now, select the time range of the history you want to delete. You can select either ‘All time’ or ‘Beginning of time,’ which one is available.
- Next, check the boxes, ‘browsing history, ‘cookies and other site data’ and ‘cached images and files, ‘Autofill form data’ and ‘passwords’ to delete everything.
- Now, click ‘Clear data.’
- Now close and re-open Google Chrome again to visit the website.
Method 5: Use Google DNS
In some cases, using Google DNS offers a solution. The DNS settings often affect your network connection and may result in timed-out connections, displaying the error message.
The DNS settings and servers are found under your device’s TCP/IP protocol settings. You can change the server details. But, the procedure depends on the windows system you are using on your PC.
On top of that, always use a reliable DNS server like Google DNS to ensure your device is safe during internet surfing.
You can use the following guide to change the Google DNS-
- First, open the Control panel from your device.
- Next, open “Network and Internet.“
- Now, choose “Network and Sharing Centre.“
- From here, click “Change Adapter Settings.“
- After this, double click on “WiFi.“
- A window will open. Choose “Properties”

- Now, click on “Internet Protocol Version 4(TCP/IPv4)”
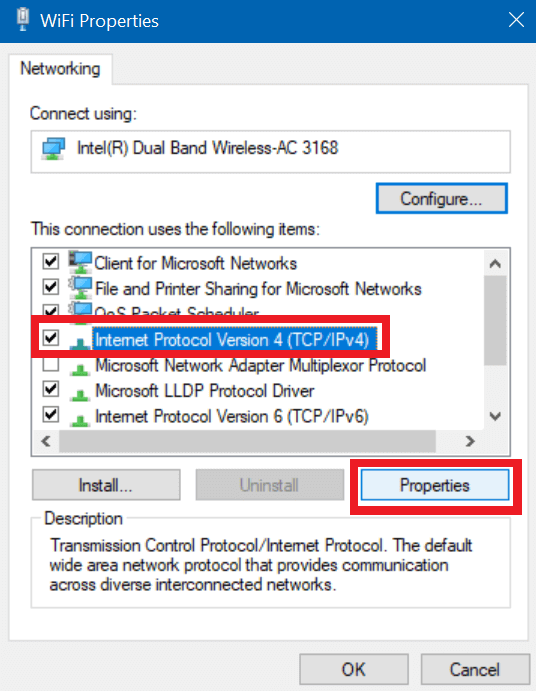
- When the new window opens, click on “Properties.“
- Now, check “Use the Following DNS Server Addresses”
- Here type the two commands-
- Preferred DNS server: 8.8.8.8
- Preferred DNS server: 8.8.4.4
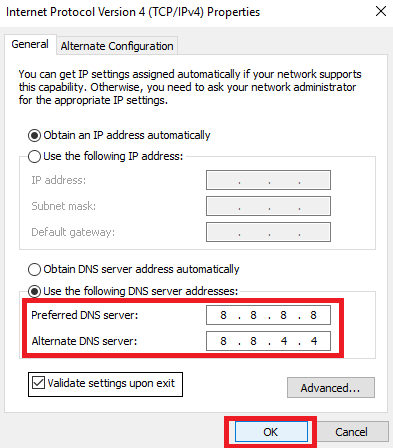
- Close the window and try browsing again
Method 6: Uncheck Proxy
If changing or using Public DNS also does not help, you can try checking the proxy settings. Here is a step-by-step guide-
- Press the Windows key and R key together to open the Run dialogue box.
- Next, type “inetcpl.cpl’ and click “OK”. A new window will open on your screen.

- From here, open the “Connections” tab.
- Now, select “LAN Settings”. A new menu box will appear.
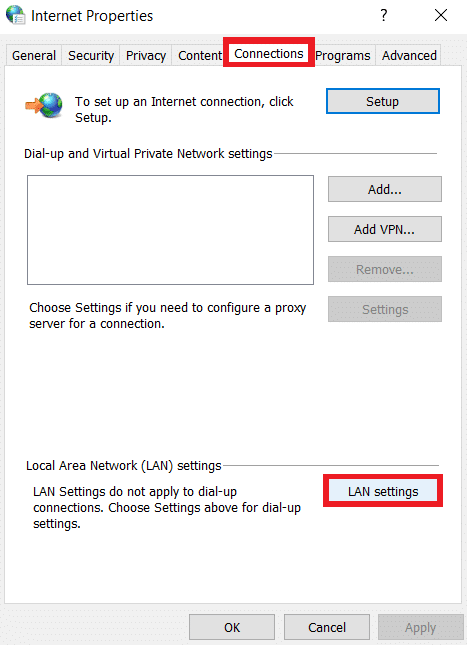
- After this, uncheck” Use a Proxy Server for the LAN” and check “Automatically Detect Settings”
- Now, click “OK”

- Finally, click “Apply”
- Now, restart your computer and try visiting the website once again.
Method 7: Re-Install or Update your Network Adapter Drivers
If the Network Adapter drivers of your device are not up-to-date or corrupted, you may get frequent error messages while visiting sites. The best way is to re-install or update the network adapter drivers, whichever is possible.
IN general, the windows automatically update the network software. But, if you find the drivers require an update, update them. If you do not find any update notification, it is time to uninstall and re-install the network adapter drivers.
For re-installing the drivers-
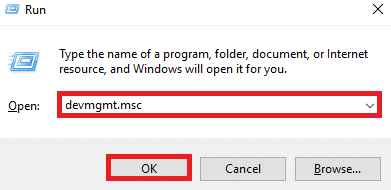
- Open the Run dialogue box by pressing the R and Windows keys together.
- Type “in devmgmt.msc” and click the Enter key in the box. A new window will open on your screen.
- From here, expand the “Network Adapters” section. Here search for your Network adapter. You can also not the name if needed.
- Now, right-click on the network adapter and click “Uninstall“..
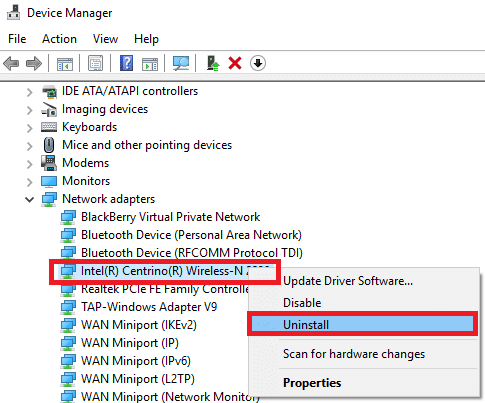
- A new pop-up box will appear, asking your permission for uninstallation. You can either click “Ok” or “Yes”, whichever appears on your screen,
- Now, restart the computer and reconnect with the network to start internet surfing again.
If you want to update the Network adapter drivers, here is a step-by-step guide-
- First, right-click on the”Start” button.
- Next, click on “Device Manager“. A new window will appear.
- From here, expand the “Network Adapters”
- Now, right-click on “WiFi adapter“
- From here, click on “Update Driver Software“

- A new screen will appear on your device. Select the “Search Automatically for Updated Driver Software” option.
Method 8: Delete the WLAN Profiles
If you have tried all the above tricks and are still getting the error message, tru deleting the WLAN profiles once.
Here is how to do it-
- Forst, open the command prompt
- Now, type, “netsh wlan show profiles”
- Now, type,
netsh wlan delete profile name=”[PROFILE NAME]”
netsh wlan delete profile name
- Repeat this process for each WiFi profile available and again reconnect the WiFi
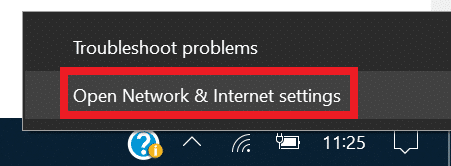
Method 9. Run Network Troubleshooter
You can try troubleshooting the network issues through the Network Troubleshooter function. It may help to find the cause automatically and fix that to prevent any such issues in the future. Here is how you can run Network Troubleshooter on your device-
- First, open “Settings“
- Now, click on “Network & Internet”. A new screen will appear with two panels side by side.
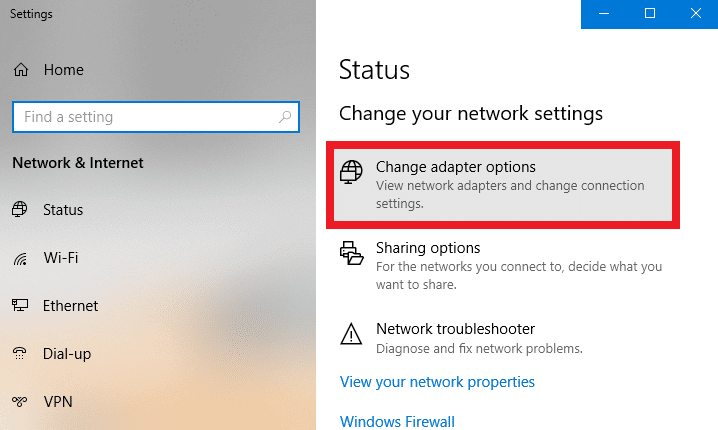
- From here, click on “Status” in the left panel.
- Now, scroll down on the right panel and find “Network Troubleshooter“. Click on it.
- Wait till the Windows diagnoses and fixes the issue.
Method 10. Run The Network Troubleshooting Commands
If Network troubleshooting does not help, you can run Network Troubleshooting commands to reset the TCP/IP stack. It will also help you renew IP addresses and flush any DNS client resolver cache.
- For this, first right click on the “Start” button to find “Command Prompt”
- Click on it to open the “Command Prompt” Window.
- Type the command “netsh Winsock reset” and press Enter.
- In the next line, type “netsh int ip reset” and again press “Enter”
- Now, type each of the following commands-
- Type ipconfig /releaseand press Enter.
- Type ipconfig /renew and press Enter.
- Typeipconfig /flushdns and press Enter.
- Now, type “Exit” and press Enter key to close the Command Prompt window.
Restart your device to check if the problem is solved.
Conclusion
Different causes can lead to the message “ERR_NETWORK_CHANGED” while you try to visit a website on Google Chrome. Here are the top ten expert-recommended methods to fix this problem. You can try each of these to check which one works for you.
