In this tutorial, we will learn about What is Linux, how is it different from other operating systems, a beginner’s guide to Linux Commands and a list of commonly used Linux Commands.
Introduction
Everybody has at least one friend who is this pro “Linux” guy, often looks down on Windows and Mac users. If you are frustrated about your “Linux” friend’s rants and wanted to see what all the fuss about Linux is or you just wanted to try a Linux flavor out of curiosity, then you might have come across the term “Linux Commands”.
In this Beginner’s Guide to Linux Commands, we will try to help you understand a little bit about Linux in general and how to get started with an ocean of Linux Commands (don’t be intimidated by the term ocean, it just means that there are a lot of commands). So, let’s get started.
NOTE: Getting deep into the concepts of Operating Systems, Kernels, etc. is like diving into a rabbit’s hole that we cannot climb up. So, the discussion here will be very subtle.
What is Linux?
Linux is a member of a family of UNIX-like operating systems based on the Linux Kernel, which is originally developed by Linus Benedict Torvalds. The Linux Kernel, along with several GNU Tools (like C libraries, compilers etc.), a GUI and many additional software are generally combined to form a Linux Distribution.
Some of the common Linux Distributions are Debian, Kali Linux, Ubuntu, Fedora, Red Hat Enterprise Linux, CentOS, openSUSE, Arch Linux, Manjaro Linux, Gentoo, to name a few.
Among beginners and students, Ubuntu seems to be the most popular one. So, I assume that you have a system running on Ubuntu (or any flavor of GNU/Linux, as it doesn’t matter) at your disposal before proceeding into Linux commands.
Shell Prompt and Terminal
Once the operating system is installed and your system is up and running, you can start working with your new Linux system. There are two ways you can interact with your system. One is the easier graphical way, similar to your Windows or Mac, where you use a mouse (or trackpad) to control the cursor on the screen.
The second and the better way to interact with the system is by using the Shell. Shell is a command language interpreter, where you type commands to interact with the computer. If you are a Windows user, you might have come across the “cmd” processor. Working with shell will be similar but much powerful.
Bash (Bourne Again Shell) is the main command processor in many Linux Distros, where the user can enter commands in the form of text and system responds with corresponding actions.
There are multiple ways to get into the shell interface in any Linux System like the Shell Prompt, the Terminal Window and the Virtual Console. In this tutorial, we will use the Terminal.
While shell prompt is the non-GUI way of using the shell, a terminal emulator or a terminal window is a GUI way to start the shell. There are multiple ways to launch the terminal. In Ubuntu, you can right click on the desktop and select Terminal from the context menu.
Alternatively, there is a keyboard short. Just type the following keys in Ubuntu.
Also, press ALT+F2 and enter “gnome-terminal” in the space provided (without the quotes) and hit enter.
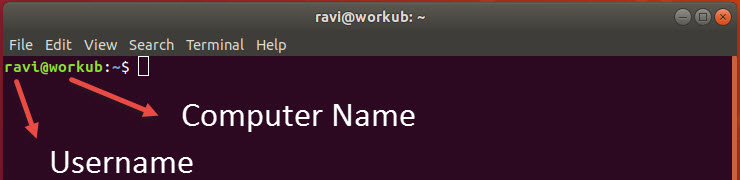
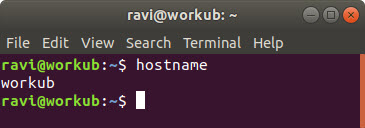
Once you launched the terminal emulator, the shell prompt appears, as shown in the above image. The first text that is displayed on the shell prompt (again, this depends on the distribution) is username@computername followed by the present working directory and a “$” sign.
If the last character is “#” sign, then you probably are logged in as root user and the terminal session has superuser privileges.
WARNING: You need to login as roots user or as superuser only when you intend to do setup and configuration tasks that require administrator privileges. These tasks include installing software packages, performing system configuration or network configuration.
Now that this is clear, let us proceed with some simple commands.
Simple Linux Commands
There are few simple Linux Commands, which you can type see the output and get used to the terminal and its layout. These are just simple commands to test out and more commands and their functionalities will be explained later.
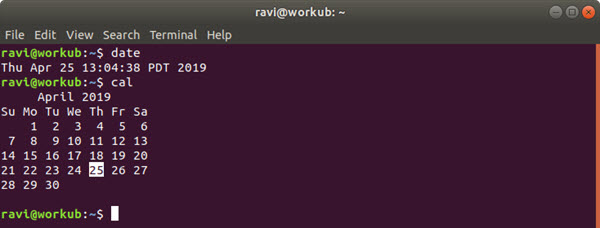
date
The first command is date. As the name mentions, when you type date and hit enter, the terminal responds with the current date and time.
cal
If date is your first command, then bringing up calendar will probably be your second one. So, type cal and hit enter.
NOTE: Here after, whenever I say enter some command, I mean type the command and hit the enter button to run the command, unless otherwise specified.
clear
The clear command will clear the terminal screen by removing all the previously entered command and corresponding outputs. Alternatively, you can use ctrl+l to achieve the same result.
whoami
The “whoami” command will display the username of the current logged in user.
exit
In order to end the current session of the terminal, you can enter exit command or simply you can close the terminal window.
Basic Linux Commands
Now that we have seen a few simple Linux Commands and also how to work with the terminal, let us proceed with a set of few Basic Linux Commands. These commands are not categorized based on the function they perform but are picked out as a result of being some of the most commonly used and frequently used commands.
After looking at these basic commands, I will list out some other commands in a more categorized way.
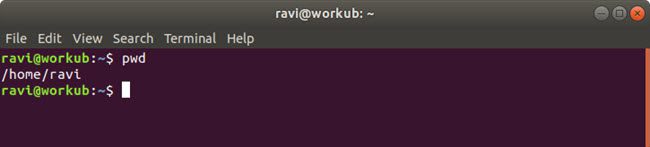
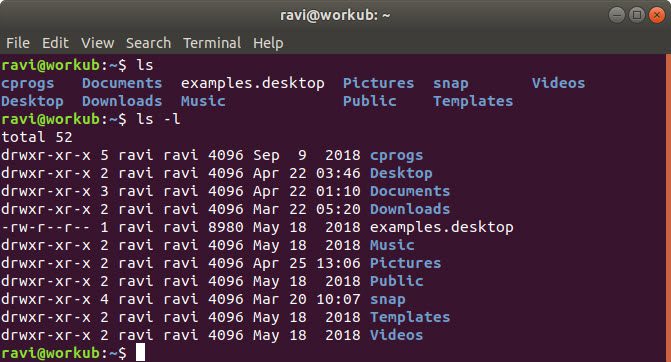
The “pwd” command displays the present working directory. When you first start the terminal, you are in the logged in user’s home directory, which is /home/ravi, in my case. Each user account is provided with its own home directory, usually /home/username.
In order to list out the files and directories in the current working directory, we use the “ls” command.
Most commands have more than one option that you can add in order to modify the behavior of the command. These options usually consists of single letters preceded by a hyphen.
For example, the ls command has many options like –a, –l, –t, etc. Adding these options will bring out additional features for example, by using the –a option, all the files and directories are displayed including the hidden ones.
The cd command is used to change the working directory of the shell environment i.e. it takes you to the specified directory. For example, from the above ls command output, we have several directories in our home directory like Documents, Downloads, Music, Pictures, etc. If you want to go to Pictures, then simple enter cd Pictures.
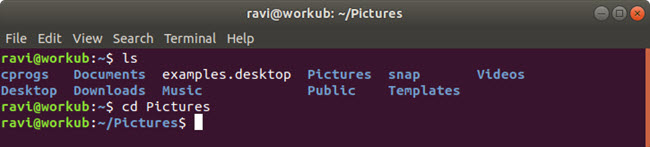
The directory names are case sensitive i.e. “pictures” and “Pictures” are different. Also, if your folder name consists of any spaces, then using it directly will give you an error. For example, you have a folder named “my folder”, then you have use the following format.
cd my\ folder
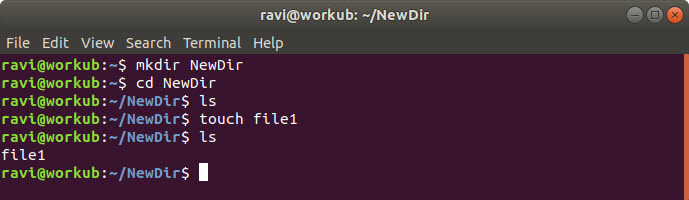
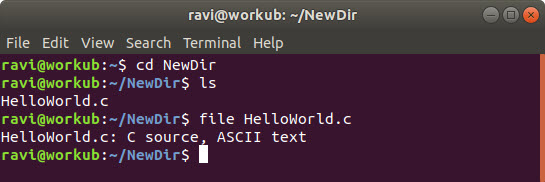
If you want to create a new directory, then use the command mkdir. For example, mkdir NewDir will create a new folder in the pwd with name NewDir. Follow the above mentioned convention if your directory name consists of any space.

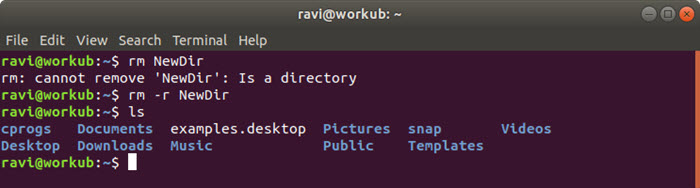
If you have an empty directory and you want to delete it, then you can use the command rmdir. If there are any files (or directories) in the directory you want to delete, then rmdir will not work and you have to use rm command.
By default, the rm command will only delete the files. But if you want to remove folders which are not empty, then use the command rm –r foldername.
The man command is one of the very useful commands in Linux. It shows the manual pages of a command. The argument to the man command can be a program, a utility or a function. For example, if you want bring up the “man” page of ls command, simply enter man ls.
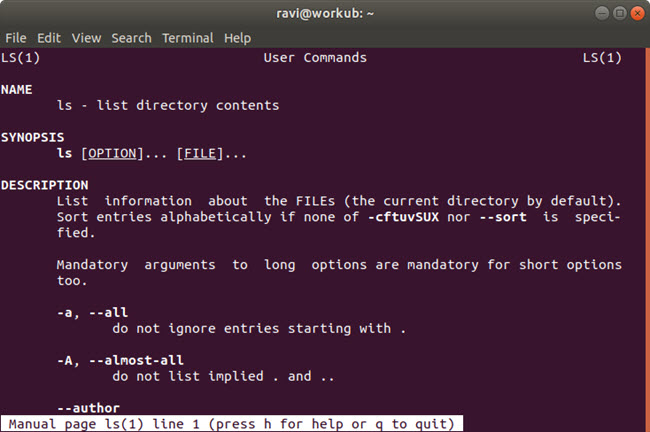
To come out of the man page, you can enter q.
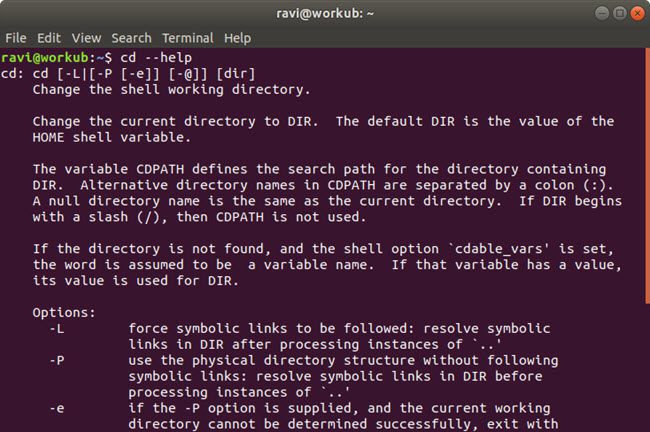
The – -help command displays a small explanation about how to a command and also displays the list of available options. Most GNU commands support the – -help option. For example, the cd command doesn’t have a man page but for more information on the cd command, you can use the – -help option as shown below.
cd – -help
Every file in a Linux system is associated with a timestamp i.e. it contains the information like last access time, last modification time and last change time. But if you want to update the access or modification times of a file, then you can use the touch command.
touch filename
By default, the touch command will change both the access and modification timestamps if the file is already existing. If the file doesn’t exist, then touch command will create an empty file.
The cp command is used to copy files and directories through terminal. The first argument is the source of the file and the second argument is the destination to where the file (or directory) must be copied to.
Single file or multiple files can be copied by adding multiple source arguments and a single destination argument.
If you want to move or rename the files, then you can use the mv command. If both the arguments are file names, then the mv command will rename the file. But if the second argument is a directory, then the files will be moved from source to destination folder.
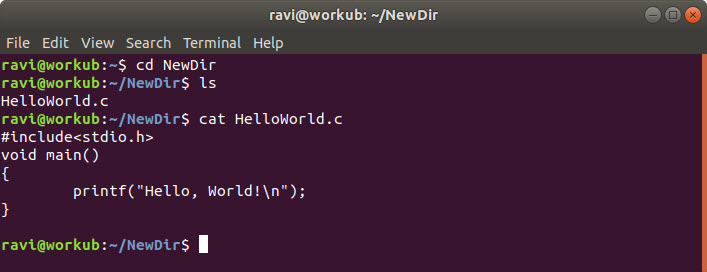
The cat command is used to concatenate files and display the contents of a file on standard output i.e. the terminal. It is an easy way to view the contents of a file without the worry of making any changes to the file. For example, you have a simple text file called newfile.txt and to instantly view its contents, just use the cat command.
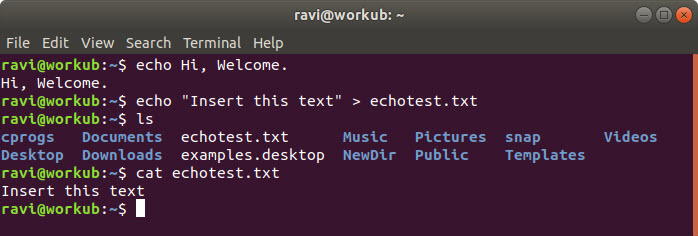
The echo command is used to display a line of text on the terminal. You can also move some text data into a file using the echo command. If you have an empty text file and want to add a line of text to it, then use echo “text to be inserted” > filename.txt.
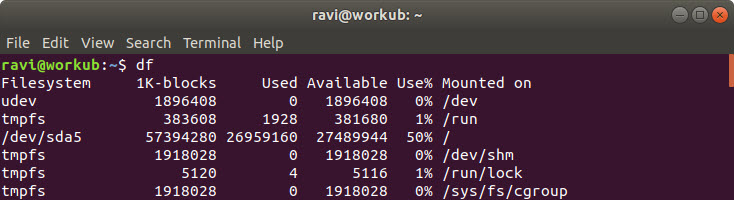
The df command or the disk free command is used to display the information about partitions and their mounted file systems (logical). Just enter the command df and the result will be details about various file systems, their sizes, used size, available size, percentage of usage and mount point. By default, the results will be displayed in KB.
The du or the disk usage command is used to display the disk usage information of a file or directory. For example, if you want to know the disk usage of the Documents directory, simply enter du Documents. If the du command is followed by no options and no arguments, then it displays the information about all the directories starting from the current working directory as parent directory.

The uname command displays the basic information about the systems hardware (architecture) and software (Kernel, its version). Simply entering uname will result is displaying only the Kernel (Linux, in our case). Hence, uname with option –a will provide the maximum possible information.

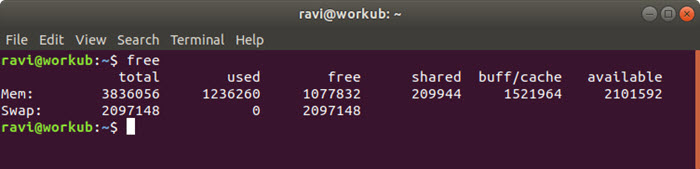
The free command provides the information about used and unused memory as well as the swap space (virtual memory). Simply enter free in the terminal and get the results about your free memory.
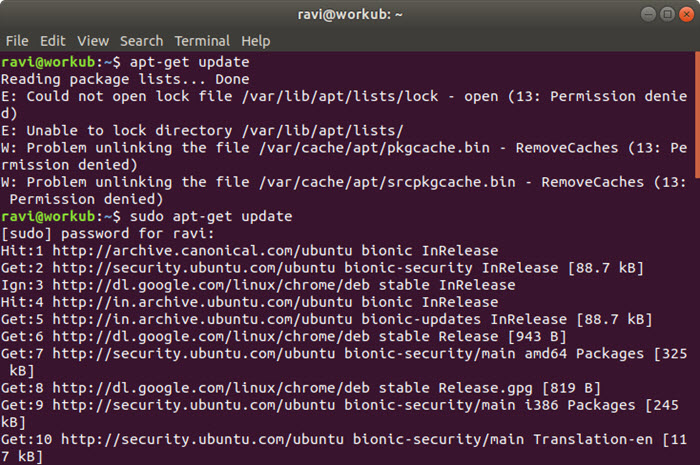
The sudo command (short for superuser do or switch user do) allows users to execute commands with root or administrator privileges. Generally, you require root privileges to install software, make any system configurations, update the system software (like OS) etc.
For example, apt-get install packagename will install the corresponding package (like python, for example) in Ubuntu. But without root privileges, this action will fail. So, you have to enter sudo apt-get install python3.6 to install Python3.6 in your system.
Once this command is entered, the system will ask for the user’s password and authenticate the user.
The su command is short for substitute user. This command is used to switch from one user to other user. Alternatively, you can use su command to become superuser by simply entering su without any usernames. Hence, su is also known as superuser command.

NOTE: By default, the root account will be disabled in Ubuntu. An alternative way is to enter sudo su.
The file command is used to determine the type of file that is entered as argument. The file type can be ASCII Text, tar archive, HTML document, ELF, etc.
The tar command, which is short for tape archiver, is used to create, view, extract tar archives as well as various other compressed file formats like gzip, bzip2, etc. For example to archive different files as a tarball (archive created with tar), then you have use the following command.
tar –cvf test.tar file1 file2 file3
The options c, v and f are used to create a .tar archive, view the progress (verbosely) and indicate that next argument is the name of the archive.
To extract a .tar file, use tar –xvf test.tar. There are other options like –j for .bz2 (bzip2) archives, -z for .gz (gzip) archives, -t to view the contents of the archive, etc.
If you want to know the system’s hostname, you can use the hostname command. Using this command, you can also set the hostname.
The Advanced Package Tool or simply apt is a tool to interact with packaging system. It is used for software management i.e. installing, updating and removing software packages. There are three tools used for this purpose.
- apt
- apt-get
- apt-cache
apt-get is used to install, upgrade or remove software packages while apt-cache is used to search for new packages.
NOTE: Using “apt” commands require root privileges, so you have to use sudo command in front of the apt commands.
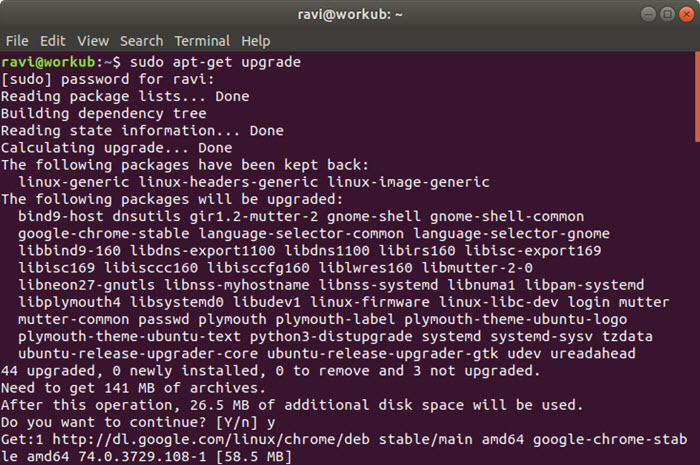
Before installing any new packages, you have to perform two steps using apt commands. They are sudo apt-get update, which will update the package database and sudo apt-get upgrade, to upgrade the already installed packages.
Once everything is up-to-date, you can proceed with installing new packages. Now, if you want to install a new software, like vlc player for example, the use the following command.
sudo apt-get install vlc
Using chmod command, you can change the access permissions of a file (or a directory). But before making any changes, to view the current permissions, you can use the ls –l command.
The first three values after the – are permissions related to the user, the next three value are related to the group and the last three values are related to everyone else. Here, r is for read, w is for write (to modify) and x is for execute.
Now to modify these permissions, you can use the chmod command. For example, you have a shell script file test.sh with current permissions as follows.
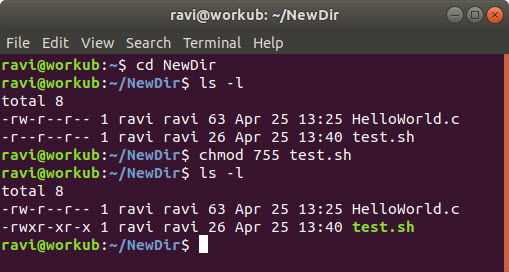
If you want to modify it to user – rwx, group – r-x, others – r-x, then use the following command.
chmod 755 tesh.sh
Here, 755 indicates the octal values of the permissions. For user, the permissions are rwx, so 111. Its octal equivalent is 7. Similarly for the rest.
Comprehensive List of Linux Commands (Category Wise List)
NOTE: Every command has several options associated with it and it is difficult to include all possible combinations and variations. So, if you are interested to know more about a command, I suggest you to refer to the “man” pages of that particular command or the “help” option.
File and Navigation Commands
Command
Synopsis
1
ls
List out files and directories.
2
ls –a
List out all files and directories including hidden ones.
3
ls –l
Long format listing with additional details like owner, file type, size, timestamps, etc.
4
cd dir
Change working directory to dir.
5
cd or cd ~
Move to user’s home directory.
6
cd ..
Move back to the parent directory.
7
cd /
Change to root directory.
8
pwd
Display the current working directory.
9
mkdir dir
Create a directory called dir.
10
rmdir dir
Deletes an empty directory.
11
rm file
Delete the file.
12
rm –r dir
Deletes the directory and its contents.
13
rm –f file
Force to delete the file.
14
rm –rf dir
Force to delete the directory (and its contents).
15
cat file
Displays the contents of file.
16
cp file1 file2
Copy contents of file1 to file2
17
cp –r dir1 dir2
Copy contents of dir1 to dir2. Creates dir2, if not present.
18
mv file1 file2
Rename or move file1 to file2. To move, file2 directory should be existing.
19
touch file
Creates a file (if not present) or updates timestamps.
20
more file
View files line by line or screen by screen.
System Info Commands
Command
Synopsis
1
date
Shows current date and time.
2
cal
Shows current month’s calendar.
3
whoami
Displays the username of the logged in user.
4
w
List of all logged in users with username, login time, etc.
5
finger user
Displays username, login, home directory, shell, etc.
6
uptime
Tells how long the system is running.
7
df
Displays the amount of free disc space on all file systems.
8
du file
Displays the disc spaced used by the argument (file or dir).
9
free
Displays memory and swap space details.
10
uname –a
Shows hardware and software information (arch, Kernel, etc.)
11
man command
Displays manual pages of the command.
12
whereis app
Displays source/binary, manual pages of an application (file).
13
whatis command
Brief description about commands.
14
which –a file
Searches all directories and displays all files with same name.
15
cat /proc/cpuinfo
Displays CPU information.
16
cat /proc/meminfo
Displays Memory information.
File Compression Commands
Command
Synopsis
1
tar –cvf newarchive.tar file
Create new .tar archive with name newarchive and containing file.
2
tar –cvzf newarchive.tar.gz files
Create new Gzip (.gz) file.
3
tar –cvjf newarchive.tar.bz2 files
Create new Bzip2 (.bz2) file.
4
tar –xvf archive.tar
Extract contents of .tar file to current folder.
5
tar –xvf archive.tar –C /dest/directory
Extract contents of .tar file to specified folder.
6
tar –xvzf archive.tar
Extract contents of .gz file.
7
tar –xvjf archive.tar
Extract contents of .bz2 file.
8
tar –tvf archive.tar
List contents of .tar archive. Same command can be used to view contents of .gz and .bz2 archives as well.
9
gzip file
Compresses the file and renames it to file.gz.
10
gzip –d file.gz
Decompresses file.gz
Commonly used options with the tar command are given below.
-c – Create an archive file.
-x – Extract an archive file.
-v – Show the process verbosely.
-t – View contents of archive file.
-z – Filter archives through gzip (.gz).
-j – Filter archives through bzip2 (.bz2).
-r – Append files (or directories) to existing archive.
Process Management Commands
Command
Synopsis
1
ps
Display current working processes.
2
pop
Display all running processes.
3
kill pid
Kill the process with given pid.
4
killall proc
kill all processes named proc.
5
pkill pattern
Kill all processes matching the pattern.
6
bg
List stopped or background processes. Resume a stopped job.
7
fg
Bring the recent job to foreground.
8
fg n
Bring job n to foreground.
File Searching Commands
Command
Synopsis
1
grep pattern file
Search for pattern in file.
2
grep –r pattern dir
Search for pattern recursively in a directory.
3
locate file
Find all instances of file.
4
find . –name filename
Searches in current directory and all its child directories for files and directories with name starting with filename.
5
pgrep pattern
Searches all named processes for a matched pattern and returns their IDs (by default).
6
command | grep pattern
Search for pattern in the output of a command
File Permission Commands
Network Related Commands
Command
Synopsis
1
chmod octalvalue file
Change permissions of the file as per the octal value.
Command
Synopsis
1
ping hostname
Pings host to check if it is alive or not.
2
whois domain
Performs whois operation and gets info about domain.
3
dig domain
Displays DNS info about domain.
4
dig –x host
Reverse lookup host.
5
wget file
Download file.
6
wget –c file
Continue a stopped download.
