In this project, I will show a very practical project called Arduino based Smartphone Charging Controller, where the amount of the time your smartphone charges its battery is controlled by you.
Introduction
Almost every mobile phone (either a fancy smartphone or a simple feature phone) user faces this one issue: connecting your phone to the charging adapter and forgetting that you plugged in the device.
Almost all the modern charge controllers on mobile phones are very advanced and detect when your battery is fully charged and disconnect supply of power to the battery (not completely but a keeps the device in a charging state known as trickle charge).

But the main disadvantage of keeping the device plugged in even after the battery is full is its affect on the lifetime of the battery. Every battery has a limit to the number of times it can be charged (known as charge cycles).
Also, temperature plays an important role in the life of a battery. Higher temperatures might disrupt the chemistry of the battery.
But what if I told you that the Arduino based Smartphone Charging Controller project can be help full to control the charging time and once the time is up, the power to the charging adapter is disconnected. Sounds interesting and practical, right.
So, let’s get started with the project Arduino based Smartphone Charging Controller.
Concept behind Arduino based Smartphone Charging Controller
The main concept behind the Arduino based Smartphone Charging Controller is very simple. Set the time for which you wish to charge your mobile phone. Once the time is reached, turn off the power supply to the charger.
For example, you have set the charging time as 2 hours (maybe based on the previous observation or by mathematical calculations). The power to the charger is turned on with the help of a relay and the timer begins.
Your mobile phone gets charged for the next two hours and when the countdown is reached to the 2-hour mark, the relay is turned off and as a result, the power supply to the charger is also cutoff.
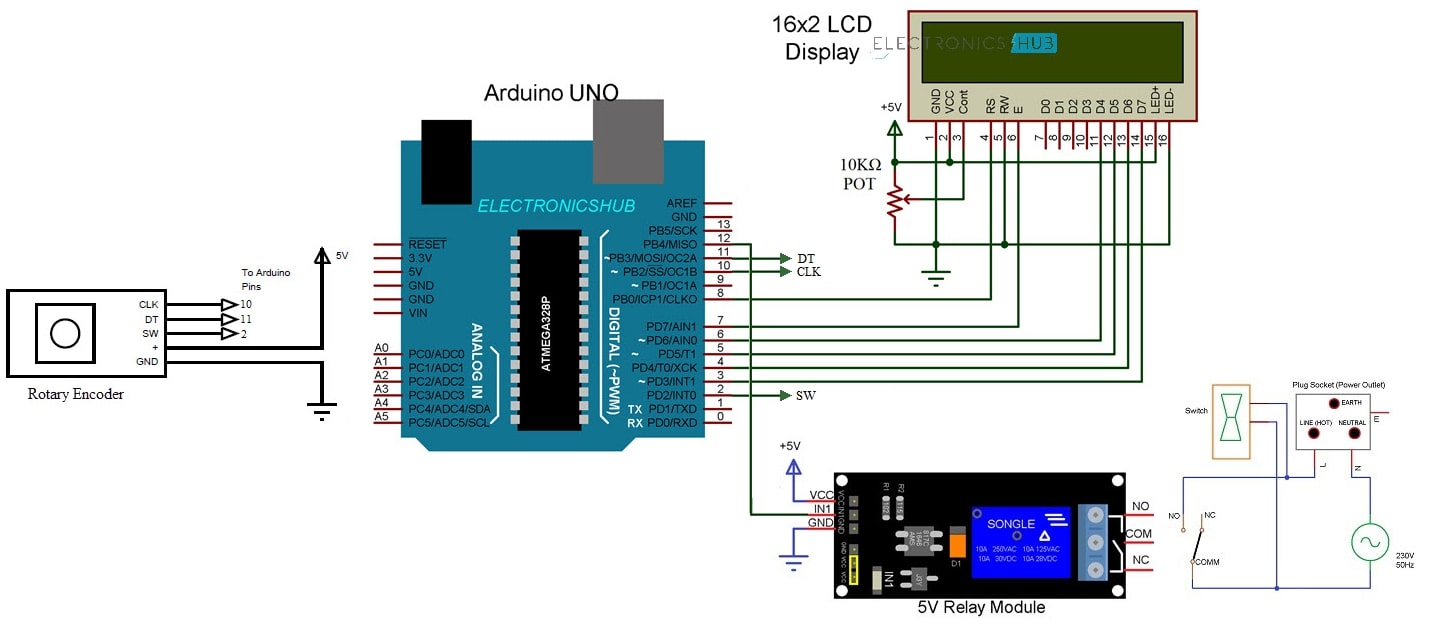
Circuit Diagram
The following image shows the circuit diagram of the Arduino based Smartphone Charging Controller system.
Components Required
- Arduino UNO
- 16×2 LCD Display
- Rotary Encoder
- 5V Relay Module
- 10KΩ POT
- Connecting Wires
- Breadboard
- Charging Adapter
- Single Socket Power Outlet Box
NOTE: There is a separate tutorial on using Rotary Encoders with Arduino called “Rotary Encoder With Arduino – Know it all”. You may refer to that tutorial for any information regarding rotary encoder.
Circuit Design
The main components of the project other than Arduino UNO are Rotary Encoder, Relay and 16X2 LCD Display. Let me start with the Relay. Connect the IN1 Pin of the Relay Module to Pin 12 of Arduino.
Coming to the rotary encoder, its CLK, DT and SW pins are connected to Pins 10, 11 and 2 of Arduino UNO. Finally, the LCD, Pins 8 through 3 of Arduino are connected to RS, E, D4 – D7 of the LCD.
Setting up the Arduino based Smartphone Charging Controller Project
Components like 16×2 LCD Display, Rotary Encoder and Arduino UNO can be placed on a breadboard but I though it would be nice to place the relay in a single socket power outlet box with a control switch so that the relay would control the socket and you can plug in your charging adapter into the socket.
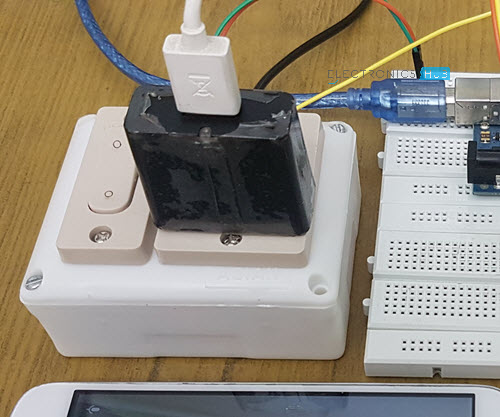
WARNING: If you are implementing this project, you have to deal with 230V AC Mains Supply, which is potentially dangerous. I suggest you take an expert guidance for the connections.
Code
The code for the project Arduino based Smartphone Charging Controller is given below.
Working
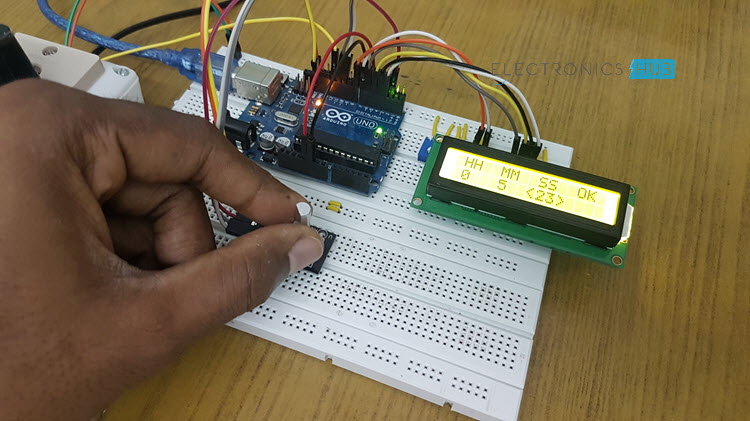
After making the necessary connections as per the circuit diagram, upload the code to Arduino and turn on the power supply.
You will get Hours (HH), Minutes (MM), Seconds (SS) on the 16×2 LCD Display. By selecting Hours, rotate the knob on the rotary encoder to set the desired number of hours. When the hours value is set, push the knob to fix that value.
Similarly, you can set minutes and seconds. After everything is set, select OK on the LCD and push the knob.
Now, the relay gets activated (which means the phone starts charging) and the countdown begins for the amount of time set by you. Once the countdown reaches “0”, the relay is turned off (power to adapter is off).
During charging if there is a power failure, the remaining time is stored in the memory and when the power comes back, it will prompt you whether to continue with the countdown or to set a new time. Accordingly, the charging will be performed.
Conclusion
Arduino based Smartphone Charging Controller is implemented here which a simple project for controlling the amount of time you charge your mobile phone.
Using this project, you can plug in your phone to the charger, set the time for which your phone gets charged and forget as the project will automatically disconnect power to the charger.
This project is very useful for people who tend to charge the phone during night time or those who often forget that they plugged in the phone to the charger.

6 Responses
Actually
According to your circuit diagram and code
I was able to make this project
For that thank you so much
But there is a problem
When I set the time for 1 hour it doesn’t go like 59-0 minute rather it goes like 59-0 SECONDS
can you please tell me why this is happening.
Is there any problem in the code??
Plz reply fast
I have wired up the circuit but the lcd display is not displaying the required content.. instead it only blinks . Can you tell me why this happens…
I can’t see the code here.Could you please share the code?
Why do no one ask and author does not say anything about the time after cutting off the mains? How does this circuit conclude that after cutting off it is the time to set relay on for recharging the battery again?
Question? is it necessary to use a 10k ohm potentiometer. Because in our case we cant find that component.
Is it possible to create something where the time is always set to a specific number of minutes, and every time someone charges it, the timer automatically starts? We also want the power source to be a power bank instead of a power outlet. Thank you so much, your response would mean a lot to us!