In every gamer’s computer, you can easily find Steam as it’s one of the best gaming platforms that allow you to play legitimately licensed games. Despite it’s one of the largest platforms for downloading PC games, it still sometimes misbehaves and refuses to open, which can be quite frustrating for the users.
That said, we have got to know that many users out there are struggling with this Steam client issue due to which steam won’t open, no matter what you do! However, you’ll be glad to know that we have certain fixes for this problem that can effectively help you resolve this error on your PC. Hence, if you want to know how to fix this issue with Steam, make sure to follow all the below-mentioned steps properly. Let’s start!
Methods for Steam Won’t Open
1. Close all the Steam tasks in the background
In general, not only Steam, but many software might refuse to start if there’s an instance of the software already running in the background. Hence, if you are trying to launch Steam on your PC, there are chances that it’s already running in the background, but not visible to you. In that case, you need to make sure that all the Steam-related background tasks are killed first. Thereafter, you can try to launch the Steam client on your PC once again. To check for any running background processes, follow these steps:
1. First of all, you will need to access the Task Manager on your PC. You can use Ctrl+Shift+Esc to immediately get the Task Manager on the screen.
2. Scroll through the list of running processes and find all the Steam processes.
3. To kill a running process, just right-click, and click on the End Task button.
4. Do it for all the running Steam processes or tasks, and kill them all one by one.
5. Once you are done, close the Task Manager, and try to Launch the Steam Client.
2. Restart your computer
If you do not find any running background process on your computer related to Steam. There might be some issue going on with the Operating System on your computer, blocking the Steam Client to open. If that’s the case, it’s pretty simple to fix such a problem. All you need to do is restart your computer, and it should be enough to fix up all the ongoing issues. Once the computer restarts, try to launch the Steam Client once again, and this time, it should work fine.
3. Restart your network devices
By default, Steam Client is set to launch in online mode, which requires your computer to be connected to a healthy internet connection. If your computer’s network status is bad, or there is some problem with the network devices such as router or modem. The Steam client may fail to run properly. To fix this issue, all you need to do is follow some simple steps, and you can easily resolve all the issues which are caused by faulty network devices.
- To reset any network device, firstly, you need to make sure your computer is turned Off. Hence, before you proceed, shut down your PC.
- Now, remove and unplug all the wires which are connected to the router or modem, whichever you are using.
- Once you have unplugged the router or modem, wait for a few minutes.
- Now, join the cables back.
- Turn on the network devices and wait for them to get active.
- Start your computer and connect it with the internet connection.
- Try to launch the Steam Client, it should open at the first go.
4. Reinstall your Steam client
If the issue is occurring because of any corrupted files in the Steam folder, it’s better to uninstall the currently installed Steam Client from your PC and reinstall it from the official website back again.
- To uninstall Steam Client from your PC, right-click on the Start button.
- From the menu, click on the Apps and Features option.
- A list of all the installed software will appear on your computer screen, scroll down till you find Steam.
- Click on Steam, and then, click on the Uninstall button.
- Then, follow the on-screen instructions to properly uninstall it from your PC.
- For installing it back, you will need to visit the official website and click on the Install Steam button on the webpage.
5. Update your operating system and drivers
Apart from Steam, if you are facing problems running other software on your computer, it’s basically an operating system issue. There may be some faulty or buggy files present on your computer which can only be fixed by updating the OS. Windows OS frequently receives updates that are highly recommended to install to keep your PC clean and safe from such minor issues. There are high chances that your PC might also have pending updates, so check for them, and install them as soon as possible.
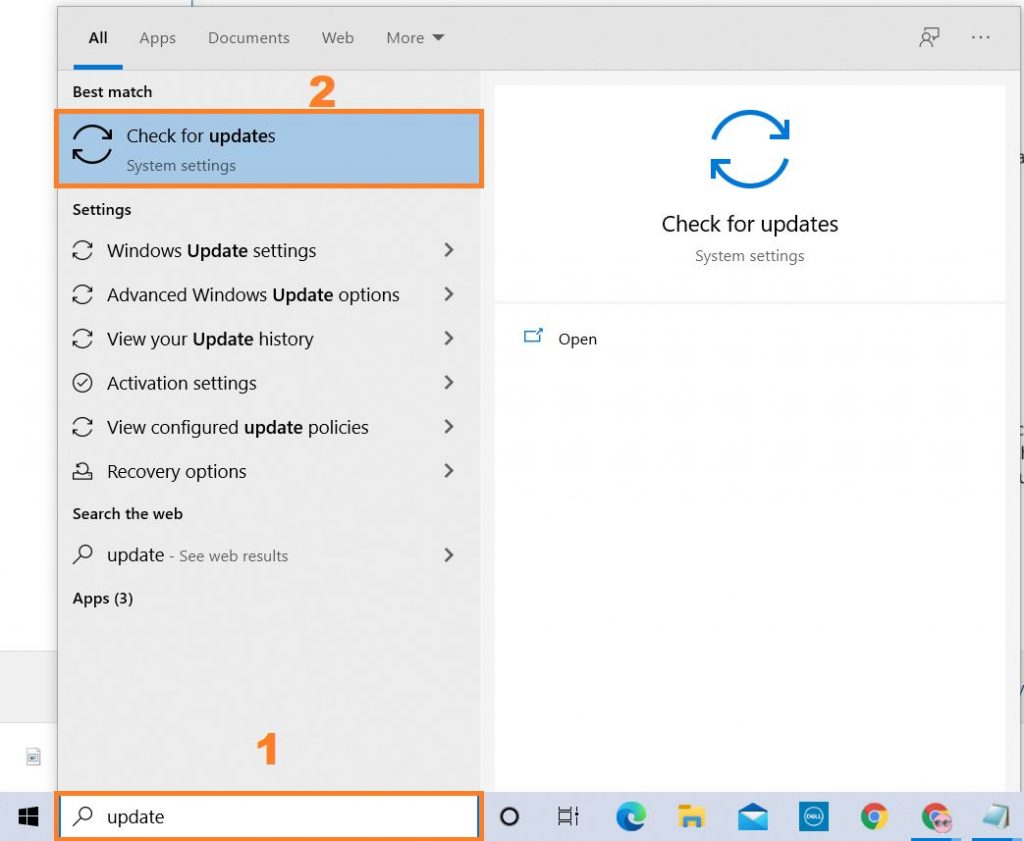
1. To download and install a Windows Update, click on the Start button, and type “update” in the search box.
2. Now, click on the Check for Updates option.
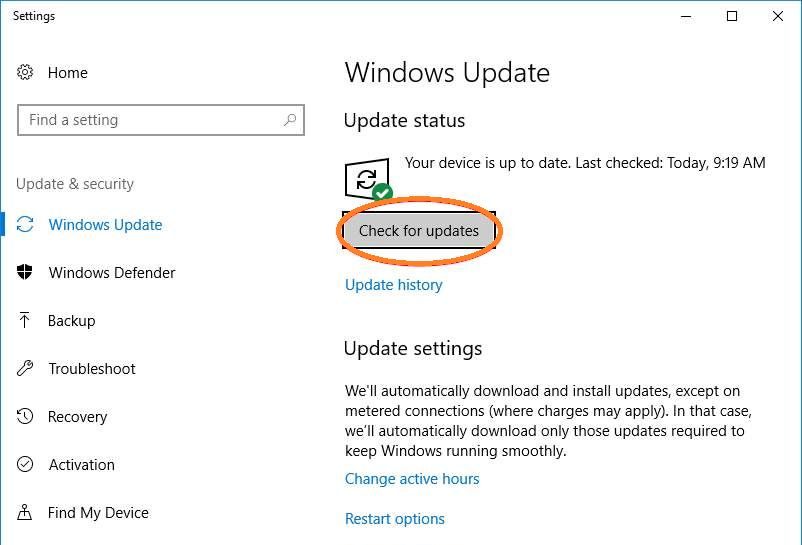
3. You will land on the Windows Update window.
4. Here, you can click on the Check for Updates button, and see if there’s any new update presently available to install.
5. If there is any update available, you can simply download and install it.
6. Installing the new updates will automatically update the drivers on your computer as well.
6. Temporarily disable your antivirus software
Generally, the Steam client does not face any such problem with Windows Defender. However, if you have installed any third-party antivirus software on your computer, there can be complications. Oftentimes, third-party antivirus software detects useful files as malicious and blocks the programs from launching properly. So, you can try to disable the antivirus software for a while and try to launch Steam afterward, and see if that works for you!
If it does work, you can re-enable the antivirus software and put Steam into the exclude folder in the antivirus software. By doing so, your antivirus software will no longer interfere with any files or folders related to Steam.
7. Restore your computer from a restore point
If you have enabled the backup and restore function on your Windows PC, it can be highly helpful to you in such scenarios. If you have recently changed or tweaked any settings on your PC after which you are experiencing problems, loading back the Windows to an old restore point can help you restore all the previous settings and resolve the issue.
1. Firstly, click on the Start button.
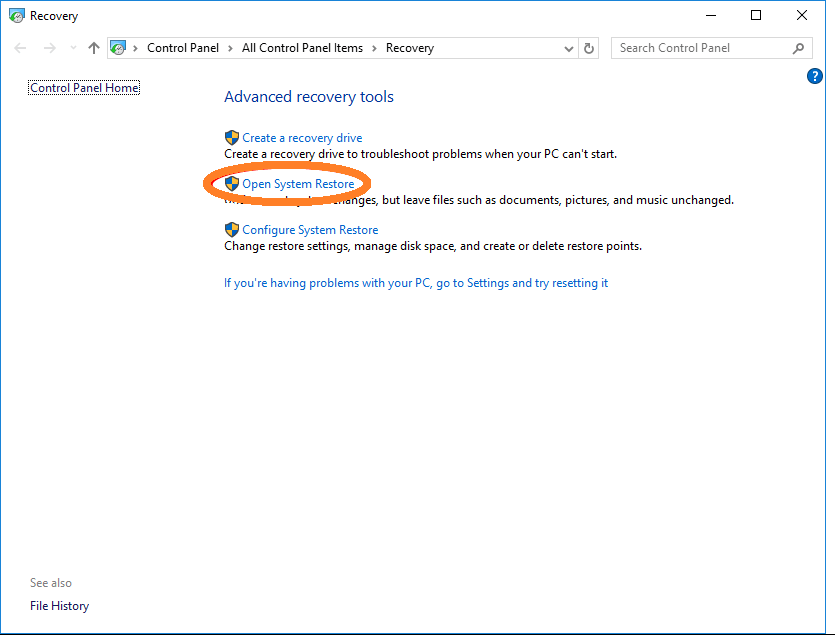
2. Now, type “recovery” in the search box.
3. Click on the Recovery option.
4. It will redirect you to the Control Panel, click on the Open System Restore option.
5. Follow the on-screen instructions and select any restore point as per your preference.
6. It will restore all the settings of your computer to the time when that particular restore point was made.
Conclusion
Wrapping it up, all of the methods that we have mentioned above have helped several people in the past to fix up their Steam-related problems. Hence, we believe that if you try out the same techniques, as we have mentioned above, it’ll be a lot helpful for you as well. Do make sure to try out these fixes in the same order as we have listed. It’s because the top 3 methods are highly effective in fixing this particular Steam issue and you might not even need to try out the other methods. Still, if you face any difficulties or have any further queries, we will assist you. So, don’t forget to leave a comment and tell us about your experience.


