Integrating a solid-state drive (SSD) into your computer setup is a game-changer for enhancing performance alongside a traditional hard drive. However, ensuring its seamless integration begins with proper initialization. Without this crucial step, your operating system might fail to recognize its potential. The good news? Initializing an SSD isn’t as complex as it sounds. It’s the gateway to expanding storage and accelerating data processing. In this guide, we simplify the seemingly technical process, walking you through the essential steps to initialize your SSD in Windows. Get ready to harness the full power of your SSD with ease!
Outline
ToggleWhat does ‘Initialize an SSD’ mean?
Initializing an SSD refers to the process of preparing the drive for use within a computer system. It involves setting up the necessary structures and formatting the drive with a specific file system, such as NTFS or exFAT in Windows, so that the operating system can recognize, access, and utilize the SSD for storing data. This initialization procedure essentially configures the SSD to be compatible and functional within the computer, making it accessible and ready for data storage and retrieval.
Why Do We Initialize SSD?
Initializing an SSD is essential to prepare it for use within a computer system. When you initialize an SSD, you’re essentially formatting it to a specific file system that your operating system can recognize and use. This process partitions the drive, sets up necessary structures, and marks it as usable storage space. Without initialization, the SSD remains in a raw state, inaccessible for storing data or integrating into the system’s architecture. Therefore, initializing the SSD is a critical step to ensure its functionality and compatibility within your computer setup.
How to Initialize SSD?
Initializing your SSD is a fundamental step in unlocking its full potential within your computer system. Whether you prefer a user-friendly graphical interface or the precision of command-line operations, we’ve got you covered. Below, we’ll guide you through two distinct methods to initialize your SSD in Windows: Using Disk Management and utilizing the Command Prompt. Let’s explore each approach to ensure you can make the most out of your SSD effortlessly.
By Using Disk Management
Initializing your SSD through Disk Management is a straightforward process that ensures your drive is ready for optimal usage. Follow these step-by-step instructions to initialize your SSD:
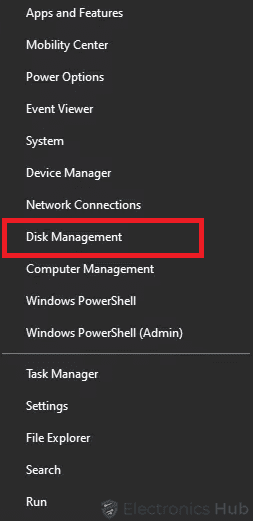
- Access Disk Management: Begin by right-clicking on the Start menu and selecting Disk Management as an administrator.
- Verify Online Status: Confirm that the SSD you wish to initialize is Online. If it appears as Offline, right-click on the disk and select Online.
- Initiate Disk Initialization: Right-click on the targeted SSD and choose Initialize Disk from the options.
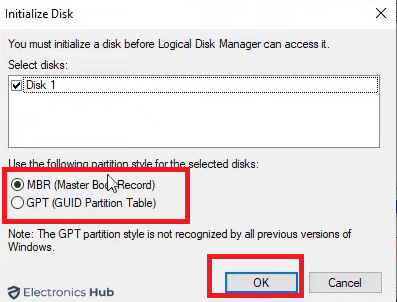
- Configure Disk Settings: In the Initialize Disk dialogue box, select your SSD and specify the desired partition style – either GPT (GUID Partition Table) or MBR (Master Boot Record).
- Initiate Initialization: Click Ok to commence the disk initialization process.
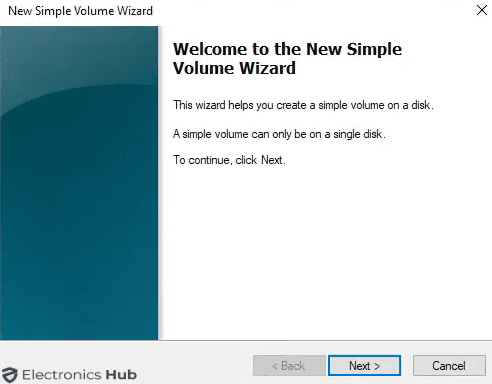
- Create a New Simple Volume: Right-click in the Unallocated area, choose New Simple Volume, and open the New Simple Volume Wizard by clicking Next.
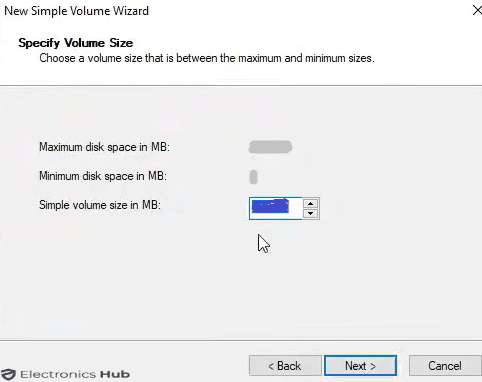
- Specify Volume Size: Keep the Specify Volume Size as the maximum (default value) and proceed by clicking Next.
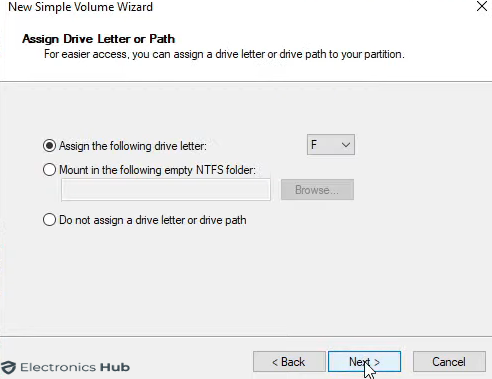
- Assign a Drive Letter: Select a Drive Letter for your SSD and click Next.
- Format Partition: In the Format Partition screen, decide on a Volume label (the desired name for your drive) and proceed by clicking Next.
Your SSD is successfully initialized and ready for use within your system.
By Using Command Prompt
Initializing your SSD through Command Prompt provides a direct and efficient method for users comfortable with command-line interfaces. Here’s a step-by-step guide to help you through the process:
- Access Command Prompt: Open the Start Menu, type “diskpart,” and press Enter to launch the Command Prompt.
- Initialize the Disk to MBR/GPT: Type the following commands and press Enter after each:
| list disk select disk # (Replace # with Disk number) convert MBR/GPT |
- Create Primary Partition on MBR Disk: If you choose to continue creating the primary partition on an MBR disk, run the following commands and press Enter after each:
| list disk select disk # (Replace # with Disk number) Clean create partition primary format quick fs=ntfs assign exit |
- Create Primary Partition on GPT Disk: For creating the primary partition on a GPT disk, use the following commands and press Enter after each:
| list disk select disk # (Replace # with Disk number) clean convert gpt create partition primary format quick fs=ntfs assign exit |
Executing these commands will guide you through initializing your SSD using Command Prompt. Once completed, your SSD will be ready for use in your system.
GPT VS MBR – Which One is Better?
When initializing an SSD, you’re faced with a choice between two partition styles: GPT (GUID Partition Table) and MBR (Master Boot Record). Each comes with its own set of advantages, and the better option depends on your specific needs.
GPT (GUID Partition Table):
- Supports larger drives: GPT is suitable for drives exceeding 2 terabytes, making it ideal for modern, high-capacity SSDs.
- More partitions: GPT allows for an extensive number of partitions, providing flexibility for complex storage configurations.
- Enhanced data integrity: GPT includes redundant copies of critical data structures, reducing the risk of data loss due to corruption.
MBR (Master Boot Record):
- Compatibility with older systems: MBR is compatible with a wide range of systems, making it suitable for older hardware and some legacy software.
- Simple and widely supported: MBR is a well-established standard, and its simplicity ensures broad compatibility across various platforms.
Which One is Better?
For Modern Systems and Larger Drives: GPT is generally preferred due to its support for larger capacities and more partitions.
For Older Systems or Compatibility Requirements: MBR remains a viable choice, especially if your system is older or has specific compatibility needs.
Ultimately, the decision between GPT and MBR depends on your specific use case and system requirements. Choose the partition style that aligns with the size of your SSD and the compatibility needs of your computer system.
Initialize SSD – FAQs
Ans: You can initialize an SSD using disk management tools provided by your operating system. In Windows, for instance, you can use Disk Management or DiskPart. On macOS, Disk Utility is commonly used for this purpose.
Ans: Yes, initializing an SSD will erase all the data on it. Ensure you’ve backed up any important files before proceeding.
Ans: The best format (NTFS, exFAT, APFS, etc.) depends on your intended use. For Windows, NTFS is a common choice. For macOS, APFS or HFS+ might be preferred. exFAT is a more universal format for compatibility across different systems.
Ans: Back up any important data on the SSD before initializing it, as the process will erase all existing data. Also, ensure that you’re initializing the correct drive to avoid accidental data loss.
Ans: Check the SSD connections, ensure it’s recognized by the system, and look for specific error messages. If problems persist, consult the SSD manufacturer’s support documentation or contact their customer support for assistance.
Conclusion
In conclusion, initializing your SSD is a crucial step to unlock its full potential in your Windows system. Whether you choose the user-friendly Disk Management or the precise command-line approach, understanding the “why” and “how” empowers you to seamlessly integrate this performance powerhouse into your setup. Remember, choosing the right partition style (GPT for modern systems, MBR for older ones) further optimizes your SSD’s capabilities. With proper initialization, your SSD is ready to propel your computing experience to new heights!


