Jigsaws have gained quite the popularity for its convenience to accurately and efficiently cut a broad range of materials.
But working with a jigsaw is not a simple as it seems. Without proper knowledge, you may end up hurting yourself or make a wrong cut.
Whether you are DIY’er or a beginner, this article can teach you the right way to use this tool. Here, we have provided step-by-step instructions of how to use a jigsaw efficiently and other safety information.
Before getting into the instructions on how to use a jigsaw, we shall look into the different parts of a jigsaw.
Components or Parts of a Jigsaw
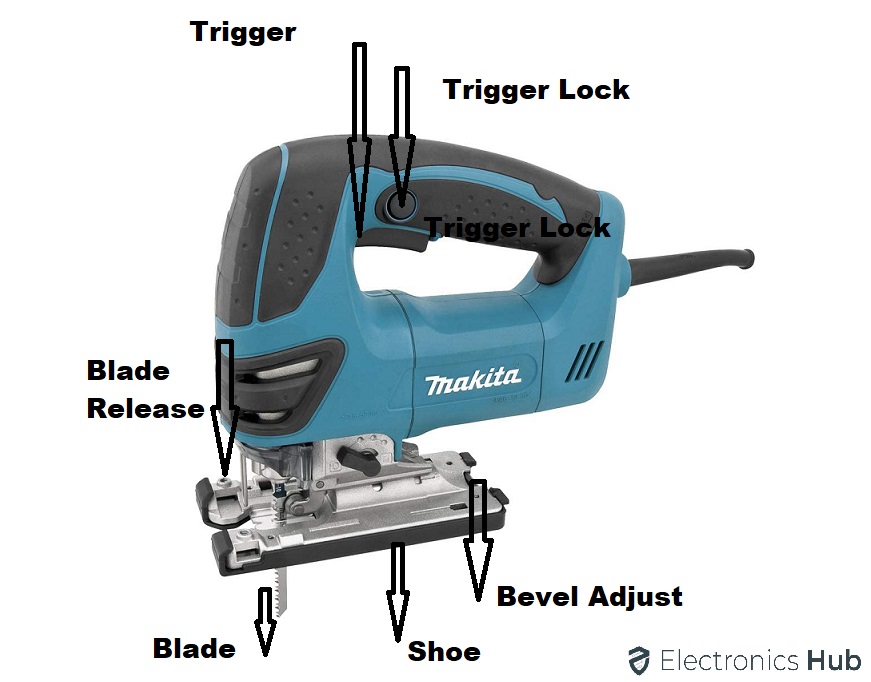
Below, we have mentioned some of the common parts of a jigsaw. Understanding the parts helps you with the steps and using the tool correctly.
1. Blade
Jigsaw blades are usually straight and long. Typically, they are available in different materials, width, shanks and tooth counts. With jigsaws, they have either a T-shank or U-shank blade.
2. Shoe
Usually, the base of a jigsaw is referred to as a shoe which is sits over the material that needs to be cut. It is essential for the shoe to lay flat over the material for making an accurate cut (be it straight or curved). For plunge or bevel cut, the shoe has to be angled differently.
3. Handle
The best jigsaw comes with a convenient and comfortable handle that makes an entire cut safely. Usually, the jigsaws come with either a top handle (D-handle) or a barrel grip handle.
4. Trigger
On the tool, you can see the ‘On’ switch located usually inside the top handle jigsaw. When you make the cut, the trigger has to be hold for the blade to keep running. When the trigger is let go, the saw will come to a stop.
5. Trigger Lock
This part locks the trigger of the jigsaw in ON position so you don’t need to hold the trigger while making the cut. This is helpful in situations where you are going to make the long cuts.
6. Speed Control Dial
Most of the jigsaws come with a dial which lets you adjust the jigsaw blade speed. The speed at which the jigsaw blade has to run depends on the material you are making the cut.
7. Blade Roller Guide
It is located just over the shoe. The roller guide is slotted while the blade rests between the slots. This ensures the blade is maintained square over the work piece.
8. Orbital Switch
Jigsaws come with one of the two cutting actions – the straight or the orbital. In the straight auction, the blade moves up and down for making the cut. With the orbital action, the blades move forward while cutting including the up and down. This provides faster cut and rougher. So, you should never use orbital action for cutting hardwoods and metals.
9. Bevel
It lets you tilt the saw for making the bevel cuts. This tilting varies based on the model you are using.
How to Use the Jigsaw?
Now that you have understood the components of a jigsaw, lets take a look at the step-by-step process of using this tool. We have provided the steps of using the jigsaw below for your reference.
1. Choosing the Right Blade
The package containing the jigsaw blade will indicate the material is made from, stating “wood” and “metal”. Over the package or on the blade, the blade’s teeth per inch (TPI) number will be listed. For most woodworking project, TPI of 10-12 is acceptable. Lesser TPIs let you to cut more quickly, but will result in a slower cut. Higher TPIs allow for faster cuts and smoother results. Appropriate blade width is another consideration.
The width of your blade should be chosen to fit the radius you are cutting. The Jigsaw blades are available in two different widths, 1/4 ” is suitable for cutting tight radius curves while the 3/8″ for gradual curves. Make sure you are familiar with the direction of your teeth. A standard jigsaw knife has teeth that point upwards for cutting the blade’s upstroke. This is the appropriate option for cutting all kinds. To reduce chipping and nicking, a reverse blade where teeth pointed downward has to be used over the material that has a pre-finished surface.
2. Setting Up the Jigsaw
First, insert the blade into your jigsaw. Next, unplug the saw. To change the blade, some jigsaws require that you loosen the bolt with an Allen wrench. The blade grip is loosened by pulling down on newer jigsaws. When you remove the black lever, ensure that the blade faces in the correct direction. The teeth of the blade should face towards the front of your jigsaw. Now you can plug in your jigsaw and get ready for the cut.
3. Setting Up the Material
You should mark where you intend to cut your material. Using a T-square, you can make a straight line at the end of material if you require a square or even cut. Even when the cut is not necessary for to being a square, you can mark the required shape using pencil over the material. Although jigsaws can be used to cut curves, it is important not to make too many curves. If you go around sharp bends, the blade could bend.
Any material that you have intended to cut have to be secured to the table with adequate clearance which ensures the jigsaw will not run into the clamps. If the edges of a large wood piece are too long to fit on the table, you can place two tables next to one another so that you can cut efficiently and safely between them. Make sure both sides should be secured.
It is okay to allow wood ends to hang from the table for smaller cuts. You should leave enough room to let the foot pass through the clamps, but not so much that the saw is forced off-track.
4. Cutting the Material
Before you set jigsaw for cutting, ensure that the foot is placed flat over the material. Before you pull the trigger, make sure the blade is not in contact with any material. After aligning the blade with the cut, release the trigger for the blade to pick up the speed. You can slowly move the jigsaw blade forward until it reaches full speed. The blade will then cut through the material. You can apply some forward pressure, but don’t force the saw too fast. The blade will cut through the material naturally. Pushing too hard can cause it to reshape or break. You must ensure that the blade does not stop after you have gone through all of the material.
If the blade suddenly stops mid-cut, release the trigger and gently pull the blade out. If you cut with your foot at an angle, if the curve is too sharp or if it is moving too quickly, the blade may stop.
5. Cleaning Up
To avoid any splinters, sand the edges of all your material after you have finished cutting. This can be done using an orbital sander or a belt sander depending on the material.
Make sure you unplug the jigsaw and remove the blade. Then, store them in the correct place. Vacuum your work area and sweep it clean. Place large amounts of scrap material in an area designated for scrap material.
How to Cut Curves with a Jigsaw?
When cutting over a curve, ensure the radius isn’t too small to cut using the blade. Jigsaws can be flexible however they cannot be turned and turned in any way. If the curve is actually too tight, then the saw might snap.
This trick can be used if you have to cut a tight curve with your saw. To remove bulky material, initially, you have to do a rough cut along the line.
Next, make several small relief-cuts over at an angle and stop at the cut line. You can complete the cut over that line once you have removed enough material.
How to Cut a Hole Using a Jigsaw?
The initial step is the most important. Initially, you have to drill a hole big enough to accommodate the jigsaw blade. This will allow you to insert your blade and begin cutting. Make sure your hole is not close to the line. The drill bit could drift when you start drilling and cause damage to the material beyond the line. So, you can always remove more material, but it is impossible to place it back.
How to Cut a Bevel With a Jigsaw?
It is possible to cut bevelled angles using a jigsaw. However, it can be difficult. This is most commonly used to install trim. The nature of the flexible blade can create cut that is not perfectly 45 degrees, but you have to work using what you have.
You can adjust the show angle to achieve the desired bevel. To help you find the right angle, there has to be an indicator close the knob. A speed square can be used for checking the accuracy of a 45-degree cut. It should be able to fit properly between the blade of the shoe and the sole.
While you are cutting, make sure nothing is in the way of the blade’s progress. Remember that cutting at an angle will result in a decrease in cutting depth. To prevent the saw’s from sliding during the cut, use a straight edge guide.
Some Safety Tips to Consider While Using a Jigsaw
- You should always use clamp to secure the material before you start working on it. However, there is no need for clamping with heavy materials. But if your workpiece is light, you should use clamps to ensure that it doesn’t slip or move.
- You should use rails to place your workpiece as it allows you to use the jigsaw’s full range without damaging the workbench.
- The best way to prevent binding of blades is to use to relief cuts. It also helps in minimizing waste, and everyone must follow this tip when working on tight curves.
- Before start cutting, always check that your blades are sharp enough. Blunt blades reduce the accuracy and put more load on the jigsaw.
- If you don’t want to deal with excessive chimping on cut edges, you should start cutting and marking through the masking tape.
- You should never force the jigsaw to run and cut. Always let it work at its own pace and allows it to run freely.
- Always go through the user manual to understand the jigsaw’s working mechanism and features properly
- Make sure that your hands and the jigsaw’s cable are at a distance from running blades
- Make sure that the blades have completely stopped running before you put them away from the workpiece
- Avoid wearing jewelry or lose clothing while using the saw
- Lubricate the jigsaw regularly, and don’t use blunt blades
- Never use a saw in a moist environment and ensure that the workbench is also dry and clean
Some Frequently Asked Questions
1. How difficult is it to use a Jigsaw?
A jigsaw can be used by both professionals and DIYers to create straight or curved cuts in woodworking projects.
2. How can you make a smooth cut using a jigsaw?
To prevent the blade from vibrating when cutting, hold the saw down tightly. The work surface is affected by vibration and downward force. Apply a few layers of masking tape to the bottom of the jigsaw to reduce marring.
3. How do you cut 2×4 using a jigsaw?
Straight cuts in 2×4 lumber can be achieved by guiding the jigsaw slowly and in one pass. You will be fine if the pace is consistent and slow. The blade will do all the work for you. Keep your eyes on the cutting line and control the speed and pace.
4. What thickness of wood can a saw cut with a jigsaw?
Jigsaws are best for cutting softwood less than 1-1/2 inches. Hardwood can be up to 3/4 inches thick. thick. When cutting curves in thicker boards with a jigsaw blade, it tends to bend and leave a bevelled edge instead of a square one.
5. Is it possible to use a jigsaw for cutting a 4×4?
A majority of jigsaw blades are capable of cutting to a maximum depth 1 1/2 inches. This is much less than the depth required for cutting through a 4×4. A jigsaw blade cuts perpendicularly to the guard, using an up-and-down motion. It cannot cut through thicker material than a circular saw, miter saw, or circular saw.
6. What type of lumber is difficult to cut with a saw?
Jigsaws can cut almost any material, including wood. As it pertains to wood, jigsaws are capable of cutting both hardwood and softwood. The process of cutting hardwood is slightly different. Although a jigsaw may not be the best solution for hard woods, it can work well as long as you take your time.
Final Conclusion
Be it a professional carpenter or beginner, jigsaws have been a preferred choice for cutting different materials. Compared to traditional saws, they are convenient and offer accurate cuts.
However, it is important to know how to use the jigsaw. If not, this can lead to rough cuts or you may harm yourself. Especially if you are beginner, make sure to understand the process before attempting your first cut.
To help you with process, we have provided a detailed step-by-step process with all the information. We hope the process and instructions mentioned here have helped you understand the process.
If you still have any doubts, write to us in the comment section below. We will reply at the earliest.
