Embark on a gaming journey that bridges the past and present with the Dolphin Emulator. This guide serves as your compass to seamlessly install and configure the Dolphin Emulator on both your PC and Android device. Whether you’re a seasoned gamer seeking to resurrect classic favorites or a curious enthusiast delving into the world of emulation, this comprehensive walkthrough empowers you to relive Nintendo GameCube and Wii titles effortlessly. Dive into this guide to unlock the gateway to a treasure trove of gaming nostalgia!
About Dolphin Emulator
The Dolphin Emulator stands as a leading open-source platform, enabling the emulation of Nintendo GameCube and Wii games on modern devices. Developed by a dedicated community, this emulator strives to preserve gaming history by faithfully replicating the original consoles’ functionalities. Its continuous refinement ensures compatibility across various hardware configurations, offering users the chance to revisit beloved classics and experience gaming nostalgia in a contemporary setting. The emulator’s versatility and commitment to accuracy make it a go-to choice for enthusiasts looking to relive the magic of Nintendo’s iconic titles.
Install Dolphin Emulator on PC
Installing Dolphin Emulator on your PC is a straightforward process, allowing you to seamlessly play Nintendo GameCube and Wii games. Follow these simple steps to get started:
- Visit Dolphin Emulator’s Download Page: Head to the official Dolphin Emulator website and locate the download section.
- Choose the Latest Beta Version: Look for the most recent beta version available for download.
- Select Windows x64: Opt for the Windows x64 version by clicking the designated button to start the download.
- Access Your Downloads Folder: Once the download completes, navigate to your Downloads folder.
- Extract the Downloaded Zip File: Right-click on the downloaded file and choose “Extract” to unpack its contents. This action generates a folder containing multiple Dolphin Emulator files.

- Launch the Emulator: As a portable application, Dolphin requires no installation. Simply double-click on the Dolphin executable file within the extracted folder. This action opens the emulator, ready for use.
- Build Your Game Library: Create a dedicated folder on your PC to store GameCube and Wii game files. Select the location of the folder where you want to Create your dedicated folder and right click on empty space and select “new” and rename the folder whatever you want. This step simplifies the process of loading and organizing your gaming collection within Dolphin.
Since Dolphin is portable, feel free to relocate the folder to a location of your choice for convenient and easy access.
Install Dolphin Emulator on Android
Bringing the world of Nintendo gaming to your Android device is a seamless process with Dolphin Emulator. Follow these steps to install the emulator on your Android device and unlock a trove of classic games on the go:
- Download from Google Play Store: Head to the Google Play Store and search for “Dolphin Emulator.” Download and install the app on your Android device.
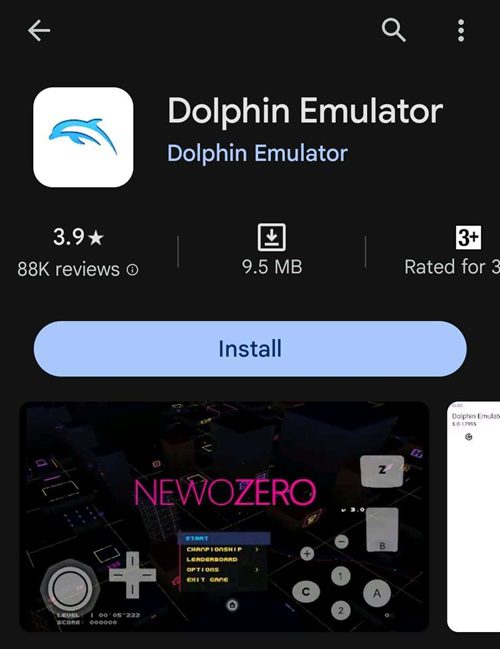
- Enable Usage Statistics Reporting: Upon opening the Dolphin Emulator app for the first time, agree to the “Enable usage statistics reporting agreement” by selecting “Yes.”
- Create a Dedicated Folder: Launch your file browser app and navigate to your device’s internal storage. Create a new folder using the file browser and rename it as desired.
- Organize Game Files: Access your device’s Downloads folder and move any GameCube or Wii game files to the newly created folder within the internal storage. This folder will serve as the designated directory for your ROMs within Dolphin Emulator.
Setup Dolphin Emulator on PC
Once Dolphin Emulator is installed on your PC, configuring its settings optimally enhances your gaming experience. Let’s delve into the various aspects of setting up Dolphin on your computer to ensure smooth gameplay and customization. What specific settings or configurations would you like to explore under this section
Set up Controls
Configuring controls in Dolphin Emulator is a crucial step to tailor your gaming experience to your preferences. Whether you’re using a keyboard or a controller, follow these simple steps to set up controls for optimal gameplay:
- Open Dolphin Emulator: Launch Dolphin Emulator on your PC to access the settings.
- Access Controller Configuration: Navigate to the Controller icon located on the top toolbar within Dolphin Emulator.
- Select Controller to Customize: Depending on whether you’re configuring a GameCube or Nintendo Wii controller, choose the respective section for configuration
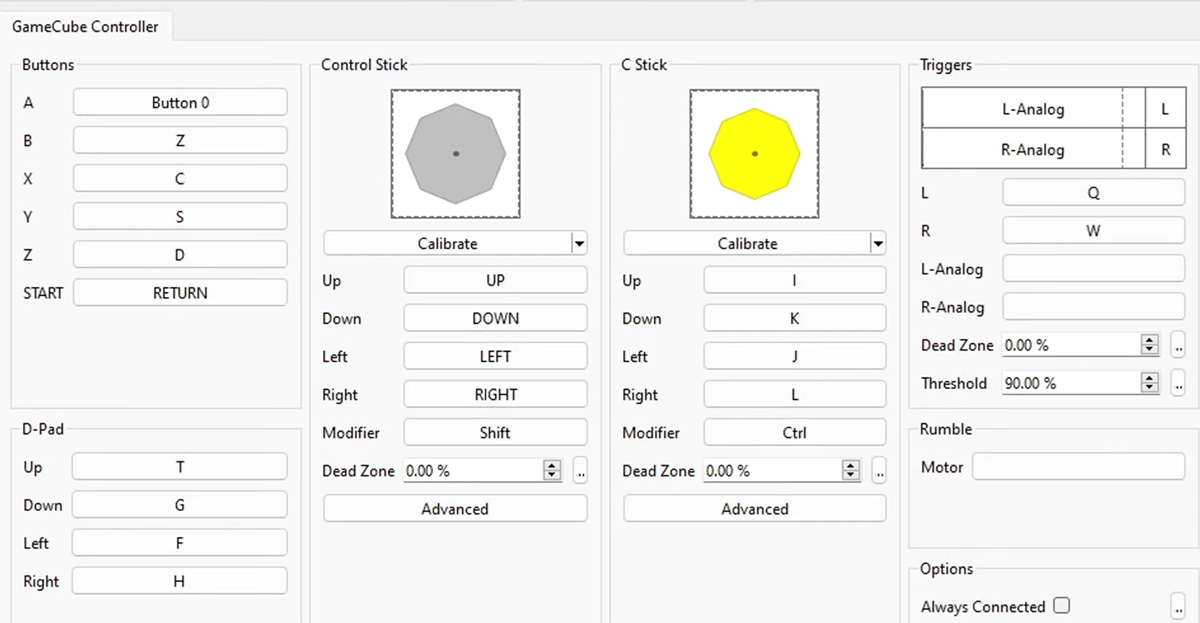
- Remap Buttons and Joysticks: A screen displaying all available buttons and joysticks for the selected controller will appear. Modify button assignments and joystick configurations to match your desired layout.
- Optional: Create Multiple Profiles: If desired, create multiple controller profiles by entering a profile name in the Profile box on the right side of the window and selecting Save. This feature allows you to save and load different controller configurations easily.
- Confirm and Save Changes: Once you’ve customized the controls to your satisfaction, select OK to confirm and save the settings.
By following these steps, you can personalize the controller configuration within Dolphin Emulator to align with your gaming preferences, enhancing your overall gaming experience.
Setup Graphics Settings
Fine-tuning Dolphin Emulator’s graphical settings can significantly impact performance and visual quality. Follow these steps to optimize graphics settings:
- Access Graphics Settings: Open Dolphin Emulator and select the Graphics option from the top toolbar. A window with four tabs: “General, Enhancements, Hacks, and Advanced” will appear, each containing various graphics settings.
- Adjust Settings as Needed: Explore the settings within each tab, utilizing Dolphin Emulator’s feature where tooltips explain each option when hovering the mouse over it. Modify settings based on your preferences and system capabilities.
- Enhance Internal Resolution (Optional): Consider increasing the Internal Resolution under the Enhancements tab if your computer can handle it. Higher resolutions not only improve visuals but also provide a larger screen for gameplay.
Dolphin Emulator generally comes with efficient default settings, often at lower levels or turned off to ensure smooth performance. Adjust these settings to achieve a balance between performance and visual quality, maximizing your gaming experience based on your computer’s capabilities.
Other configuration settings
Dolphin Emulator offers additional configuration settings accessible through the Options menu at the top of the window, followed by Configure. While these settings are generally for troubleshooting purposes, it’s essential to understand each tab in the Configure menu:
- General: The General tab houses configurations for dual core settings, idle skipping, and usage statistics reporting. Typically, users won’t need to make adjustments here, but it can be explored for troubleshooting purposes.
- Interface: The Interface tab provides minor customizations to the emulator’s user interface. For instance, you can enable an exit confirmation to prevent accidental data loss when exiting the app.
- Audio: As the name suggests, the Audio tab deals with audio settings. Only modify these options if you encounter issues with the audio in your games.
- GameCube and Wii: Both tabs offer console-specific options such as aspect ratio, memory cards, and other settings related to GameCube and Wii emulation.
- Paths: The Paths tab allows you to add, remove, or change paths to your ROM folder. You can also define paths for Default ISO, DVD Root, App loader, and Wii NAND Root if needed.
- Advanced: The Advanced tab provides the option to “overclock” your emulator, increasing frame rates but putting a higher strain on your CPU. Tinkering with this is optional, especially if your computer is already running games at the maximum framerate.
Explore these settings cautiously, primarily for troubleshooting purposes or for specific customization needs, as most default settings within Dolphin Emulator are optimized for efficient performance.
Note: Before starting gameplay, ensure you have a ROM, as Dolphin Emulator requires game files (ROMs) to run games.
Setup Dolphin Emulator on Android
Configuring Dolphin Emulator on your Android device opens the door to a portable gaming experience, allowing you to enjoy Nintendo GameCube and Wii classics on-the-go. This section provides a step-by-step guide to help you set up the emulator on your Android device.
Modify on-screen controls
Customizing on-screen controls within Dolphin Emulator on your Android device enhances your gaming interface for a personalized experience. Follow these steps to modify on-screen controls:
- Open Dolphin Emulator and Select Game: Launch Dolphin Emulator on your Android device and open the desired game.
- Access Dolphin Emulator Menu: While the game is running, slide in from the side of the screen or use the back button to open the Dolphin Emulator menu.
- Select Overlay Controls: Within the menu, choose “Overlay Controls” to access the control customization options.
- Edit Layout: Click on “Edit Layout” to reposition buttons according to your preference. Move the buttons around the screen until they suit your desired layout, then select “Done.”
- Adjust Controls Size and Opacity: Tap “Adjust Controls” to find sliders for adjusting the size and opacity of the on-screen buttons.
- Hide On-Screen Controls (Optional): Utilize “Toggle Controls” and tap “Toggle All” at the bottom of the window to hide on-screen controls. This option is handy when using an external controller.
Note: Customizing on-screen controls must be done manually for each game. Additionally, toggling controls off/on may be necessary depending on the use of an external controller.
Modify graphics Settings
Adjusting graphics settings within Dolphin Emulator on your Android device can significantly impact gameplay visuals and performance. Follow these steps to modify graphics settings:
- Open Dolphin Emulator and Access Settings: Launch Dolphin Emulator on your Android device and tap the Cogwheel icon to access the settings menu.
- Navigate to Graphics Settings: Within the settings menu, tap on “Graphics Settings” to explore various options.
Various Options are: - Shader Compilation Mode (Performance Option): If encountering performance issues, consider adjusting Shader Compilation Mode. Note that this may cause the game to stutter but can increase overall frame rates. Use cautiously, as it’s recommended for very low-end hardware.
- Enhancements: Explore the Enhancements section for processing enhancements aimed at smoother gameplay and improved graphics. Notably, increasing the Internal Resolution is beneficial if your phone can handle it.
- Hacks: Check the Hacks section for options to enhance performance or graphical quality. Review each option and toggle as needed.
- Statistics: The Statistics section allows you to display information such as FPS, VPS, and speed, aiding in monitoring changes. None of these options affect performance.
- Advanced: Within the Advanced menu, find options for enabling texture packs, mods, and other miscellaneous features. Some of these options may impact performance.
By navigating through these settings, you can fine-tune the graphical aspects within Dolphin Emulator on your Android device, optimizing gameplay based on your device’s capabilities and preferences.
Enable Override Emulated CPU Clock Speed.
Enhancing performance on the Android version of Dolphin Emulator involves enabling the Override Emulated CPU Clock Speed option. Follow these steps to access and enable this feature:
- Access Settings: Open Dolphin Emulator on your Android device and navigate to Settings.
- Navigate to Config and Advanced Settings: Within the Settings menu, locate the Config option, then proceed to Advanced settings.
- Enable Override Emulated CPU Clock Speed: Look for the Override Emulated CPU Clock Speed option within the Advanced settings. Enable this option to significantly increase the emulator’s performance.
By following these steps, you can activate Override Emulated CPU Clock Speed and experience a significant performance boost within Dolphin Emulator on your Android device.
Install & Setup Dolphin Emulator – FAQs
Ans: Yes, the Dolphin Emulator itself is entirely legal. However, the legality of game emulation depends on various factors, such as owning the original game copies and your local laws. Ensure you’re compliant with the laws regarding game emulation in your region.
Ans: Dolphin Emulator primarily supports Nintendo GameCube and Wii games. It’s essential to check the compatibility list on the Dolphin website to see which specific games are compatible.
Ans: For Android, most Bluetooth or USB controllers can be paired through the device’s Bluetooth settings. On PC, controllers can usually be connected via USB or by using Bluetooth adapters. Dolphin Emulator allows mapping these controllers within its settings.
Ans: Dolphin Emulator is actively developed and frequently updated by its community of developers. Updates are released periodically, improving performance, compatibility, and adding new features.
Conclusion
This guide serves as a comprehensive roadmap to install and configure Dolphin Emulator on both PC and Android, empowering you to relive the magic of Nintendo GameCube and Wii titles. From navigating installation steps to customizing controls and graphics, this walkthrough equips you with the knowledge to unlock a treasure trove of gaming nostalgia, whether you’re a seasoned enthusiast or a curious newcomer to the world of emulation. So, embark on this journey, configure your emulator, and prepare to dive into a universe of classic gaming experiences!
