When the system files become corrupted or go missing, there will be an error message “Explorer class not registered.” To understand it better, you will have to know the significance of DLL (Dynamic-link Library) files. These are also called the shared libraries and are essential for Windows programs‘ operation. It is the DLL files that help your system when it is running on less memory.
As the DLL file is not registered, you will not be able to perform certain actions. You may find the error while opening photos, PDF files, or opening programs like Excel, Internet Explorer, and Outlook. There can be many factors that can lead to Explorer.exe error. As it can be due to many reasons, we shall now discuss the methods to fix the error “Explorer class not registered.”
How To Fix Explorer.Exe Class Issue?
Here are all the different ways to fix “Explorer.exe class not registered” error message.
1. Restart File Explorer
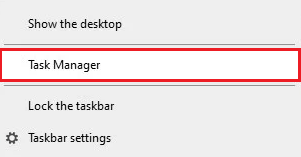
Step 1: On your keyboard, press Ctrl + Shift + Esc together. Alternatively, you can right-click on the Windows icon and select “Task Manager.”
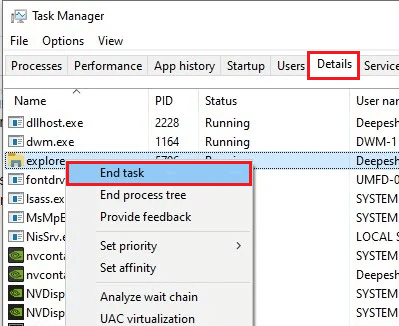
Step 2: Click “Details.”
Step 3: Search for “explorer.exe”
Step 4: Hit on the option “Ends task” by giving a right-click on it.
Step 5: Click “File.”
Step 6: Select the option “Run new task.”
Step 7: Type “explorer” and hit Enter.
2. Run SFC & DISM
Step 1: Press the Windows key + R simultaneously.
Step 2: In the search box, type “cmd.”
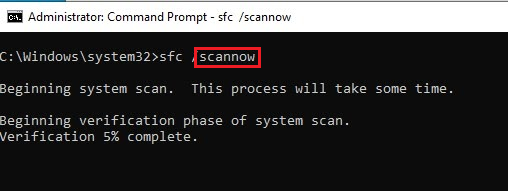
Step 3: In the Command Prompt, type “SFC / scannow” and hit Enter.
Step 4: Select “Run as administrator.”
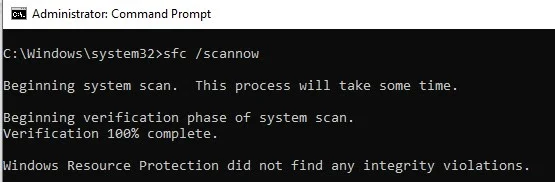
Step 5: Wait for the scanning to complete.
Step 6: Restart your system.
Here is the step to run DISM
Step 1: Open the search bar by pressing the Windows key + R.
Step 2: In the command prompt, type “DISM / Online / Cleanup-Image / ScanHealth” and press Enter.
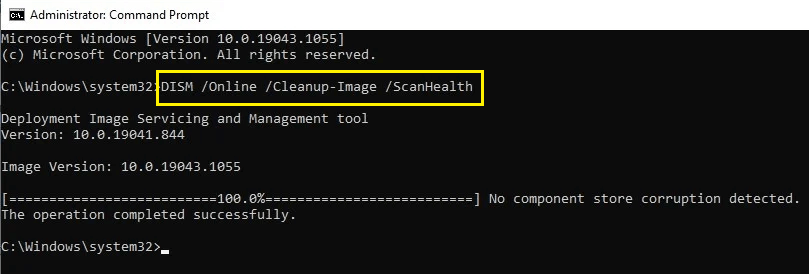
Step 3: Ensure that you select “run as administrator.”
Step 4: After the scanning is complete, type “DISM / Online / Cleanup-Image / RestoreHealth” and hit Enter.
3. Restart Internet Explorer Service
Step 1: In the search box, look for “Run.”
Step 2: Type “services.msc” and hit Enter.
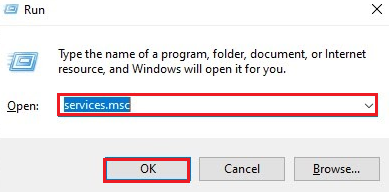
Step 3: From the Services panel, right-click on the option “Internet Explorer ETW Collector Service.”
Step 4: Select “Start” in the drop-down menu.
4. Reset The Default Apps
Step 1: Click on the Start menu on your computer.
Step 2: Hit on “Settings.”
Step 3: Go to “Apps” followed by “Default Apps.”
Step 4: Scroll down and press the button “Reset.”
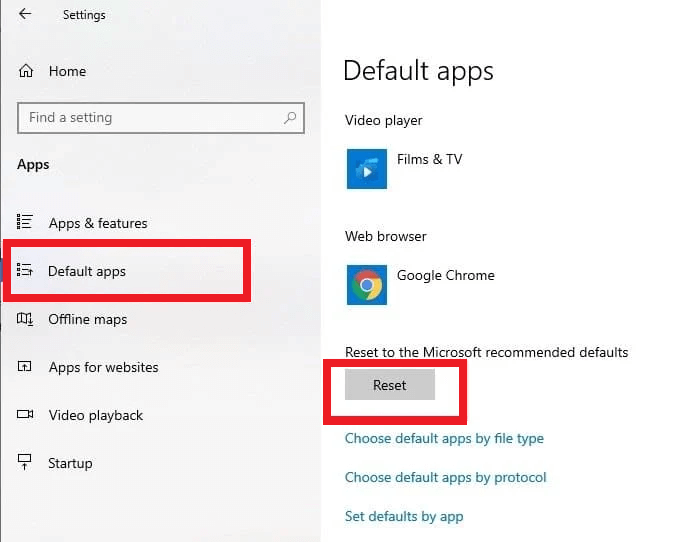
Step 5: You can now return to options to customize them.
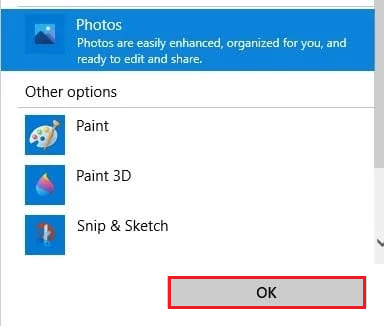
5. Set Windows Photo Viewer As Default Viewer
Step 1: Open the menu by right-clicking on any picture.
Step 2: Select “properties.”
Step 3: Click on “Change.”
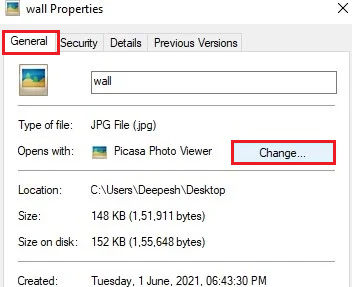
Step 4: Click on “Windows Photo Viewer.”
Step 5: Click “Ok” to save the changes.
If the error still occurs, change your default image reader to any other free picture viewing program.
6. Change Default Browser
Step 1: Click on the Start menu button.
Step 2: Select “Settings.”
Step 3: Click on “Apps.”
Step 4: From the left panel, hit on “Default Apps.”
Step 5: Select “Microsoft Edge” in the category “Web browser.” You can select other browsers if you have one.
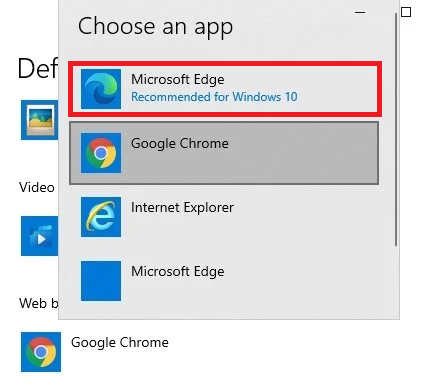
Step 6: A new browser option will be added under the heading “Web browser.”
7. Re-register Explorerframe File
Step 1: Press the Windows key and R together.
Step 2: In the search box, type “command prompt.”
Step 3: Select “Run as administrator.”
Step 4: Hit on the option “Yes” if there will be a prompt to grant access.
Step 5: Once the command prompt opens, type “regsvr32 ExplorerFrame.dll” and hit Enter.
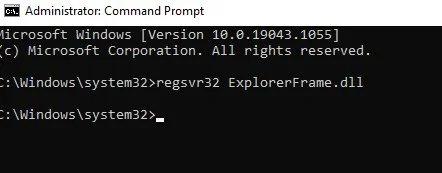
Step 6: Launch Internet Explorer and see if the problem still persists.
8. Use Component Services
Step 1: On your keyboard, press the Windows key & R.
Step 2: In the dialogue box, type “dcomcnfg” and press Enter.
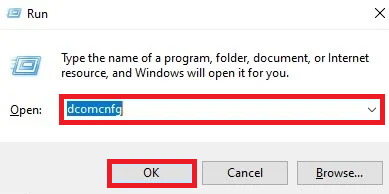
Step 3: From the left panel, double-click on “Component Services.”
Step 4: Select “Computers” followed by “My Computer.”
Step 5: Double-click on “DCOM Config” in the middle panel. A notice “DCOM Configuration Warning” will prompt.
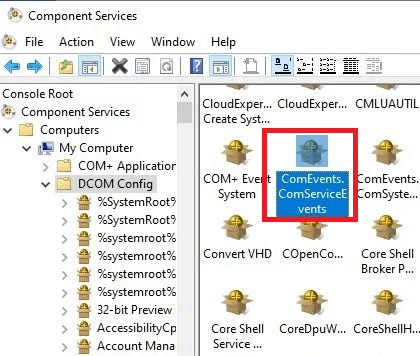
Step 6: Close the Window and restart your computer.
9. Check Hard Drive
Step 1: Press Windows key + R.
Step 2: In the search box, type “cmd.”
Step 3: Type “prompt” in the Command Prompt.”
Step 4: Enter the command “wmic diskdrive get status” and press Enter.
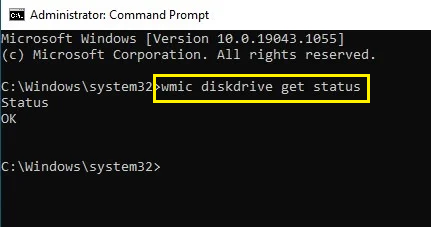
To confirm if everything is ok, the hard drive on your computer must be Ok. There can be “Unknown”, “Bad”, or “Caution” options. If there is such a problem, you will have to look further.
10. Disable the iCloud Services
Step 1: On your keyboard, press Ctrl + Shift + Esc simultaneously.
Step 2: You can also go to Task Manager by right-clicking on the Windows icon.
Step 3: Scroll down and look for iCloud.
Step 4: Right-click on iCloud and click on “End Task”.
You can delete or disable iCloud if you don’t want iCloud to start.
Step 5: Navigate to Task Manager.
Step 6: Go to the table “Starting.”
Step 7: Look for iCloud.
Step 8: Hit on the option “Disable.”
11. Use a different local account
Step 1: Press the Windows key + I together to open Settings.
Step 2: Go to the section “Accounts.”
Step 3: Hit on “Family & other people.”
Step 4: Click on “Add someone else on this PC.”
Step 5: Enter your Microsoft email.
Step 6: Click “Next.”
Step 7: If you don’t have a Microsoft account, you will have to create one.
Step 8: Log out of your existing account and enter new account details.
12. Create a new Microsoft account
Step 1: Click on the WIndows icons and select “Settings.”
Step 2: Go to the option “Accounts.”
Step 3: Select “Sign in with a local account instead.”
Step 4: Enter your password for the local account.
Conclusion
When the error “Explorer.exe class not registered” happens, you will not be able to access different applications on your computers. It can happen due to many reasons. Thankfully there are ways to fix the error. You can try the above troubleshooting and prevent the error. These are simple steps and do not require professional help.
