Razer Synapse serves as the nerve center for customizing and optimizing your Razer peripherals, ensuring an enhanced gaming experience. However, encountering issues like Razer Synapse not opening can disrupt your gaming flow and leave you seeking effective solutions. Additionally, compatibility issues with the internet can further hinder your experience. In this guide, we delve into the root causes of these problems and provide detailed steps to resolve them, ensuring that your Razer Synapse operates smoothly and efficiently.
Why Is Razer Synapse Not Opening?
There are several potential reasons why Razer Synapse may fail to open:
- Outdated Software: Using an outdated version of Razer Synapse may lead to compatibility issues with your system.
- Corrupted Installation: A corrupted installation of Razer Synapse can prevent it from launching properly.
- Background Processes Interference: Conflicting background processes running on your system may interfere with Razer Synapse’s functionality.
Identifying the specific cause is crucial for implementing the appropriate solution and restoring Razer Synapse’s functionality.
Why Razer Synapse is not working with the Internet?
Issues with Razer Synapse’s connectivity to the internet can arise due to various factors:
- Network Configuration: Incorrect network settings or restrictions may prevent Razer Synapse from accessing the internet.
- Firewall or Antivirus Blocking: Overly strict firewall or antivirus settings may block Razer Synapse’s access to online features.
- Server Issues: Temporary server issues on Razer’s end may disrupt connectivity.
Understanding these factors helps in troubleshooting the connectivity issue effectively.
How to Fix Razer Synapse with Internet Issues?
To address Razer Synapse’s connectivity issues with the internet, follow these steps:
- Check Internet Connection: Ensure that your internet connection is stable and functioning properly.
- Verify Network Settings: Double-check your network settings to ensure that they allow Razer Synapse to access the internet.
- Disable Firewall and Antivirus: Temporarily disable your firewall and antivirus software to determine if they are causing the connectivity issue.
- Run as Administrator: Right-click on the Razer Synapse shortcut and select “Run as Administrator” to grant it elevated permissions.
- Update Razer Synapse: Make sure that you are using the latest version of Razer Synapse by downloading and installing any available updates from the official website.
- Restart Router and Computer: Sometimes, a simple restart of your router and computer can resolve connectivity issues.
- Contact Razer Support: If the issue persists, consider reaching out to Razer Support for further assistance.
Fix Razer Synapse not Opening Issue?
Now that you know more about the Razer Synapse program and why it may have issues, you might be interested in fixing the not opening issue right away. As we mentioned earlier, there are various multiple causes due to which this issue might be caused.
Thus, we are here with the following fixes for the Razer Synapse, not the opening issue. You can simply go through the following fixes one by one and successfully fix the Razer Synapse not opening issue:
1. Reinstall Razer Synapse
If you are facing any kind of issues with any program on your computer, the first and easiest fix that you can try is to simply reinstall it. This also means that it Razer Synapse is not opening on your computer, you can try reinstalling it as shown here
- First, search for Add or Remove Programs using Windows Search and open it.
- Here, you will find a list of all the programs currently installed on your computer. Use this list to find and uninstall Razer Synapse from your computer.
- After you have uninstalled it, restart your computer to ensure all temporary data is gone as well.
- Then, go to the Razer website and download the latest version of the Razer Synapse installer.
- At last, simply open this installer and follow all the on-screen instructions to successfully reinstall Razer Synapse.
2. Reinstall Razer Device Drivers
Other than the Razer Synapse software itself, all Razer peripherals also require a Razer device driver to function properly. And if there are any issues with this driver, then you might not be able to open Razer Synapse. Thankfully, you can fix this driver issue by simply reinstalling Razer device drivers by following these instructions:
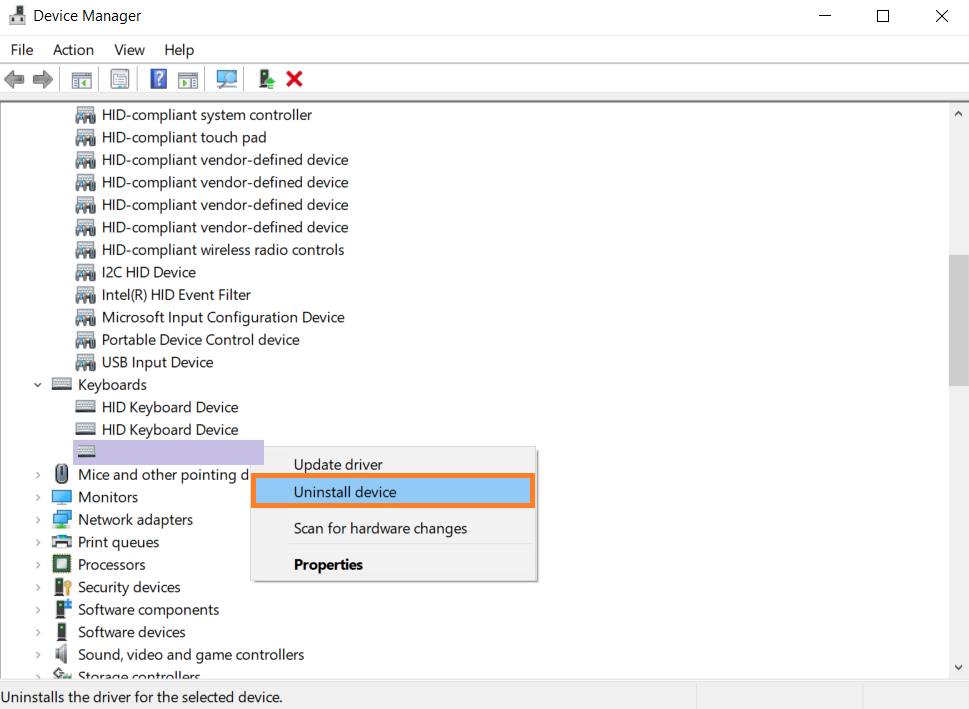
- To reinstall Razer device drivers, first, open Device Manager by pressing Windows Key + X on your keyboard.
- Here, expand the Mice and Other Pointing Device list, Keyboard list, and Human Interface Devices list.
- If you see any Razer devices within these lists, right-click on it and select Uninstall Device.
- Now, unplug all of your Razer devices and restart your computer. Once it is restarted, simply plug all of them back, which will reinstall all Razer device drivers automatically.
3. Uninstall Razer Surround
While the primary device software for all Razer devices happens to be Razer Synapse, some Razer gaming headphones may also rely on the Razer Surround applications. Even though this application is great for getting surround sound out of your Razer headphones, it can interfere with Razer Synapse on your computer.
If you are also using Razer Surround along with Razer Synapse, then it is highly recommended to uninstall Razer Surround by going through these steps:

- Press Windows Key + R on your keyboard to open Windows Run.
- In here, type appwiz.cpl and press enter to get a list of all the apps currently installed on your computer.
- At last, simply find Razer Surround, click on it, and select Uninstall to get rid of it. You can also consider rebooting your computer to make changes to Razer Synapse and get it working.
4. Clear Temporary Files Related to Razer Synapse
Similar to any other program installed on your computer, Razer Synapse also stores a lot of temporary files on your computer. While these temporary files are there to store your configuration and make the program faster, they may cause issues like Razer Synapse not opening if the temporary files themselves are corrupted.
Therefore, it is always a great idea to regularly clear temporary files related to Razer Synapse using Windows Run as described here:
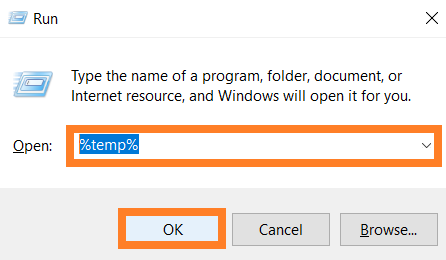
- To begin, press Windows Key + R on your keyboard and type %temp% followed by an Enter in Windows Run.
- Once you are in the Local\Temp folder, simply press Control + A on your keyboard to select files.
- Then, delete all of these files by pressing Shift + Delete, which will get rid of all temporary files from your computer, including Razer Synapse.
- Now, try relaunching Razer Synapse after rebooting your computer since all possible corrupted temporary files are gone.
5. Install Microsoft .NET Framework
Microsoft .NET Framework is highly popular and highly used by all kinds of Windows programs including Razer Synapse. This framework is meant to offer better efficiency compatibility to Razer Synapse which should prevent the Razer Synapse not opening issue. Thus, if you have not installed the Microsoft .NET framework on your computer, follow the given instructions to do the same:
- First, head over to the Microsoft .NET framework website and download the latest version.
- Then, open this installer and proceed with installing this framework on your computer.
- Once you have installed the Microsoft .NET framework, relaunch Razer Synapse which will fix any issues with it.
6. Disable your Anti-Virus and Test Razer Synapse
There is a pretty high chance that you are also using an anti-virus program on your computer for protection against cyber attacks. While anti-virus programs are meant to get rid of malicious files from your computer, they can also interfere with third-party programs in some cases.
As a result, if you are using Razer Synapse and it is not opening, then you can consider disabling your anti-virus program as shown:
- If you are using a third-party anti-virus program, simply open it and go to its preferences. Here, disable all real-time protection options as they are the pens that can interfere with Razer Synapse.
- But if you are using Windows Defender as your preferred anti-virus, then you have to use Windows Search to look up Virus & Threat Protection settings.
- After opening Windows Settings, simply disable Real-time Protection. You can then restart your computer and try reopening Razer Synapse, as it should work just fine now.
7. Disable Core Isolation
Core Isolation is a security feature of Windows 10 that is responsible for running Windows System Processes by creating a secure partition of the system memory. While it is there to protect all of the Windows system processes from different possible virus and malware attacks, it can also interfere with Razer Synapse and prevent it from opening. Thus, you can also consider disabling core isolation as shown in the given instructions:
- To disable core isolation, first search for Windows Security using Windows Search and open it.
- Now, head over to the Device Security tab from the left side panel menu and open the Core Isolation Details settings.
- After this, simply disable the Memory Integrity option and restart your computer.
- At last, Razer Synapse will start working if it has issues due to Core Isolation in Windows.
8. Turn off Windows Firewall
If you have used Razer Synapse in the past, then you must know that it is a cloud-based program that syncs all of your settings in the cloud. Because of this, if it is not able to access the internet properly, then Razer Synapse might not open up.
This might be caused due to the Windows Firewall preventing internet access to Razer Synapse. Thus, you can try turning off Windows Firewall as shown here to fix the Razer Synapse not opening issue:
- To disable Windows Firewall, press Windows Key + R on your keyboard. Once you are in the Windows Run window, type firewall.cpl and press enter on your keyboard.
- Then, click on the Turn Windows Defender Firewall On or Off from the left side panel menu,
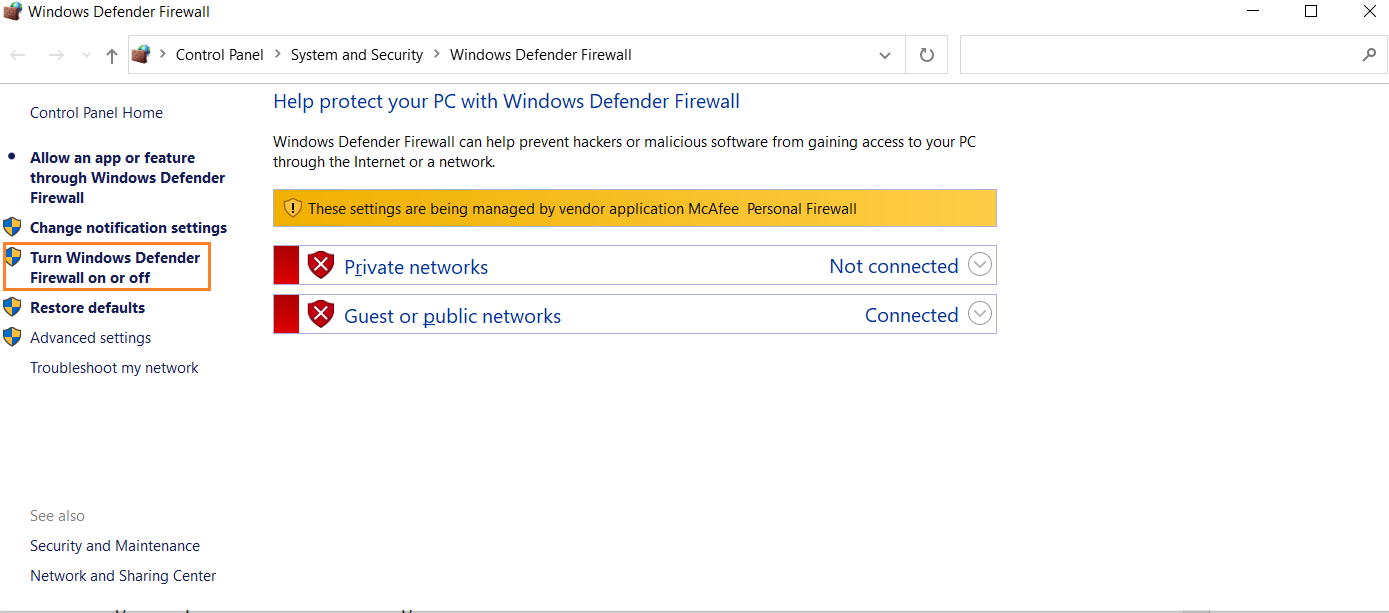
- Finally, select the Turn Off Windows Defender Firewall option under both the public as well as private network sections and click on OK.
- At last, reboot your computer and try relaunching Razer Synapse after which it should launch right away.
9. Shutdown Razer Background Process
Just like most other programs running on your Windows computer, Razer Synapse also has its background processes. While this process is there to offer extra functionality to Razer Synapse, it can sometimes prevent Razer Synapse from opening. In such a case, you can try to shut down Razer background processes via Task Manager:
- To open Task Manager on your computer, press Control + Shift + Escape on your keyboard.
- Once you are in Task Manager, click on More Details and go to the Processes tab.
- Here, find all of the processes with Razer in their name and select all of them one by one followed by clicking on the End Task option.
- After you have done this to shut down all Razer background processes, simply relaunch Razer Synapse on your computer without having the not opening error.
10. Check for Windows Updates
Even though all the various fixes stated above are quite handy and effective for fixing the Razer Synapse not opening issue, they might not work if the Windows installed on your computer itself is corrupted. Therefore, it is also a great idea to check for any possible Windows Updates via Windows Settings by going through these steps:
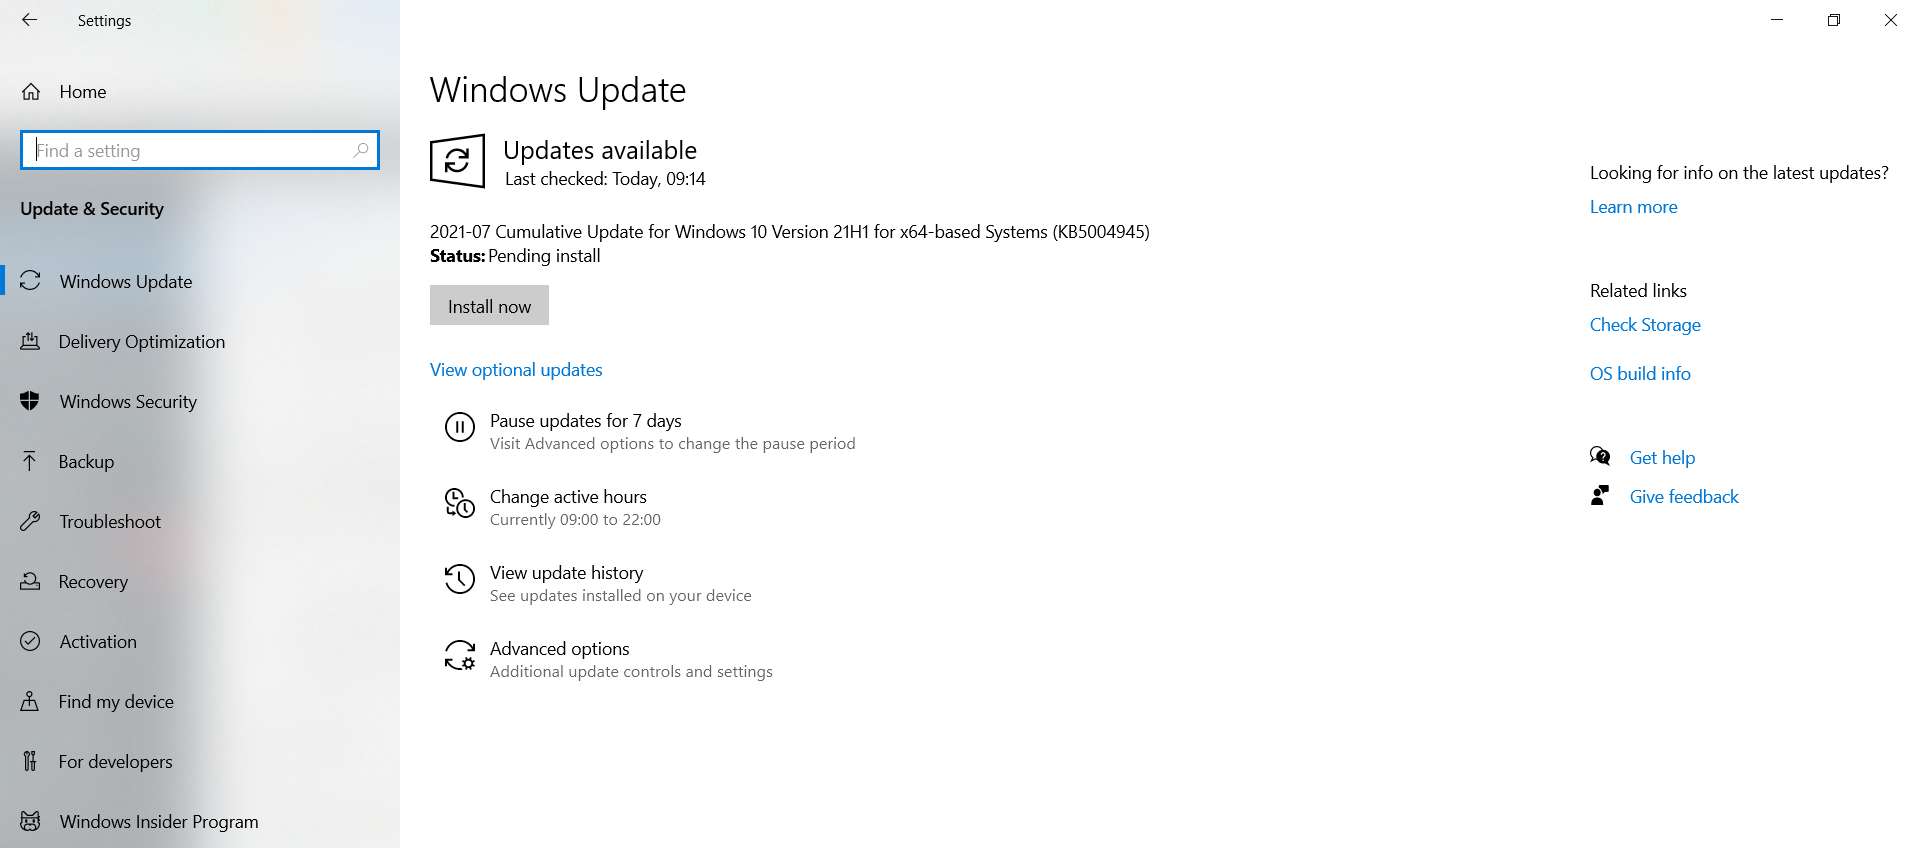
- To check for Windows Updates, press Windows Key + I on your keyboard to open Windows Settings.
- Now, head over to the Update & Security menu and select the Windows Update tab present in the left side panel.
- Finally, click on the Check for Updates option in Windows Settings which will make your computer check for any available updates. If there are any updates available, they will be automatically downloaded and installed, fixing issues like the Razer Synapse not opening.
How to Fix Razer Synapse Not Working After Update?
If Razer Synapse stopped working after an update, consider rolling back to the previous version. Uninstall the current version from your computer. Download and install the previous version of Razer Synapse from the official website.
1. Check Compatibility:
Ensure that your operating system is compatible with the version of Razer Synapse you are using. Visit the Razer website to check for any specific system requirements or compatibility issues.
2. Contact Razer Support:
If the issue persists, reach out to Razer Support. Provide details about your system, the problem, and any error messages you encounter. They may have specific solutions or be aware of compatibility issues.
Ways to fix when Razer Synapse Not Working on DPI
1. Adjust DPI Settings:
Open Razer Synapse and navigate to the mouse settings. Adjust the DPI (Dots Per Inch) settings to your preference. Test different DPI levels to find the one that suits your needs.
2. Check Mouse Hardware:
Ensure there are no issues with your mouse hardware. Clean the mouse sensor and check for any physical damage. Try using a different mouse to see if the issue persists.
3. Reinstall Mouse Drivers:
Uninstall the mouse drivers from the Device Manager. Disconnect and reconnect the mouse, or restart your computer. Windows will automatically reinstall the necessary drivers.
4. Update Mouse Firmware:
Check the manufacturer’s website for firmware updates for your mouse. Download and install any available updates following the provided instructions.
Conclusion
In conclusion, resolving Razer Synapse issues, whether related to updates or DPI settings, often involves a combination of software adjustments, driver updates, and contacting support when needed. Regularly check for updates, maintain compatibility, and troubleshoot specific issues to ensure a smooth experience with Razer Synapse. If problems persist, reaching out to Razer’s support team is a valuable resource for more personalized assistance.
