The whole scene of single board computers is rising exponentially. While Raspberry Pi started it, there are a dozen or more prominent SBC products out there. But the popularity of Raspberry Pi still remains sky high. Couple of years ago, Raspberry Pi launched their new product in the “Raspberry Pi” line-up in the form of Raspberry Pi 4. It has slightly more powerful processor, more RAM, faster connectivity, and many more features than its predecessor.
What hasn’t changed much over the years is the physical aspect of the Raspberry Pi computer and the price of its vanilla version. Due to the exposed nature of the Raspberry Pi’s design, many Pi owners purchase a case or enclosure for their Raspberry Pi SBCs in order to protect it from dust and give the Pi not so naked look.
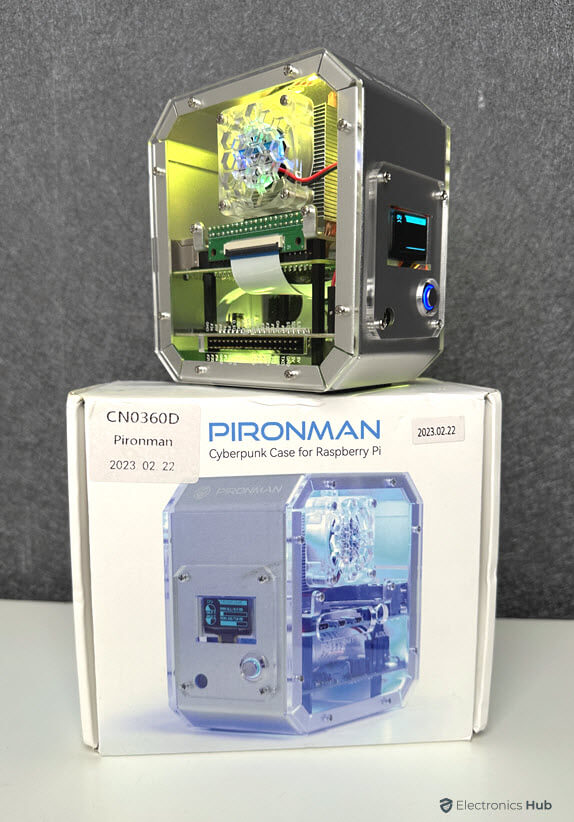
We have recently come across an interesting accessory for Raspberry Pi. It is the Pironman Raspberry Pi 4 Case, a “Mini PC” style enclosure for Raspberry Pi 4. It is a DIY kit that comes with several cool features to make your Raspberry Pi build exciting. This is the review of the Pironman Raspberry Pi 4 Case. We are writing this review after building it, testing all its features and functions, checking how easy/hard it is to build by a complete beginner, and many more. Continue reading to find our thoughts and impressions of the same.
Let us kick things off by unboxing the contents of the SunFounder Pironman Raspberry Pi 4 Case package. And boy there’s a lot to unpack. Even though the overall package looks small, there is a lot of stuff inside it. Opening the box, we get a large and colorful assembly guide. It lists out all the components you get in the package and very detailed step-by-step instructions to assemble the mini-PC.
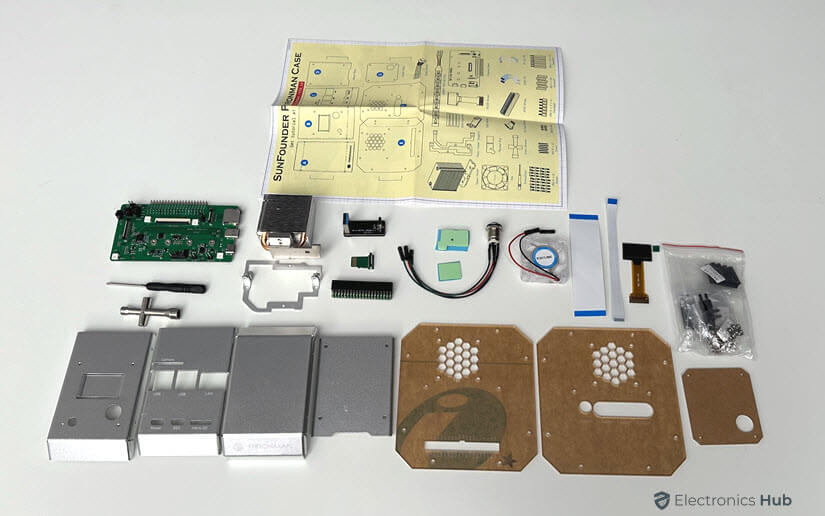
The main “case” consists of four aluminum alloy plates and a couple of acrylic plates. There is a special SunFounder Pironman Board in the package. It connects to the Raspberry Pi through the GPIO pins. Other than this, it also has connections for micro-SD card and a USB to USB-C Bridge for M.2 SSD.
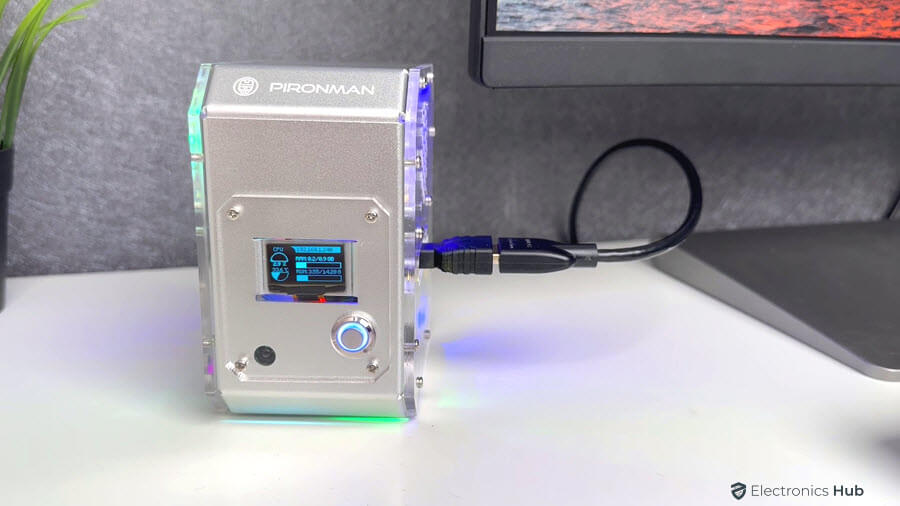
Yes. The Pironman Board has a feature to connect full-size M.2 SSD. There is an Addressable RGB LED Strip, heat sink for the CPU, RAM, and a couple of other ICs on the SBC, and a tiny cooling fan. You also get a small OLED Screen in the kit.
We missed the WS2812B RGB LED Strip in the above components image. But believe us, it is present in the box and we used it as well. Another important component in the kit is a power button.
There are a lot more bits and pieces in the kit and when you purchase one, you will see for yourself.

All the zip lock bags that contain small components such as screws, standoffs etc. have labels on them describing the component. We though this is a nice touch, especially for beginners.
That’s it for the unboxing and we recommend you to organize all the components on a large desk or workbench as there are several of them and you don’t want to lose or misplace even one piece of the kit.
After unpacking and arranging all the parts on our desk, we were really exited to start assembling the case. For the purpose of this build and testing, we used the original Raspberry Pi 4 Model B with 1GB RAM. That’s right. We have a 4GB RAM variant but it was part of another project we were testing and couldn’t remove it. So, we had to settle for the 1GB variant. We plan to replace the 1GB Raspberry Pi with the 4GB variant very soon as we really like the Pironman Case and want to use it as a permanent case for our main Raspberry Pi Computer.

Apart from the RAM hiccup, the entire build process was very smooth. If you have some DIY experience assembling kits, then you will finish the build in 30 to 40 minutes. We asked a colleague of ours, who has no prior experience with such DIY stuff, to assemble the kit just by looking at the assembly document and it took just over an hour for them to properly build the kit.
You have pay extra attention while inserting the flat cables. Other than that, the rest of the components have a very straight forward assembly process. We double checked every connection, screw, nut, etc., after finishing the build and before powering it on.
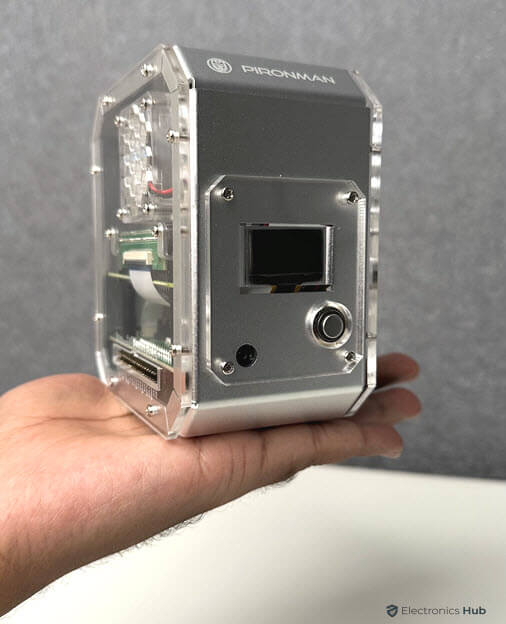
We are really impressed with how the case looks even before powering it on. The combination of metal and acrylic makes the case cyberpunk-ish (if that’s even a word). As the Raspberry Pi 4 has micro-HDMI ports for display out, we used a micro-HDMI to HDMI adapter. Then, we connected a USB-C Power Supply to the Pironman Board to see the Raspberry Pi and the case come to life.
The Pironman Raspberry Pi 4 Case, as the name suggests, supports only Raspberry Pi 4 SBC. If you have any previous models, then you cannot use the Pironman Case. We were slightly disappointed by this but the advantages of Pi 4 over older Pi’s makes this a good decision.
Yes. You have to provide power to the Pironman Board and not to the Raspberry Pi. Don’t forget this. We are skipping a lot of details such as preparing a microSD card and other similar steps as they are essential for any Raspberry Pi operation
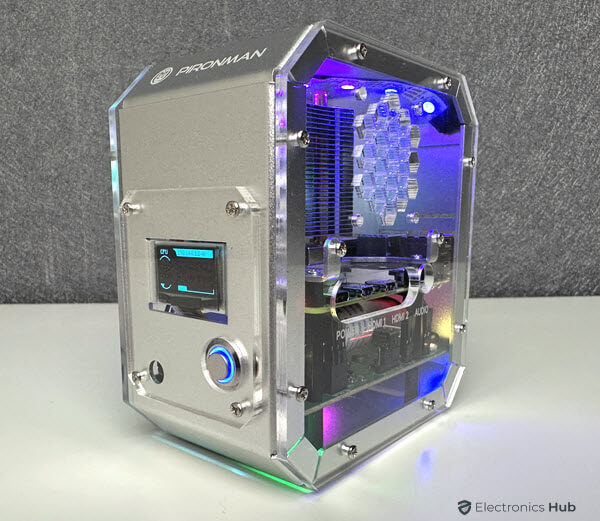
The Pironman Case doesn’t look like the one in the above image after the first boot (with all the bling). You have to install a special script from Pironman to activate the Pironman Board and let Raspberry Pi control it.
If you worked with Raspberry Pi before, then you can easily install the script. There is a very-detailed online instruction guide by SunFounder for installing the script. We highly recommend going through the guide and following the instructions.
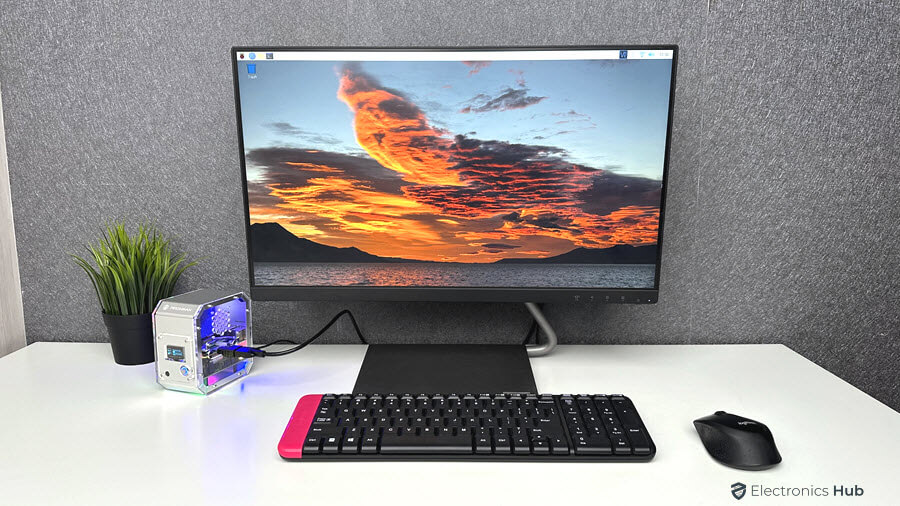
After installing the necessary software tools and the Pironman script, the Pironman Board comes to life along with the RGB LEDs and the OLED Screen.
Speaking of the OLED Screen, it shows the CPU, RAM, and ROM usage, CPU temperature, and IP address of Raspberry Pi. You can customize a script in the “Pironman” module that we installed earlier to display any other information.
The Pironman script works only on certain versions of operating systems. The SunFounder’s website has a detailed list of all the supporting operating systems. Go through that list before preparing the microSD card for Raspberry Pi, if you want to make use of the OLED Screen and other features.
Even if the hardware is great, a poor software can ruin the whole experience. That’s not the case here. The Pironman script by SunFounder works well with simple commands and offering a lot of customization. Speaking of which, you can set, adjust, or change many useful features of the Pironman Board in the Pironman Raspberry Pi 4 Case.
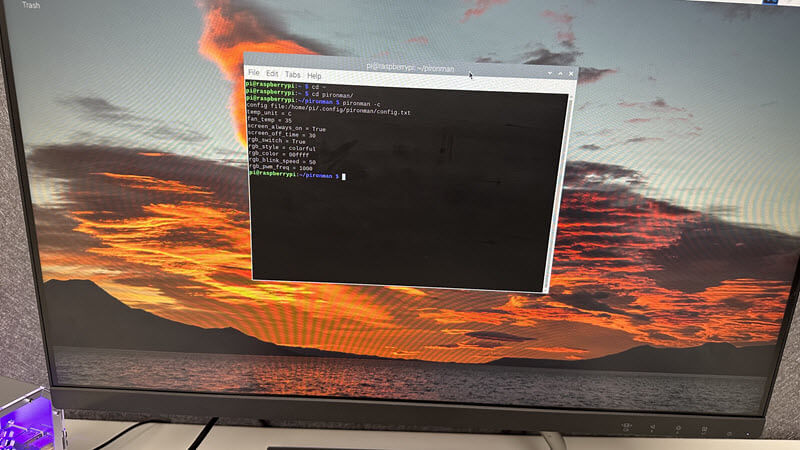
Some of the things are: temperature at which the cooling fan turns on, color of the RGB LEDs and its effects, what to display on the OLED screen and whether to display it continuously or allow it to sleep to prevent burn-in, and many more.
Once you get your hands on the software, you can explore and experiment with it the way you like. Another important feature is M.2 SSD Slot. The Pironman Raspberry Pi 4 Case or the Pironman Board to be specific, has a feature to install an M.2 SSD. It has to be a SATA SSD and not NVMe one but the good thing is you can choose between multiple size options including the most popular 2280.
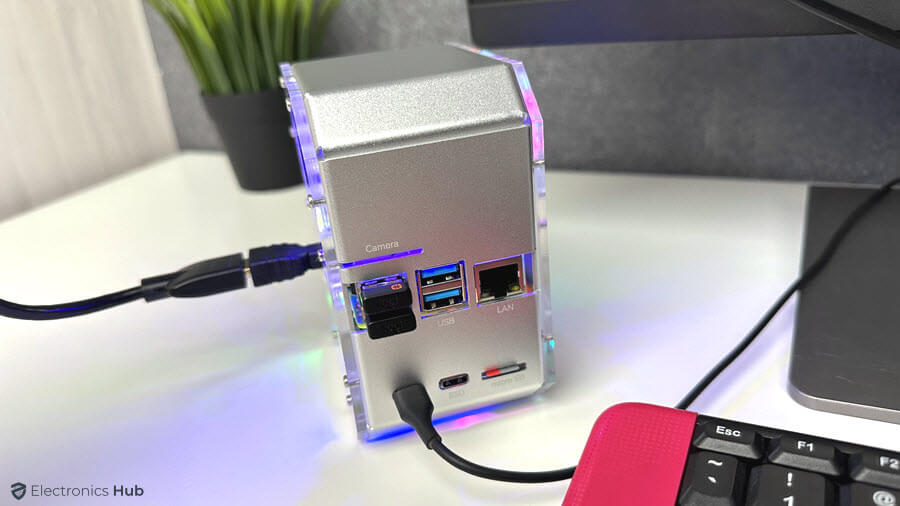
There is a special USB 3.0 to USB-C bridge that connects the M.2 SSD on the Pironman Board to the Raspberry Pi 4. Also, you can clone the microSD to the SSD and use the M.2 SSD as the main boot device.
If you don’t want to use the M.2 SSD as boot drive, you can use it as a storage device and make the Raspberry Pi 4 a NAS. A good thing about the design of the Pironman Raspberry Pi 4 Case is that you don’t have to disassemble the entire case to access the M.2 Slot, just the bottom plate.
The Pironman Raspberry Pi 4 Case offers an excellent way to glorify your Raspberry Pi 4 build. Whether you are using it for a 3D Print monitoring system or for home automation, the Pironman Case is a very good albeit expensive option.
The Pironman Board also has an integrated infrared receiver. You can use this with a compatible IR Remote and use the Pironman Raspberry 4 mini-PC as a neat little media unit.
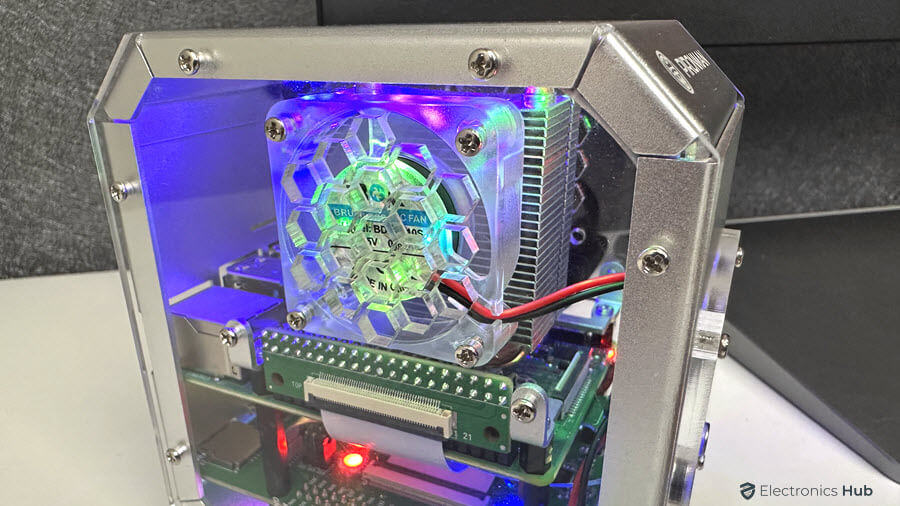
While you lose some GPIO pins of the Raspberry Pi 4 for the Pironman Board, you can still use the rest of the GPIO pins to make cool projects. With heat sink and cooling fan, you can run the Raspberry Pi 4 SBC in the Pironman Case for a long time without worrying about overheating. In our testing, the CPU on Raspberry Pi 4 never crossed 50°C even at significant loads (the ambient temperature was around 24-25°C).Impressive.
The cost of the SunFounder Pironman Raspberry Pi 4 Case is $79.99.This price is comparable to some decent PC cases. In that aspect, you are paying a premium for the product. But the experience it offers along with the features and functions of the case and the quality of the parts makes the price worth it.
Overall, we really liked the Pironman Raspberry Pi 4 Case. It is true DIY kit where you have to assemble everything from the ground up. The kit has all the necessary parts, components, and tools to build a “mini-PC” out of a Raspberry Pi 4.
Yes. The Pironman Case is compatible with only Raspberry Pi 4. Apart from this minor thing, all is well with case. Both the hardware (mechanical as well as electronic) and the software are really well made.
Some features such as the RGB Lighting increases the aesthetics of the case. But other features such as heatsink, cooling fan, OLED Screen M.2 SSD Slot, and IR Receiver are very functional and improves the performance/experience of the Raspberry Pi 4.
If you are planning to build a Raspberry Pi 4 based system (a NAS, 3D Print Server, Media Center, etc.) and you are looking at a “permanent” yet good-looking solution to house your Pi, then the Pironman Case is definitely a worthy contender.
Get great content that you love. No ads or spams, we promise.
How To Guides
Product Reviews
For Students
Get great content that you love.
No ads or spams, we promise.
Your Privacy is important to us
Copyright © 2024 Electronicshub.org