A multimeter is an essential tool to perform quick measurements of different electrical quantities. If you are an electrical and electronics engineer, then you definitely know importance of having a good multimeter on your bench and you probably have a bunch of them. But if you are new to this electrical stuff and want to measure voltage, current, resistance, test for continuity and many other things, then a multimeter is a very good place to begin with. As there a bunch of multimeters in the market with a price range varying from couple of dollars to hundreds (and even thousands) of dollars. But the KAIWEETS KM601 Smart Digital Multimeter can be an excellent beginner’s multimeter. Even professionals can use this multimeter, at least as a second multimeter (it is always good to have multiple multimeters at hand).
This is the review of the KAIWEETS KM601 Smart Digital Multimeter. We are writing this review after properly testing the multimeter for all its basic functionalities. Continue reading to find out more.
What Do We Get?
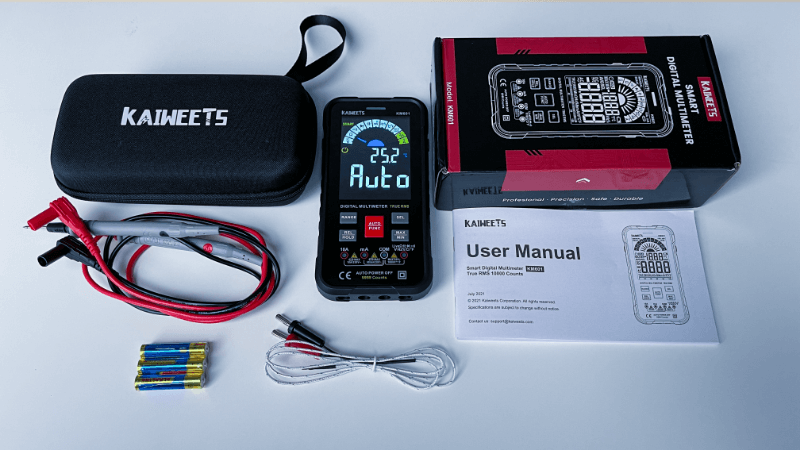
Let us quickly take a look at the contents of the package. The first thing is the KAIWEETS KM601 Smart Digital Multimeter itself. It is attached with a silicone cover, which is really sturdy. Next, we have couple of test leads (probes). The probes have covers at the tips as well as the connectors. There are 3 AAA batteries in the package.
There is a K-type Thermocouple in the package, which can be used to measure temperature of an object. Then there is the detailed user manual, which is in English (and it is really well written covering all the basic functions).
Finally, there is a carry bag with a net on the left side to hold the probes and thermocouple and an elastic strap on the right to hold the multimeter.
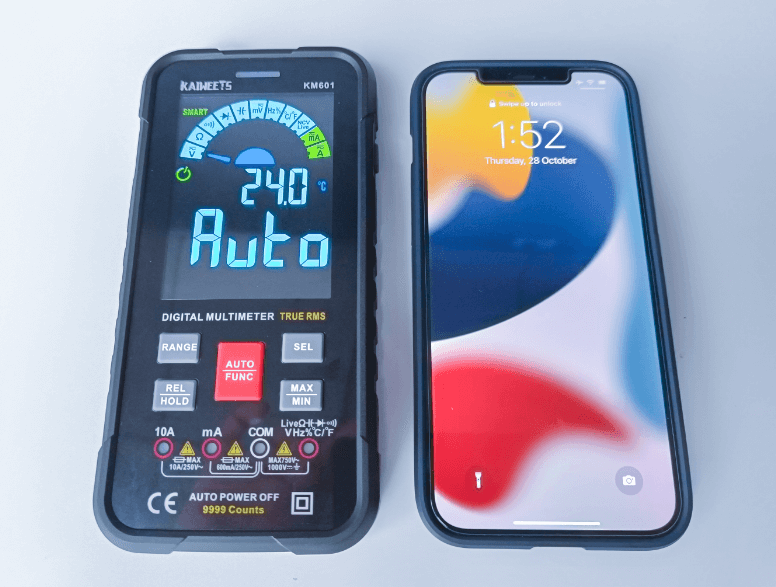
You might have seen multimeters before. The design of most of the multimeters, whether it costs $10 or $500, is almost the same with a LCD on top, a rotary knob in the center and connectors or jacks to insert probes at the bottom. If you look at the KAIWEETS KM601 Smart Digital Multimeter, its design is now here near that of a traditional multimeter. It is close to a modern-day smartphone with large LCD, flat front and back and even a flashlight. In fact, here is a side-by-side comparison of the KAIWEETS KM601 Multimeter and an iPhone 12 Pro.
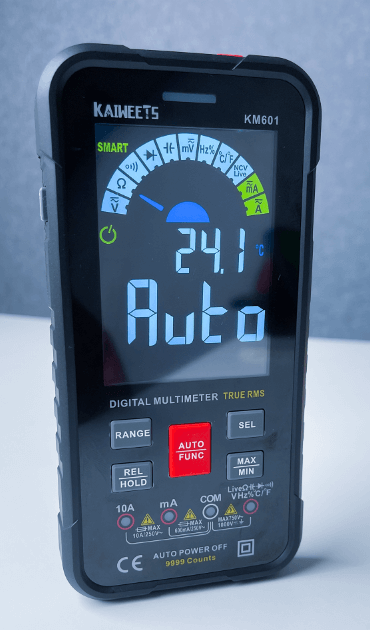
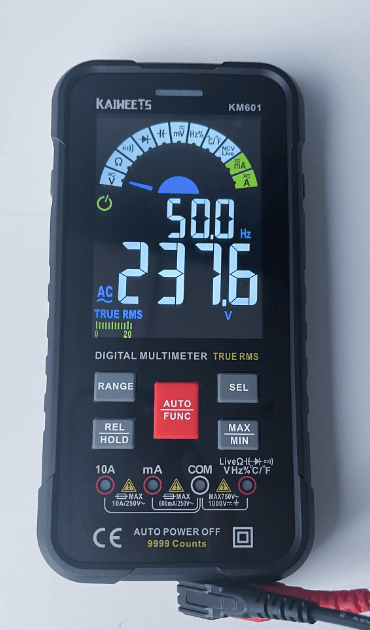
The large LCD Display is unique and functional. In the top of the display, there is a list of all the functions that the multimeter can measure. A needle points to the function that is currently being used.Next, it displays some secondary data such as temperature, duty cycle etc.
Then, we have the main reading section for displaying the quantity being measured. The number and text here are large and the data is clearly visible. At the bottom of the display, there is a bar graph to simulate an analog meter.

The LCD display is very good. Even after placing the meter flat on its back, we were able to see the needle pointing to the function as well as the actual data of the measured value.
Another main difference from traditional multimeters is the selector knob / dial. This multimeter doesn’t have one. Instead, it has 5 buttons to set the modes, ranges, etc. Using these buttons, you can select the function, set the range, hold any values, get minimum and maximum values.
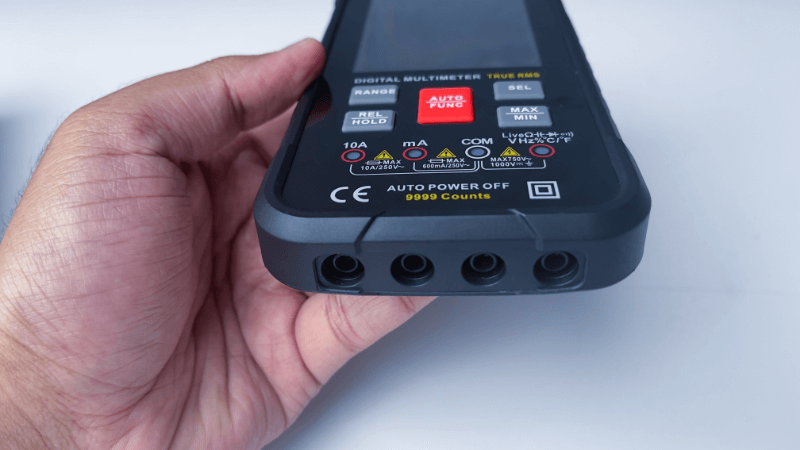
Just below the buttons, there are four LEDs corresponding to four ports i.e., main red probe port (voltage, resistance, capacitance, etc.), COM port, mA port and 10A Port. These LED will blink 5 times indicating which ports to use for a particular function. This is a nice little feature especially if you are a beginner and worried about damaging your meter.
Then at the bottom side of the multimeter, we have the four jacks / ports for plugging in the probes.They are standard jacks and can fit any professional / third party probes, if you are interested.
We are not a fan of probes at the bottom of the meter. It is difficult to use this meter standing due to this design. Even though the LCD is good and the information is visible when the meter is placed flat on the table, it would be better if the ports were placed in a traditional place.
Finally, we have three more buttons (one of top, one on left and one on right side) and a flashlight on the back of the meter. The button on the top is the main power button. Next to this button, there is the NCV (non-contact voltage) measurement port. The button on the left side will turn ON/OFF the flashlight.
The button on the right activates or deactivates auto power off feature. If this is enabled (indicated by a power symbol on the LCD), the meter shuts down automatically after 15 minutes of no usage.
In order to use the multimeter, you have to place the batteries in first. To do that,take out the meter from the back cover and remove the screw at the back, which is just below the flashlight. Then remove the battery cover and insert the batteries. Keep an eye on the polarity of the batteries before inserting and the ‘+’ and ‘–‘ signs are clearly printed in the slot.
The moment you insert the batteries (assuming correctly), the meter automatically turns on. Place the battery cover and screw it. Also, apply the silicone cover to the multimeter as it will protect the meter against scratches.
As the meter is already turned on, the LCD displays ‘Auto’ in the center and ‘SMART’ on the top left corner and the needle toggles between Voltage, Resistance and Continuity modes.
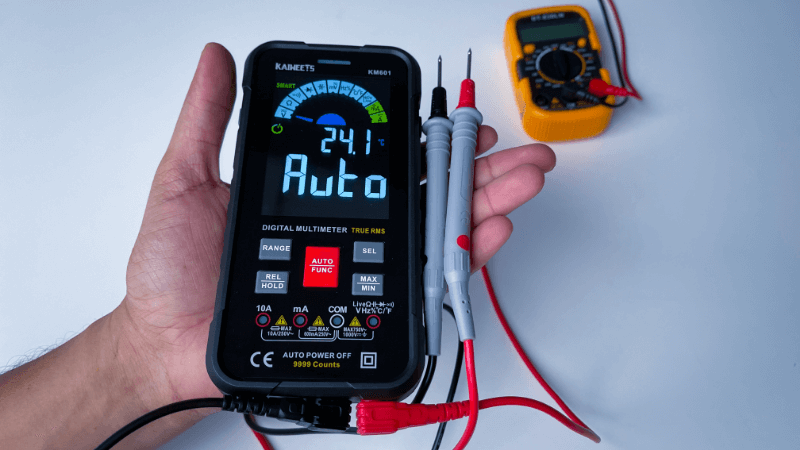
What this means is that the meter is smart enough to automatically set the function based on the quantity we measure (only between these three functions). It also displays the ambient temperature just above the ‘Auto’ sign.
Let us now proceed with using the multimeter and testing its ‘Smart’ functionality. In the smart mode, the meter can automatically detect between AC Voltage, DC Voltage, Resistance and Continuity.
All you have to do is insert / connect the probes to the test points and the meter automatically select the appropriate function and display the measured value. We tested with AC mains voltage, couple of batteries (18650 and AAA NiMH), a bunch of resistors and also continuity. The meter correctly detects the quantity being measured and displayed the result on the screen.
If the resistance is less than 50Ω, the meter detects it as a short and starts the buzzer. It continues to display the resistance even when the buzzer is on during continuity.
Apart from being a smart meter, the KAIWEETS KM601 Smart Digital Multimeter is essentially an auto-ranging multimeter. Which means, you simply have to select the function to measure the quantity and the meter will automatically set the range of measurement.
Unlike traditional auto-ranging meters, which have a rotary switch to select the function, the KAIWEETS KM601 Multimeter has buttons to do the selection and other stuff as well. There are 5 buttons dedicated for user interface. The buttons are labeled as follows: AUTO / FUNC, RANGE, REL / HOLD, SEL, MAX / MIN.
The names of the buttons are pretty self-explanatory. When powered ON, the meter is in Smart mode. In this mode, if you press the ‘AUTO / FUNC’ button, you will enter into manual mode and you will be able to select the appropriate function by clicking the ‘AUTO / FUNC’ button.
In manual mode, you can set the range manually if you want using the ‘RANGE’ button. The ‘REL / HOLD’ button will hold the current value on the screen until you press it once again. Some functions have dual modes. For example, voltage measurement has AC as well as DC voltage measurement. So, after entering manual mode and select the right function, you can select the sub-function using the ‘SEL’ button.
All these buttons and functions with manual ranging and function selection might seem a little bit confusing at the beginning. But play with the meter just for a couple of days and you will become familiar with the buttons and functions. It is really easy to understand the operation.
Finally, you can check for the maximum and minimum values that the meter has measured until now using the ‘MAX / MIN’ button. To go back to regular readings, long press the ‘MAX / MIN’ button.
After testing out the ‘Smart’ feature of the multimeter and learning about all the buttons, we next moved to use the multimeter in manual mode for testing out all the functions. We tested a bunch of components, voltages etc.
Measuring voltage, current (we tested only milliamps), resistance, capacitance, diode drop out is a breeze to this meter. We are extremely satisfied with the performance. There is a minor lag when measuring stuff but we can allow it considering its price and performance.

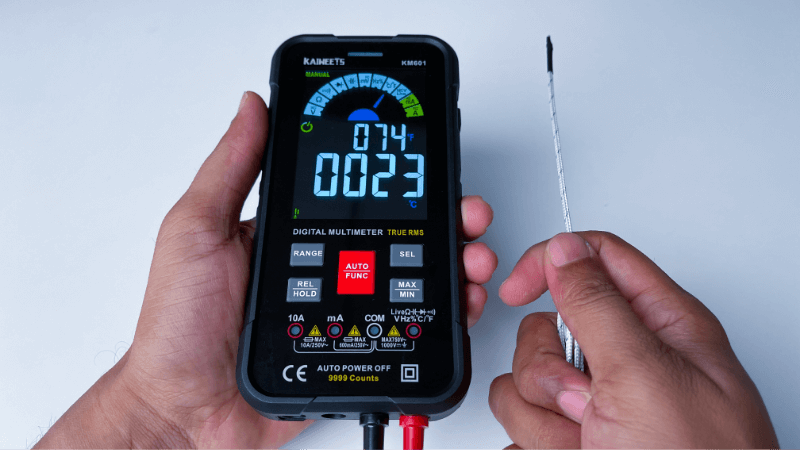
Apart from measuring the basic parameters such as voltage, current resistance, etc., the KAIWEETS KM601 Multimeter can also measure temperature, NCV (non-contact voltage) and live voltage detection, frequency and duty cycle measurement. As mentioned earlier, the package comes with a thermocouple, which can be used to measure the temperature if an object.
If the thermocouple is not attached to any object, it will measure the ambient temperature. Coming to frequency and duty cycle, it can measure frequencies up to 10MHz, which is great. Also, if you are measuring AC voltage, it displays the frequency of the AC signal.
Finally, the NCV and Live wire detection. For NCV, you don’t need any probes. Just put the meter in ‘NCV’ mode and place the NCV probe on the top near the testing point (wire, socket, stud, etc.). If the meter detects any voltage, the buzzer starts with its intensity depending on the level of voltage and also the indication LED above the LCD will change from Green (mild detection) to Red (significant detection).
For live wire detection, remove the black probe and keep only the red probe connected to regular jack (which is also marked Live). Then select the ‘LIVE’ function by pressing ‘SEL’ when the function is ‘NCV’. Now insert / touch the red probe to the test point. Again, depending on the intensity of the signal, the buzzer’s beeping intensity will change and also the indicator LED change colors.
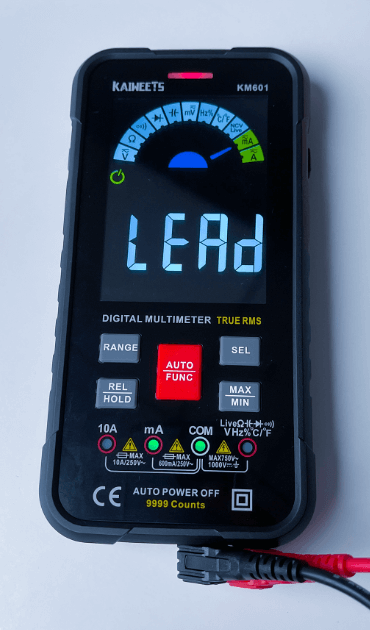
Another useful feature of the meter is indication of correct probes based on the selected function. For example, if you are in ‘Smart’ feature, you can only measure AC / DC Voltage, Resistance and Continuity. So, the LEDs corresponding to Voltage measurement and COM port will blink 5 times.
If you are measuring current, the meter again blinks the appropriate LEDs and if the red probe is not inserted into the current measuring jack (mA or 10A, depending on the selected function), the indicator LED will light up in red in color and the LCD display ‘leads’ message indicating that probes are not inserted correctly or entirely. This is a nice little feature, which is very useful for beginners.
Both the current measurements are protected with respective fuses (600mA and 10A). But the thing we didn’t like is that in order to access these fuses, you have to completely remove the back cover (not only the battery cover but also additional back cover).
At just $45.99, the KAIWEETS KM601 Smart Digital Multimeter is a bang for the buck product. The performance and features they provide dat this price point are amazing. There are many entry level multimeters in the market, but we feel that the KAIWEETS KM601 Meter has the potential to be an affordable beginner multimeter.
Overall, we liked the design, performance and price of the KAIWEETS KM601 Smart Digital Multimeter. The smartphone like formfactor, nice and large LCD display and an extraordinary performance of the KAIWEETS KM601 meter is definitely a standout among other ‘entry level’ meters. The provided probes and thermocouple are very good and even the carry case is strong and sturdy. There is definitely room for improvement such as the positioning of the ports at the bottom (we agree that it is a design choice that has to be made for a compact formfactor), hard to access fuses and better input protection with MOVs. But considering the price, performance and its target users, the KAIWEETS KM601 Smart Digital Multimeter is very good entry level and beginner multimeter.
Get great content that you love. No ads or spams, we promise.
How To Guides
Product Reviews
For Students
Get great content that you love.
No ads or spams, we promise.
Your Privacy is important to us
Copyright © 2024 Electronicshub.org