There are times when taking a screenshot of a running application becomes a necessity. It could be for educating someone, asking for help from someone, illustrating the ongoing process, and likewise. There are various methods available through which you can easily take a screenshot on Windows 10 without any issue. Depending on your requirements, you should select the method accordingly and get screenshots perfectly.
Methods For How To Take A Screenshot On Windows 10
Method 1: Press PrtScn Key
The easiest way of taking a screenshot on Windows 10 is by pressing the PrtScn key. The key is specifically designed to take screenshots. You can find the key on the top row of the keyboard, just beside the F12 key. In most keyboards, pressing the PrtScn key will do the job of taking a screenshot of whatever there is on the screen. However, there are some keyboards where you have to press Fn and PrtScn keys together to take screenshots.
Step 1: You should have on your screen whatever you want a screenshot of.
Step 2: Press the PrtScn key or Fn+PrtScn keys together as applicable on your keyboard.

Step 3: Open the Paint application from the Start menu.
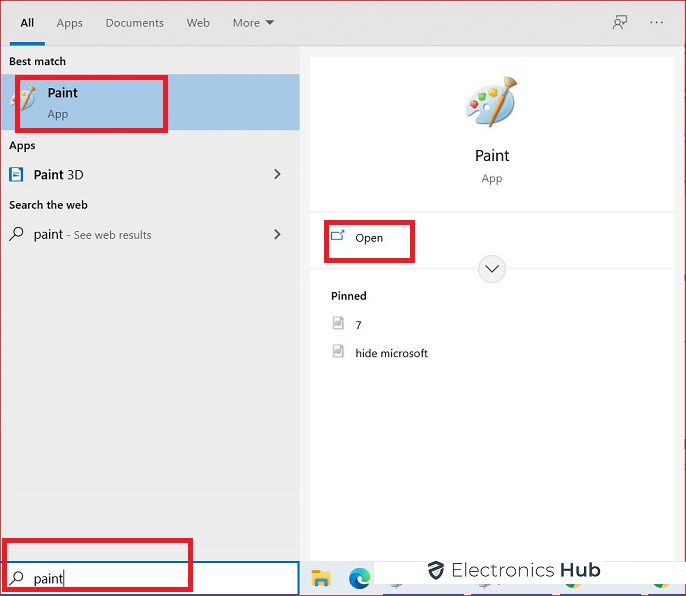
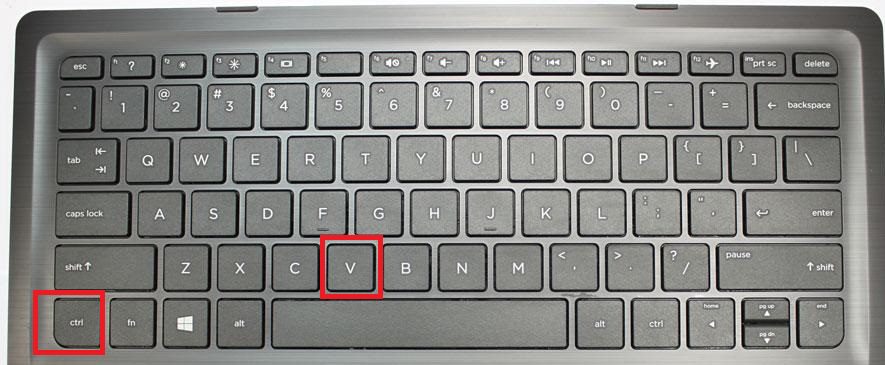
Step 4: Paste the screenshot you have taken that is currently saved in the computer’s memory by pressing Ctrl+V keys together.
Step 5: The screenshot will appear on Paint, where you can crop out parts as required.
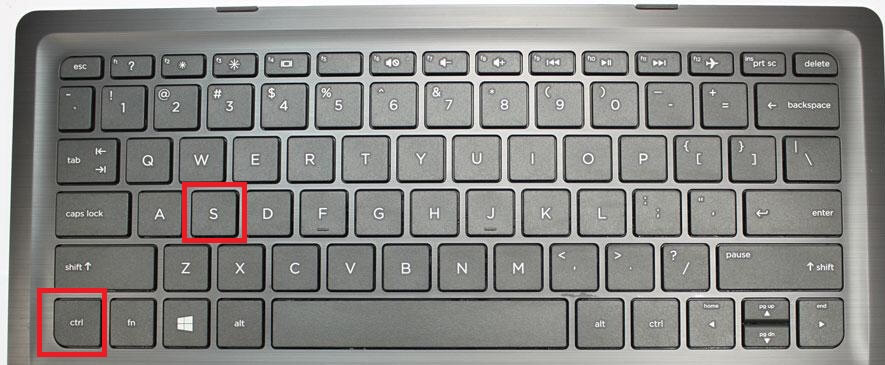
Step 6: Finally, save the screenshot on your hard drive by pressing Ctrl+S keys together. You can save on any desired location on your hard drive as well as in different file formats available.
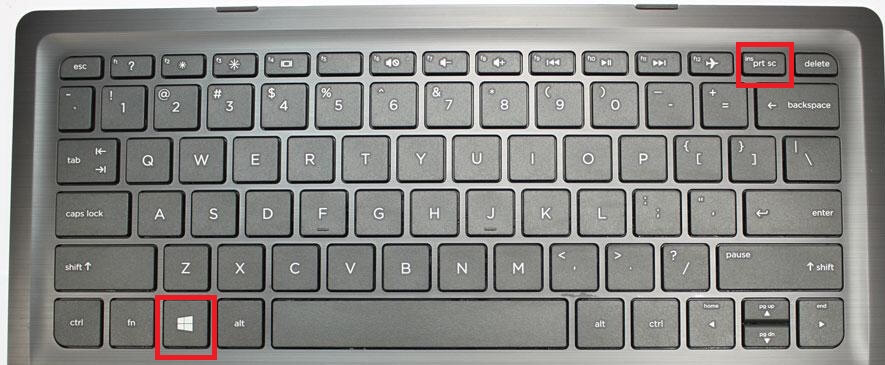
Method 2: Press Windows key + Print Screen
The fastest way of taking a screenshot on Windows 10 is by pressing the Windows+PrtScn keys together. This is because you do not need another application like Paint to paste and save your screenshot from the computer’s memory to your computer’s hard drive. The saving part is done automatically as soon as you press Windows+PrtScn keys.
Step 1: You should have on your screen whatever you want a screenshot of.
Step 2: Press Windows+PrtScn keys together. This will take a screenshot and save the file on your hard drive.
Step 3: You can view the saved screenshot by visiting the Pictures> Screenshots folder.
You can also open it directly from My Computer by visiting “C:\Users\Pictures\Screenshots”.

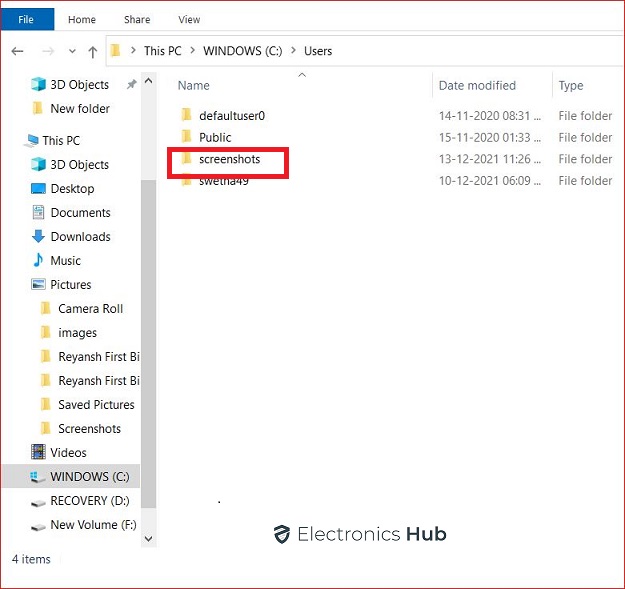
Note: The saved screenshot file is always going to be in PNG file format.
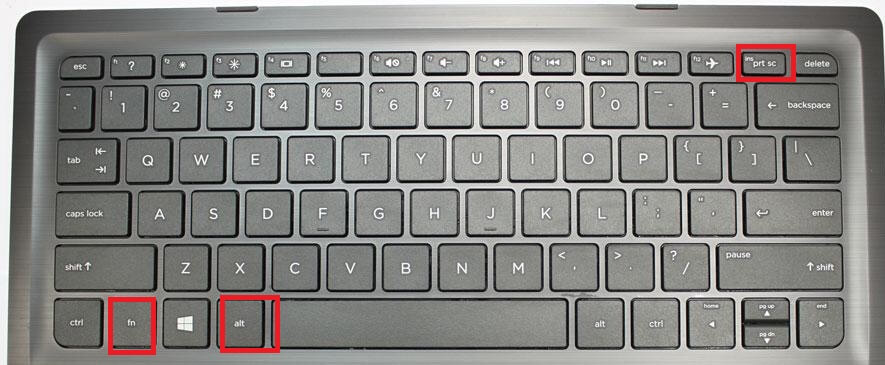
Method 3: Press Alt + Print Screen
There are times when you just need a screenshot of the currently opened window instead of the entire screen. Instead of taking a screenshot of the entire screen and cropping it out with photo editing software, you can achieve it instantly with the Alt-Print Screen combination.
Step 1: Open the window of which you want a screenshot and keep it the active window.
Step 2: Press Alt+PrtScr keys together. In some keyboards, you may have to press Alt+Fn+PrtScr keys together.
Step 3: Open the Paint application from the Start menu.
Step 4: Paste the screenshot by pressing the Ctrl+V keys together.
Step 5: Save the screenshot on your hard drive by pressing Ctrl+S keys together.
You can save it anywhere and in any available file format.
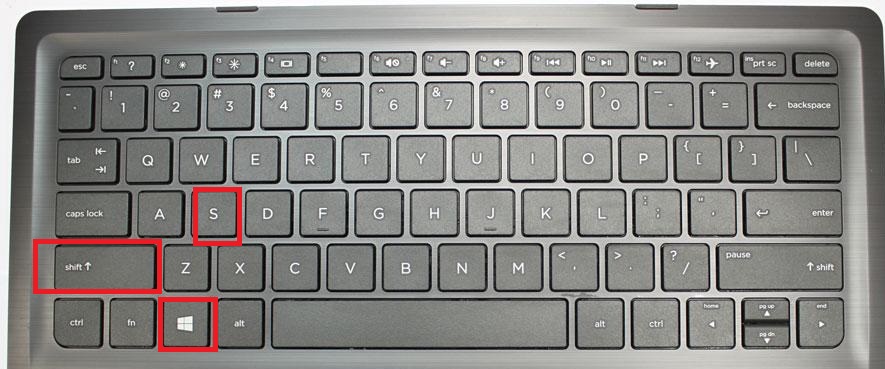
Method 4: Use Shift+Windows Key+S and Snip & Sketch
Windows 10 comes with an inbuilt tool to take screenshots instantly. The tool is called Snip & Sketch. The best part about the tool is that you can take a screenshot of any particular section of the screen instead of the entire screen or entire window. This is probably the best method of taking screenshots as there is no need for cropping.
Step 1: Prepare the screen of which you want the screenshot.
Step 2: Press Shift+Windows+S keys together to open Snip & Sketch. This will dim the screen and open a small bar at the top of the screen.
Step 3: With the mouse pointer, select the area on the screen whose screenshot you want. Thereafter, the selected area’s screenshot will be saved on the clipboard.
Step 4: Open the Paint application from the Start menu to save the screenshot.
Step 5: Paste the screenshot by pressing the Ctrl+V keys together to paste the screenshot from the clipboard.
Step 6: Press Ctrl+S to save the screenshot on any desired location on your computer in any available format.
You can also paste the screenshot from the clipboard to any other application as required.
Method 5: Use the Snipping Tool
The Snipping Tool is another screenshot-taking tool that has been available with Windows for many years now. Even though Microsoft has said that it would discontinue the tool and replace it completely with Snip & Sketch tool, it is still available. However, for the time being, it is available, and here are the steps to follow.
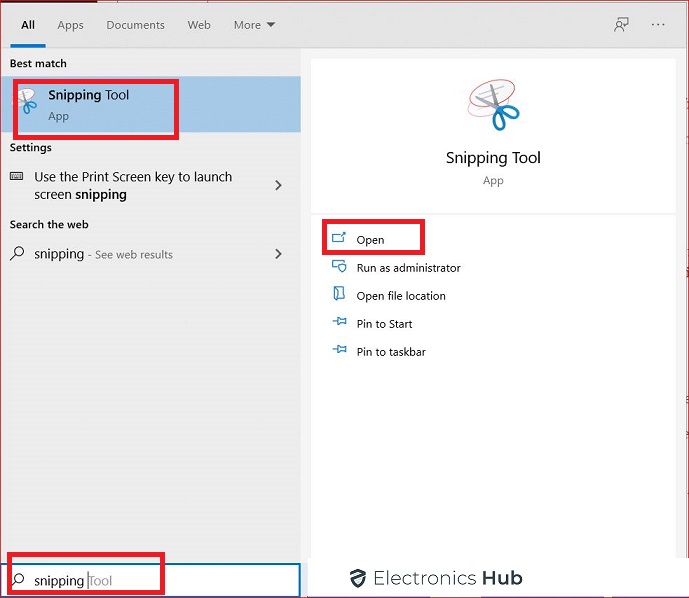
Step 1: Press Windows key and search with “Snipping Tool” and open it.
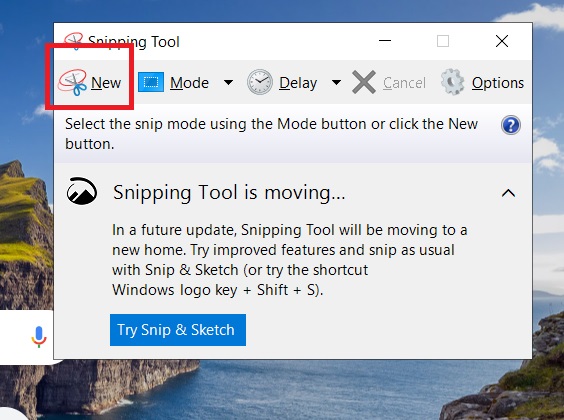
Step 2: Once Snipping Tool opens, click on New option.
Step 3: Thereafter, the screen will get dimmed, and you have to select the area whose screenshot you want.
Step 4: You will see the selected part on Snipping Tool. You can save the screenshot by pressing Ctrl+S and selecting the desired location on your hard drive.
You can explore the tool for various modifications and conveniences for taking screenshots.
Method 6: Use the Windows Game Bar
The above methods will not work when you are playing a game. To take screenshots while playing games, here are the steps.
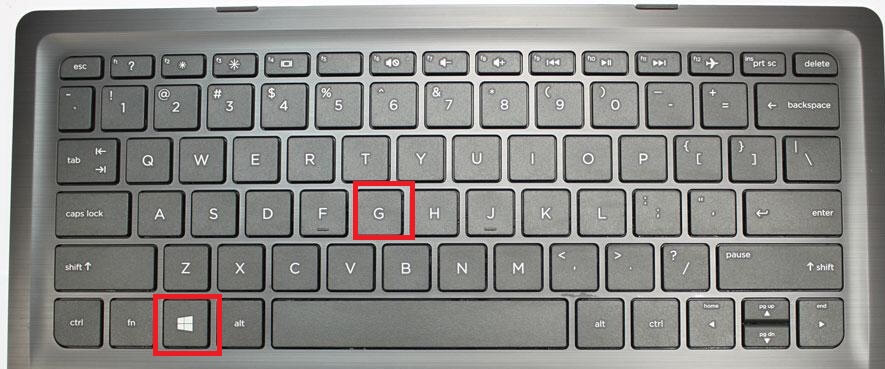
Step 1: Press Windows+G keys together. This will bring up the Game bar.
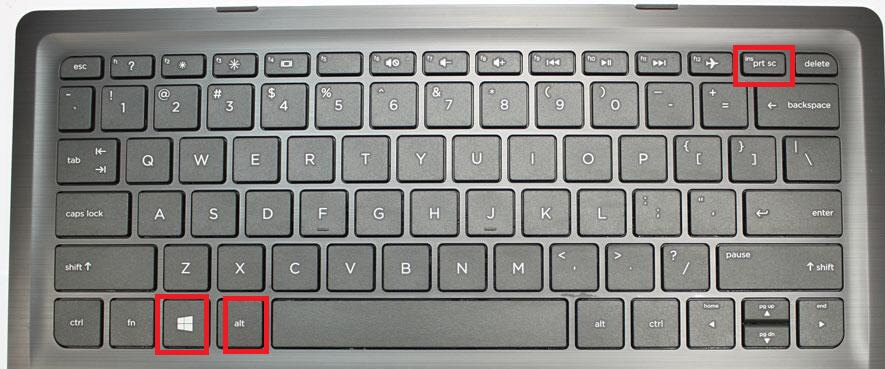
Step 2: You can click on Screenshot button on the Game bar. Otherwise, you can press Windows+ Alt+ PrtScn keys for taking a screenshot of the complete screen.
Step 3: You can also set your own shortcut key combination to take screenshots while playing games by visiting Settings> Gaming> Game bar.
From this Settings page, you can toggle on Record game clips, screenshots, and broadcast. In fact, you need to toggle the screenshot option here before you can take screenshots while playing a game.
Method 7: Use Snagit
If taking screenshots is a regular activity for you and you need these screenshots for professional purposes, we recommend you buy a third-party tool. We prefer SnagIt by Techsmith because of its features and functionalities. The application lets you take screenshots easily of any portion of the screen. Besides, you can edit those screenshots for a professional look. Most importantly, you can record videos and make them into Gifs. There is also a free trial option available which you can try out before purchasing the application.
Conclusion:
There are various methods available for taking screenshots on Windows 10. We have listed all the different methods, and you should also know all of them. This is because each one of them will come in handy in different scenarios. Therefore, go through all of them and put them into use as per situation and requirement.
