There is a healthy demand for personal storage servers and private cloud storage right now. Whether it is for home use (storing family photos, ripped DVDs/Blu-Rays, or files) or a small business use (storing and easy file sharing between multiple employees), people are storing information in multiple locations and one among them is a Network Attached Storage or simply NAS.
There are a handful of companies that make high-quality NAS devices and probably the most popular one is Synology. They offer a wide-range of storage servers catered for individual as well as commercial users. After some research, we invested in the Synology DiskStation 923+, a 4-Bay NAS from Synology. Our main requirement was to store video files (for our sister company) either from the office or from location of the shoot (remote access comes in handy for this).
How did the Synology DiskStation 923+ NAS Perform? How easy/difficult was the setup and installation process? Is the DSM as good as they say? Let us find out in this review of the Synology DiskStation 923+ NAS. We are writing this review after setting up, installing, and using the NAS for a week. We tested the ease of use, read/write speeds, remote access, and many other features. Continue reading to find more about the same.
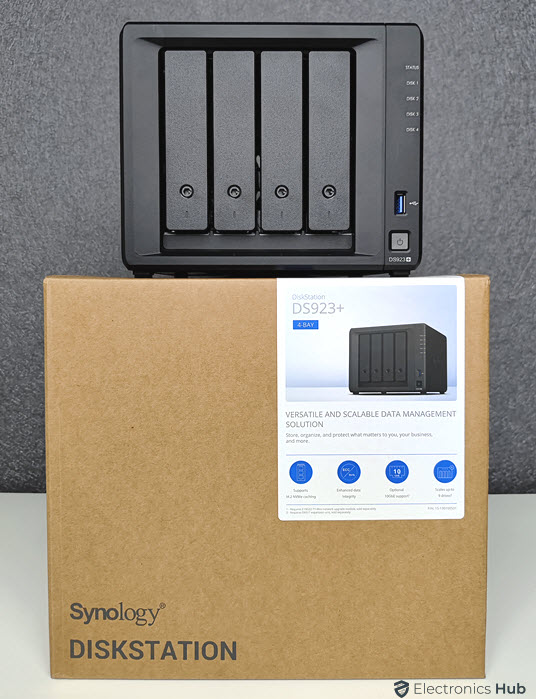
The NAS comes in a beautiful and strong cardboard box with an easy to carry handle on the top. Opening the box, we have two tiny boxes. The first box contains the main power cord. The second box has a bunch of essential accessories. We have the main power brick. It is “Synology” branded but ODM is EDAC Power Electronics.
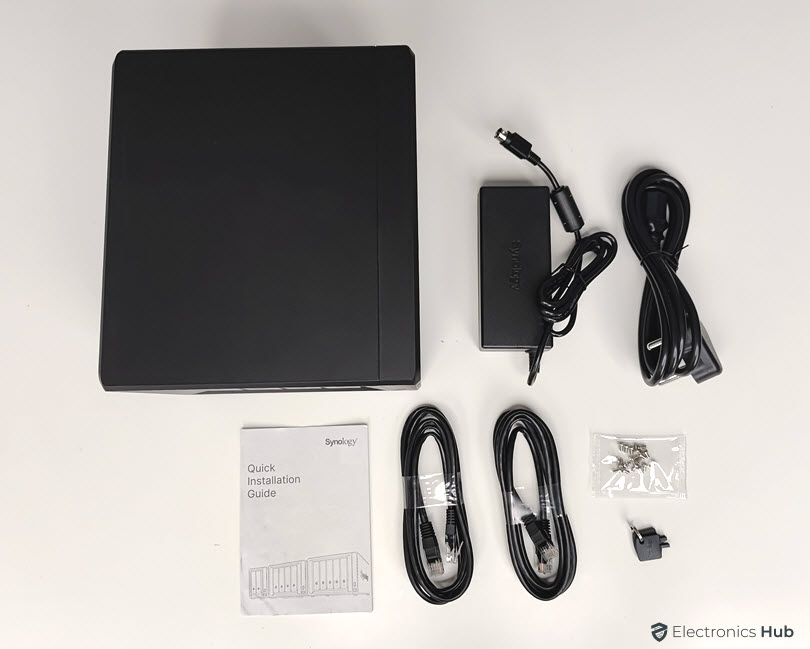
Next, we have a couple of CAT5e Ethernet Cables. You will see why we have two cables when we talk about the design of the NAS. Then there is a small bag with screws in it. There is a very minimal installation guide.
Keeping the accessories aside, after lifting a cardboard top, we have access to the main NAS unit. It is well packed in the box with protection on all sides. That’s it for the contents. We will talk more about the power supply and the NAS in the next section.
The power supply looks like a slightly larger laptop power supply. It doesn’t have a standard barrel jack for connecting to the NAS but a weird 4-pin connector. So, finding replacements (if you ever need one) might be difficult but not impossible.

The power supply takes universal mains input (100 – 240V AC, 2A @ 50 – 60Hz) and produces 12V ⎓ 8.33A. So, the maximum power from this unit is 100W.
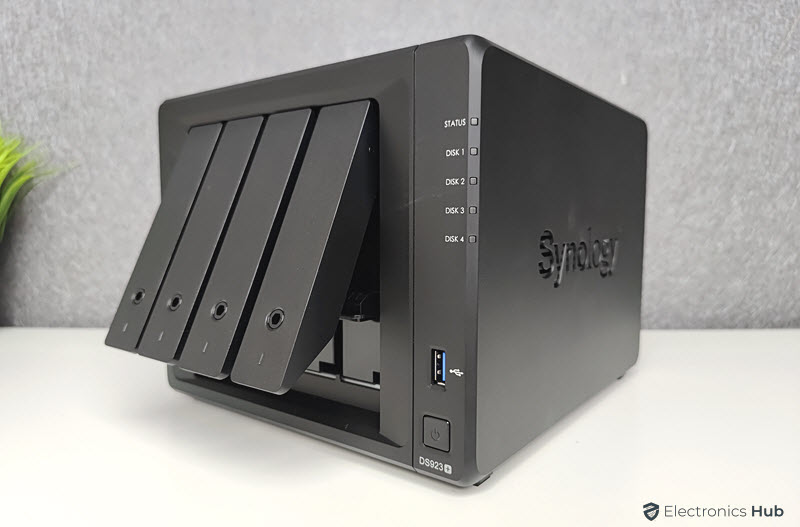
Next, we will look at the main NAS unit. The 923+ is a compact unit weighing just over 2.2 kg and dimensions of 166mm × 199mm × 223mm. On the front, we have the four drive trays that hold either 3.5” or 2.5” HDDs (or SSDs). Right to that, on the top, we have the system status LED and four drive status LEDs.
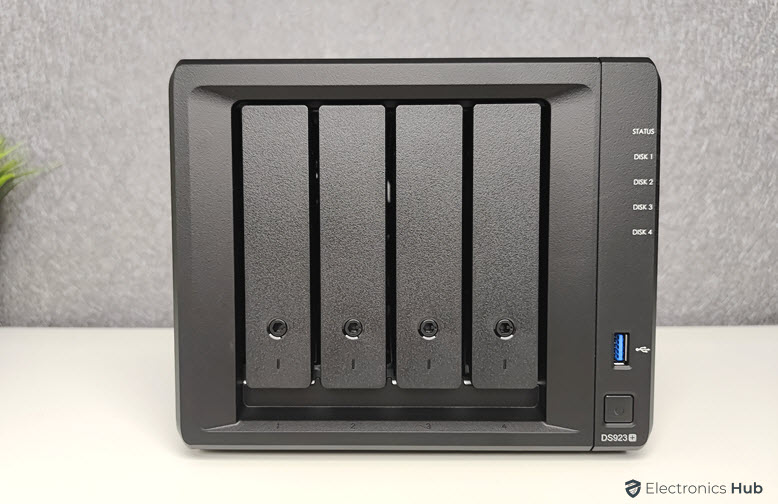
Still on the front side, the bottom right has a USB 3 Port (up to 5Gbps) and the main power button with integrated blue LED. There is a large Synology branding on both sides of the NAS. Turning to the back of the NAS, we have two large 92mm fans on the top. Below that, we have two 1GbE LAN Ports. You can use both these ports in Link Aggregation mode to increase the access speed or use it as a failover switch. You can see a tiny hole next to the LAN ports. It consists of the reset button.
Next, there is an eSATA port for connecting an Expansion Unit (DX517). Then we have the power port. There is a tiny slot with screws next to these ports. You can upgrade the LAN port of your NAS by inserting a 10GbE NIC (optional accessory). There is also a Kensington Security Port, if you want to secure your NAS.
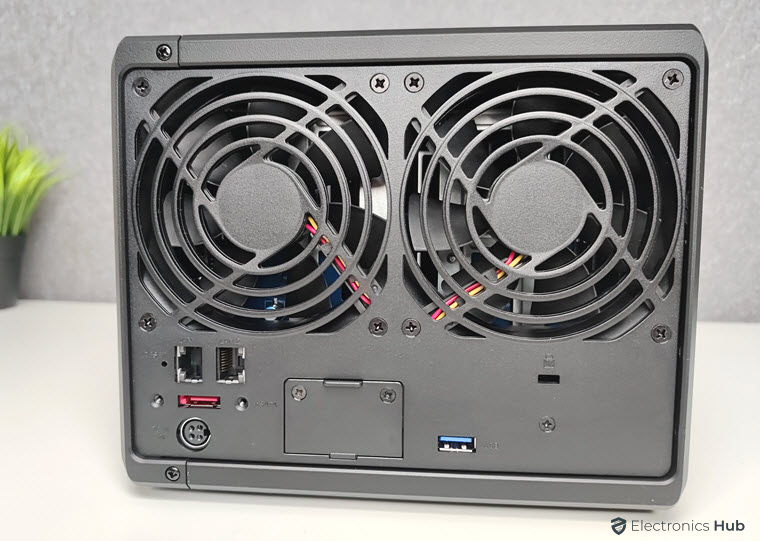
Just right to the network upgrade slot, we have another USB 3 Port (up to 5Gbps). There is also a Kensington Security Slot to secure the NAS. We are not done yet. If we take a look at the bottom of the NAS, we have two slots to insert M.2 NVMe SSDs. On the inside (you have to remove all the drive trays), you can see two RAM slots, of which one is already populated with 4GB RAM. You can expand the RAM up to 32GB.
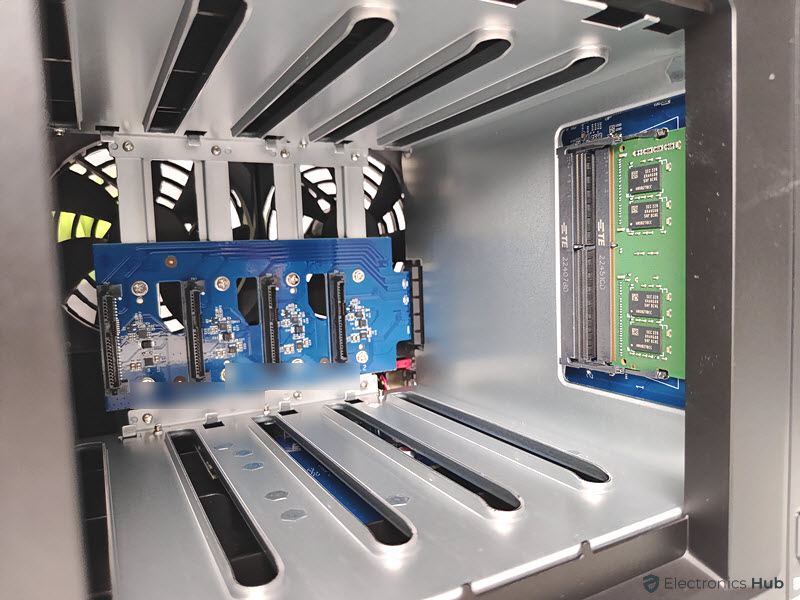
The design of the Synology DiskStation 923+ NAS is simple. Four drive trays in the front, couple of cooling fans and some IO Ports on the back, slots for NVMe and RAM. There isn’t much to talk about the physical or mechanical aspects of the NAS.
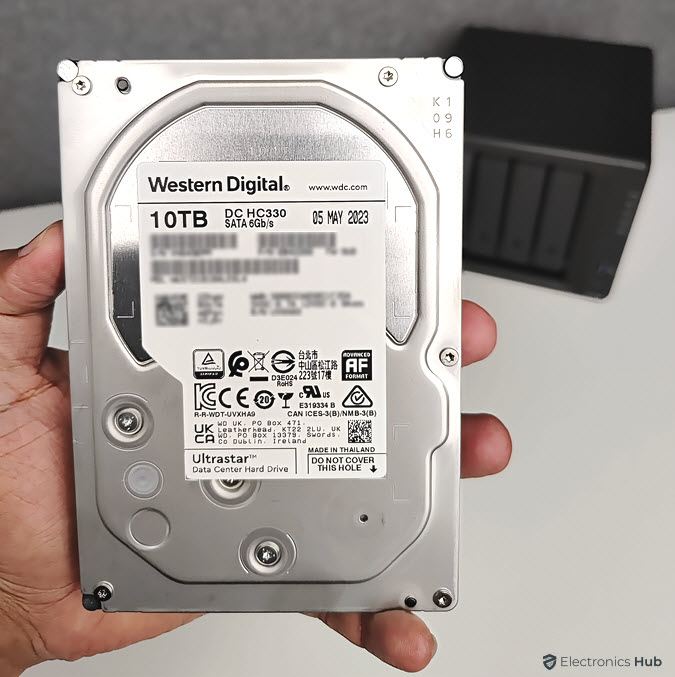
Before setting up, we would to talk a little bit about the HDDs we chose for this NAS. Instead of “NAS specific” WD Red or Seagate IronWolf drives, we opted for WD UltraStar drives. They run a little bit louder than the other options (as they can ramp up to 7,200 RPM) but have better performance and importantly costs less. We got four 10TB WD UltraStar SATA HDDs to pair with the DS923+.
That said, the first step is to install the HDDs. We can do this just be pulling the trays out, snapping out the side panels, inserting the drives in the trays and snapping back the side panels. Once you prepare all the HDDs and trays, you can insert them one by one and close the drive trays.
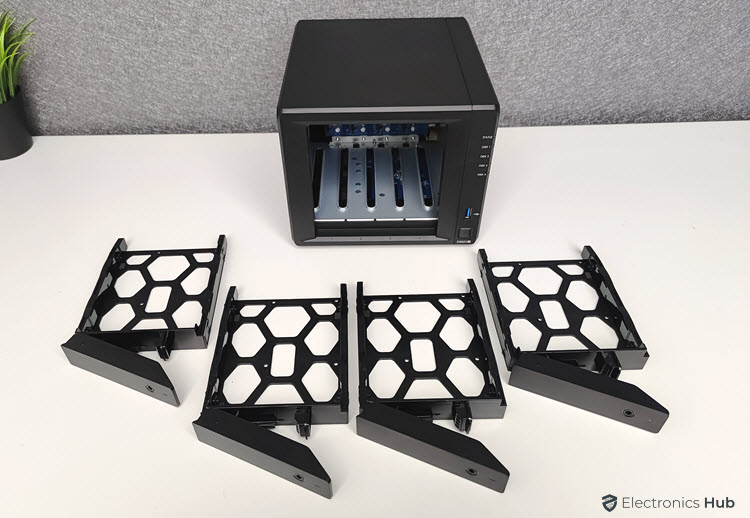
If you are using 2.5” HDDs (or SSDs) for some reason, you have to secure those drives to the tray using the screws that came in the accessory box.
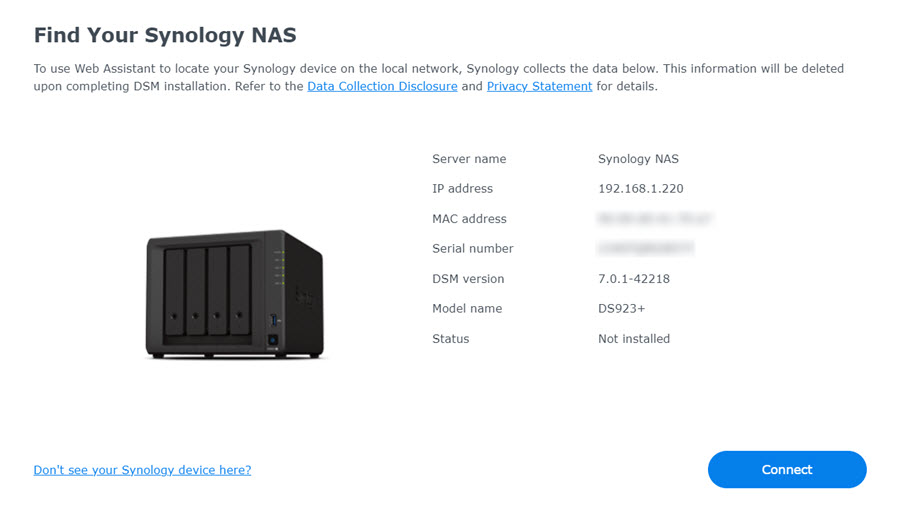
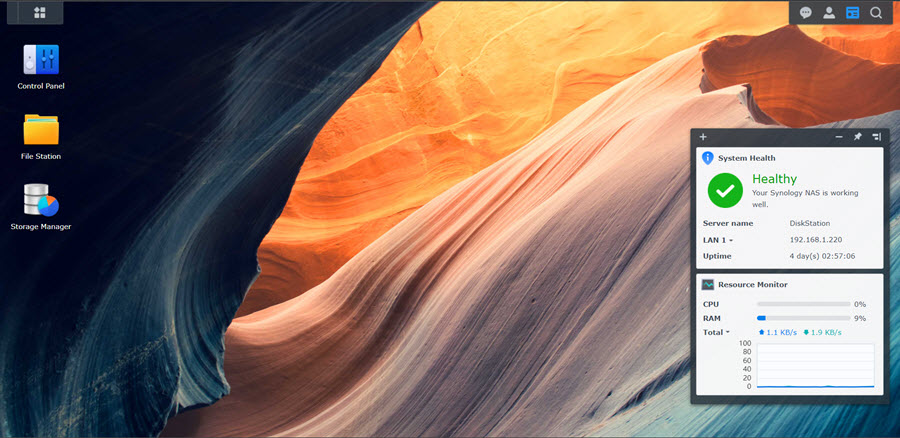
Next, connect the power supply and the ethernet cable to the NAS and switch the unit on by pushing the power button. After a minute or two, the LEDs on NAS becomes stable. Now, we have to open a browser (on a computer that is connected to the same network as the NAS) and go to the URL “find.synology.com”. The latest version of the DSM is completely web-based and you don’t have to do anything other than looking for your device through the web interface.
Now, the web UI detects the NAS and displays some basic information such as the model, serial number, etc. The important thing here is the status must say “Not installed” as this is the first time we are installing the DSM OS. The entire setup process is butter smooth and all you have to do is follow the on-screen instructions.
In less than 10 minutes, the NAS will install the software and you can enter DSM OS. The first step is to create storage pool and volume. You can explore and access the web UI very easily.
The star of the show is the DiskStation Manager (DSM) OS by Synology. It is one of the best (if not the best) NAS software available right now. Over the years, Synology fine-tuned the OS and the user experience to make it easy to operate, navigate, and control the NAS. The current version of the software is DSM 7.2.
Creating users, groups, shared folders, etc. is a breeze in the DSM. Apart from the essential stuff, the DSM also has provision for installing packages (or apps). Some are Synology apps such as Office, Photos, etc., while there are also some useful open-source apps such as Git Server, Apache HTTP Server, WordPress, etc.
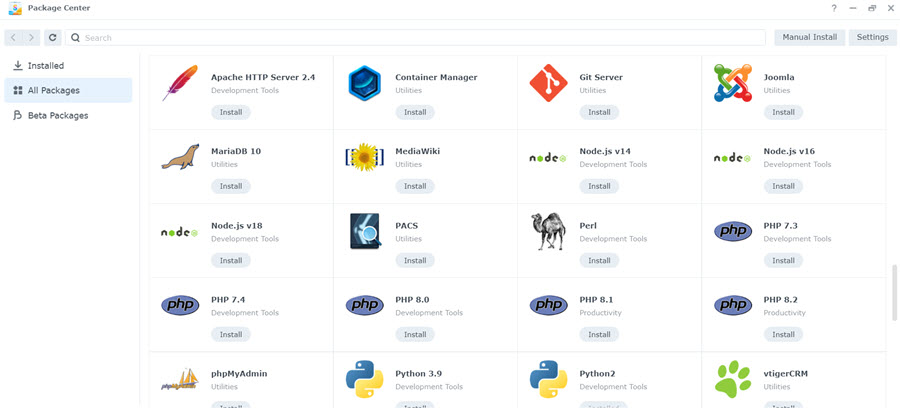
Then there are some packages from third-party developers. Plex Media Server and TeamViewer are a couple of popular apps for Synology NAS. You can look at the list of apps that your NAS supports and install them. On a whole, the DSM Software of Synology NAS is very easy to use and operate.
So, how does the Synology DiskStation DS923+ NAS perform in real-world usage? In our testing, we were extremely happy with the performance of the DS923+ NAS. As our requirement was dumping a bunch of video footage, we uploaded all the existing video files and we did not face any issues.
Once you install the hard drives in the trays, we recommend you to lock the hard drive tray so that you won’t accidentally pull the tray out while the NAS is operational.Also, don’t take the hard drive immediately after shutting the NAS down. Wait for a couple of seconds before removing.
While the data storage and transfer abilities of the DS923+ NAS are very good, the lack of an integrated graphics card in the AMD Ryzen R1600 CPU means you don’t get the benefits of hardware transcoding with this NAS. So, if you plan to use your NAS, especially the Synology DiskStation DS923+ for running a Plex Media Server, then you will be disappointed. All the transcoding is done through software and for anything with over 1080p, you can see it struggling.
It might look like a simple feature but the two 1GbE LAN Ports on the DS923+ support link aggregation. The setup process was really easy and we enabled it right away to increase the speed of the NAS. We haven’t got a chance to test the NVMe cache option yet, but we believe that it will definitely increase the access speeds.
The selling price of the Synology DiskStation DS923+ NAS is $598. Synology backs the product with a 3-year warranty (with an option of extending for additional 2-years). This price is a little bit high, especially when you compare with NAS options from competitors who offer better connectivity (2.5GbE LAN ports for example). But the software of Synology is what makes the DS923+ a worthy contender.
Overall, we really liked the combination of hardware and software of the Synology DiskStation DS923+ NAS. The setup was very simple right from installing the hard drives in the drive bays to the web-based installation of the DSM OS.
Speaking of which, the standout part of the whole Synology NAS experience was definitely the DSM Software. It has a straight-forward web UI for installation as well as operation.
On the hardware size, the AMD Ryzen R1600 Dual Core CPU does a decent job of handling the data transfer tasks. The sad part about this CPU is it doesn’t have an integrated GPU. This means the media performance is poor, especially hardware transcoding. But for data storage applications, it is a capable system. While the DS923+ has two 1GbE LAN Ports that support link aggregation, competitors are offering 2.5GbE LAN Ports in the same or even less price point.
If you are looking for an entry to mid-level NAS for safe and secure storage and access by multiple users, the Synology DiskStation DS923+ is a good place to start. While the hardware is decent, the software part is way better than any other NAS systems in the market right now.
Get great content that you love. No ads or spams, we promise.
Projects
Get great content that you love.
No ads or spams, we promise.
Your Privacy is important to us
Copyright © 2024 Electronicshub.org