In this tutorial, we will learn about one of the important concepts in Embedded Programming i.e. the Bitwise Operations or Bit-level Operations. The Bitwise Operators in the C Programming Language are the backbone for these operations. I will show you how can you use the Bitwise operators in Microcontroller Programming for easy bitwise manipulations.
IMPORTANT NOTE: A prior knowledge in binary number system and hexadecimal number system is required to work with bitwise operators in Microcontroller Programming.
Introduction
If you are familiar with Microcontrollers, then you might be probably aware of Bitwise Operators in Microcontroller Programming. In an 8-bit Microcontroller like 8051 for example, a group of 8 pins combined to form a Port. The reason for grouping the pins into ports is to make it easier for programming as you can manipulate 8 pins when working at a Port level.
But what if you want to control individual pins of a Port. Then you have to make use of Bitwise Operators in Microcontroller Programming. Using six bitwise operators, you can perform some of the important bit manipulations like Setting a Bit, Clearing a Bit, Toggling a Bit, Testing a Bit, Extracting a Bit and Monitoring a Bit.
Basics of Bitwise Operators
Now, let us get started with some basics of Bitwise Operators. As the name suggests, bitwise operators are used for manipulating data at bit level. Bitwise operators can be used with integers and cannot be applied to other data types like float or double (well, at least not directly).
Decimal integers are converted to binary i.e. a sequence of 1’s and 0’s and the bitwise operators work on this data bit by bit starting from the LSB (the least significant bit at the far right) and work towards the MSB (the most significant bit at the far left).
Different types of Bitwise Operators
Basically, there are six types of Bitwise Operators. They are:
- Bitwise OR – Denoted by ‘|’
- Bitwise AND – Denoted by ‘&’
- Bitwise XOR – Denoted by ‘^’
- Bitwise NOT – Denoted by ‘~’
- Bitwise Right Shift – Denoted by ‘>>’
- Bitwise Left Shift – Denoted by ‘<<’
Before understanding each of these operators in detail, let us quickly take a look at truth table for Bitwise AND, OR and XOR operators. The following table shows the truth table for Bitwise AND, OR and XOR operators with two operands.
| OP1 | OP2 | OP1 | OP2 (OR) | OP1 & OP2 (AND) | OP1 ^ OP2 (XOR) |
|
0 |
0 | 0 | 0 |
0 |
|
0 |
1 | 1 | 0 |
1 |
|
1 |
0 | 1 | 0 |
1 |
|
1 |
1 | 1 | 1 |
0 |
Let us now take a closer look at all the six Bitwise Operators used in Embedded C Programming.
Bitwise OR – ‘|’
The bitwise OR is denoted by the symbol ‘|’. The result of the Bitwise OR is ‘1’ when any bit is ORed with 1 and the result of bitwise OR is same as the bit when it is ORed with 0. Consider two 4-bit numbers A = 1100 and B = 1001. The bitwise OR of these two numbers will be as follows:
|
Bit Position -> |
3 | 2 | 1 |
0 |
|
A = 1100 |
1 | 1 | 0 |
0 |
|
B = 1001 |
1 | 0 | 0 |
1 |
|
A | B |
1 | 1 | 0 |
1 |
Each bit from the LSB of a number is ORed with the corresponding bit in the other number. For example, the 0th bit of A is 0 and the 0th bit of B is 1. 0 | 1 is 1. This has to be repeated for all the bits.
Bitwise AND – ‘&’
The bitwise AND is denoted by the symbol ‘&’. The result of the Bitwise AND is ‘1’ only when both the operands are 1. Otherwise, the result of bitwise AND is 0. Consider the same two 4-bit numbers as in the previous example i.e. A = 1100 and B = 1001. The bitwise AND of these two numbers will be as follows:
|
A = 1100 |
1 | 1 | 0 |
0 |
|
B = 1001 |
1 | 0 | 0 |
1 |
|
A & B |
1 | 0 | 0 |
0 |
Bitwise XOR – ‘^’
The bitwise XOR is short for Exclusive OR and is denoted by the symbol ‘^’. Bitwise XOR is an important operator in Microcontroller Programming.
When a bit is XORed with 0, then the result is equal to the bit itself i.e. if 0 is XORed with 0 then the result is 0 and if 1 is XORed with 0, then the result is 1.
When a bit is XORed with 1, then the result is toggled i.e. if 0 is XORed with 1, then the result is 1 and if 1 is XORed with 1, then the result is 0.
Consider the same two 4-bit numbers as in the previous example i.e. A = 1100 and B = 1001. The bitwise XOR of these two numbers will be as follows:
|
A = 1100 |
1 | 1 | 0 |
0 |
|
B = 1001 |
1 | 0 | 0 |
1 |
|
A ^ B |
0 | 1 | 0 |
1 |
Bitwise NOT – ‘~’
The bitwise NOT is denoted by the symbol ‘~’ and is the only Unary Bitwise Operator in the bunch i.e. it requires only a single operand (while all the other Bitwise Operators require two operands).
Bitwise NOT operator is also called as Negation or Complement. Since it is a Unary Operator, the Bitwise NOT of 0 is 1 and the Bitwise NOT of 1 is 0.
Now, consider a 4-bit number A = 1011. The bitwise NOT of this number is 0100.
|
A = 1011 |
1 | 0 | 1 |
1 |
|
~ A |
0 | 1 | 0 |
0 |
Bitwise Shift Operators (Left Shift ‘<<’ and Right Shift ‘>>’)
Finally, there are two shift operators i.e. Left Shift and Right Shift and they are represented by ‘<<’ and ‘>>’ respectively. First let us understand the left shift operator. The left shift operation is represented as follows:
Operand << n
What this means is shift the bits of the ‘Operand’ to the left by the number of positions specified by ‘n’. The left most ‘n’ bits will be discarded and ‘n’ number of zeros will be appended on the right. For example, consider the following example.
11101100 << 2 will result in 10110000
Similarly, a right shift operation is represented as follows:
Operand >> n
Consider the following right shift example.
10010111 >> 4 will result in 00001001
Bitwise Operators in Microcontroller Programming
Now that we have seen a little bit about Bitwise Operators in C, let us now understand how we can use these bitwise operators in Microcontroller Programming. For the purpose of demonstration, I am using an 8-bit Microcontroller as an example. But the same implementation can be applied to 32-bit Microcontrollers as well.
When working with microcontrollers, we often modify, read and update its registers. But it is a bad practice to directly assign values a register. For example, if you remember in 8051, there is an SFR called IE (short for Interrupt Enable) Register.
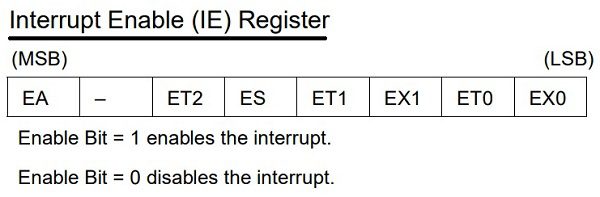
The individual interrupts can be enabled or disabled by setting or clearing the bit in the IE SFR. We have to perform this operation in such a way that only the selected bit must be affected while all the other bits must retain their intended status. Bitwise Operations will be very useful in such scenarios. Let me explain some of the common Bitwise Operation that we implement in Microcontroller Programming.
Setting a Bit
The first operation is Setting a Bit i.e. making the bit as 1. For example, consider the following 8-bit data named REG.
REG = 10001111
Now if we want to ‘Set’ the 6th bit, then we can simply perform the following operation.
First, left shift 1 by 6 i.e. 1 << 6. This will result in 01000000. Now OR this value with the value of the REG and assign it back to REG.
REG = REG | 01000000;
The final value of REG is 11001111. The above operation can be implemented in a single line as follows:
REG = REG | (1 << 6) ;
or even simplify it as
REG | = (1 << 6) ; // Set bit 6
In this way, we can set the desired bit without disturbing the other bits.
Clearing a Bit
Now, assume you want to clear the 5th bit in the data REG = 10110000. First, left shift 1 by 5 i.e. 1 << 5. The result is 00100000. Now, perform a Bitwise NOT operation on this value.
~ (00100000) = 11011111.
Finally, perform a Bitwise AND (&) operation between this value and the value of REG.
REG & (11011111) = 10110000 & 11011111 = 100100000. Only the 5th bit is cleared. The entire operation can be implemented in a single line as follows:
REG & = ~ (1 << 5) ; // Clear bit 5
Toggling a Bit
Now, let us see an example of toggling a bit i.e. if the bit is 0, then make it as 1 and if it is 1, then make it as 0. If you remember the Bitwise XOR operator, then you can use this operator to perform this task.
Consider the value of REG as 00110010. Now, if you want to toggle 4th bit, then simply XOR the 4th bit with 1. For this, first left shift 1 by 4 i.e. 1 << 4 and then XOR with REG.
REG ^ = (1 << 4) ; // Toggle bit 4
The above three Bitwise Operations are related to Bit Manipulations i.e. the bit is either Set, or Cleared or Toggled. The next three operations are related to the status of the bit and do not modify the bit.
Testing a Bit
Now, consider a situation where you need to perform some operation depending on the value of the bit i.e. if the bit is 0 then perform a set of instructions and if the bit is 1, then perform a different set of instructions. Here, we are actually Testing for the value of the bit.
if (REG & (1 << 5) != 0)
{
…
…
}
In the above example, the if statement is executed only if the 5th bit of REG is 1.
Extracting a Bit
Using the similar method as Testing a Bit, we can Extract a Bit or a set of Bits from a data. For example, let REG = 11010101. Now, if you want to extract a single bit in position, say 3, for example.
Then, we can extract the 3rd bit into another variable (let us called EXTD) as follows.
EXTD = REG & (1 << 3) ;
Now, if we want to extract a set of bits, say from 3 through 6. So, first, we have to mask the bits from 3 through 6. Hence, the mask value becomes 01111000.
Then we can extract the desired bits using two methods.
Method I
EXTD = (REG & 01111000) >> 3 ;
Method II
EXTD = (REG >> 3) & 1111 ;
Monitoring a Bit
The final Bitwise Operation generally used in Microcontroller Programming is to Monitor a Bit. This is very important in Embedded Programming as we often need to check or Monitor the status of some bits in a register of a Microcontroller. For example, the interrupt flag bits, which are usually set by the hardware, must be monitored and proceed with ISR execution.
If you want to monitor a bit, say 3rd bit for a change from 0 to 1, then you can use the following code.
while ( REG & (1 << 3) )
{
…
…
}
Similarly, if you want to monitor for a change from 1 to 0 in the 3rd bit, then you can use the following code.
while ( ~(REG & (1 << 3)) )
{
…
…
}
Conclusion
In this tutorial, we have seen the basics of Bitwise Operators and also see how we can use these Bitwise Operators in Microcontroller Programming. Bitwise Operations in Embedded Programming provide a fast way to get results and also improve the performance of the code (and there by the hardware). Make use of these Bitwise Operations in your Embedded Applications as frequently as possible.

3 Responses
Such a great article of bitwise operators..!!! It is explained very well.
I was looking for this and now I found it. Great!
Beautifully explained. thanks for this.