Facebook is one of the best-performing social media platforms, with over 3 billion users, which means a well-curated Facebook Page will definitely help to promote the business. However, to reach the target audience, stand out, and drive results, you need to delete old posts to keep your timeline updated and relevant. Also, sometimes, it is essential to remove all your posts, whether from your personal Page or business Page, to start fresh without deleting your account.
So, we came up with a detailed guide that explains how to delete all posts (or multiple posts) on your Facebook page.
Key Things to Note Before Deleting Posts on Facebook Pages:
- Facebook lets you delete up to 50 posts at a time (prefer outdated posts on your timeline). By default, it selects up to 10 posts at a time. But you can select up to 50 posts by scrolling down your activity log.
- While deleting old Facebook posts, you can select ones with text only, photos, and videos.
- Deleting any Facebook Page posts is a permanent action, so double-check before finalizing the post you want to delete.
Now, let’s discuss mass deleting Facebook Page Posts.
#Video Tutorial – How To Delete All Posts on Your Facebook Page
How To Delete All Posts on Your Facebook Page:
To delete all posts on a Facebook page, log into your Facebook account, navigate to your page, click “Manage Posts,” select all posts, and then choose “Delete”.
Here’s a more detailed breakdown:
- Open Facebook on your smartphone (Android or iPhone) or computer.
- Tap on the top three horizontal lines (☰) at the top right side on an Android phone/PC (OR) tap on the profile picture at the bottom right corner on an iPhone.
- Go to the Facebook page you want to manage.

- Scroll down to Your Posts, where you can easily post and manage all those posts.
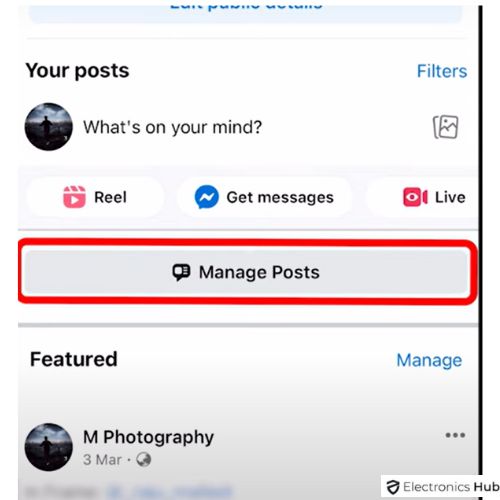
- Mobile App – Click on the “Manage Posts” option just above your feed posts.
- Desktop – Click on “Manage Posts” under the “Posts” tab.
- Upon opening the Professional dashboard (Manage Posts), you need to select the “Published” posts to see all your feed posts.
- Click “Select all” to mark all posts on your Facebook page.
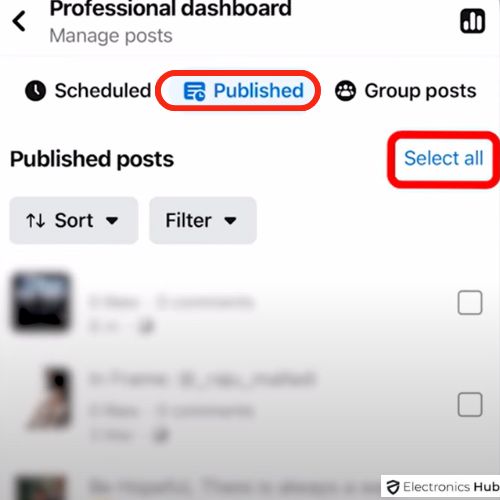
- You can also filter by year or other criteria, like sorting your FB posts if needed.
- However, after clicking on the Select All option, every post will be checked. So, if you want to keep some posts on your feed, simply uncheck them.
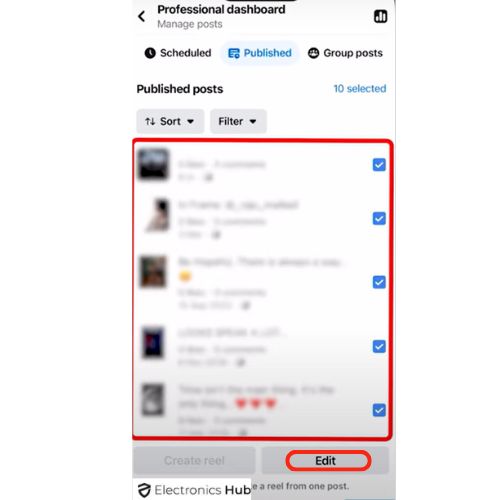
- Now you need to delete the posts on that particular FB Page.
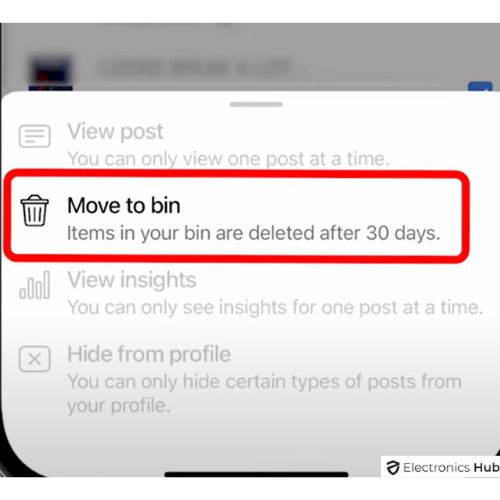
- On the Mobile App – Tap on “Edit” under all these selected posts. Click on the “Move to Bin” option. A pop-up appears, stating – Are you sure you want to move these posts to your recycle bin/trash? Then tap on the “Delete” option.
- On Desktop – Click “Next”, Choose “Delete Posts”, and Click “Done”.
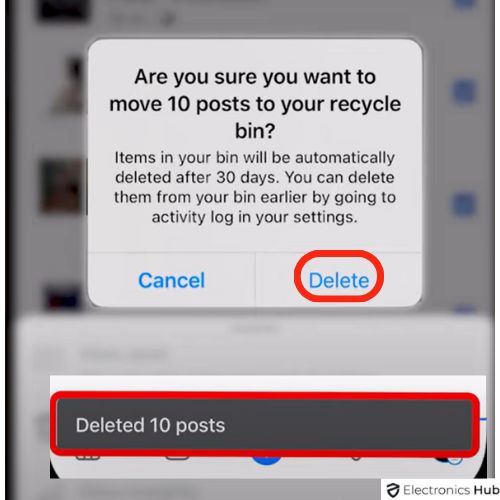
- Then, FB confirms that all those selected posts are deleted.
- That’s it! You’ve successfully deleted all posts on your Facebook Page.
Note: The items in the bin will automatically be deleted after 30 days. In case you want to delete them earlier, then go to activity log in your settings.
Alternative Methods:
Here are some alternative methods that you can follow to delete either a single post or all of those posts on your FB Page.
Method – 1: Via Facebook Settings
- Open the Facebook app on your smartphone or log into your Facebook account on your PC.
- Click on the Profile icon (in the top-right corner on your Android phone/PC or at the bottom-right side on your iPhone).
- You will find a small difference deleting the posts on your Facebook Page on Desktop and the phone app.
On Mobile App –
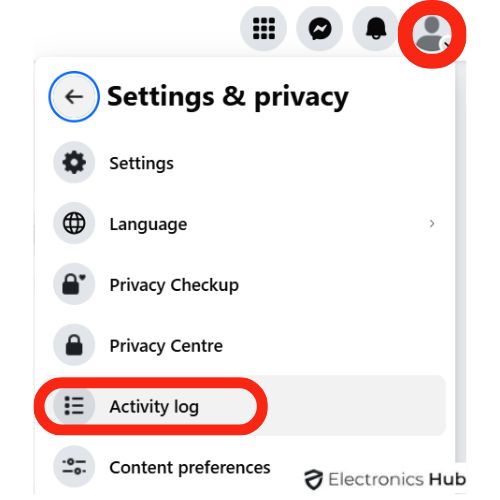
- Select Settings & Privacy -> Tap on Settings -> Scroll down to find Your Activity Section -> Tap on the Activity Log -> Select Your Facebook Activity tab -> Tap on Post (the downward arrow).
- Select Your Posts, photos, and videos to see all those posts that have been published till now.
- You can either select all posts as per date and year wise or select the particular posts that you want to delete on FB.
- Tap on the Trash option, which is found under all these posts, to move them to the trash.
On Desktop –
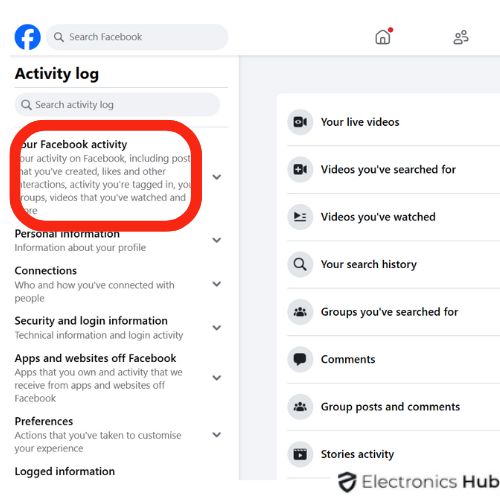
- Select Settings & Privacy -> Click on Activity Log -> Select Your Facebook Activity on the left side of the FB Website -> Click on Post -> Choose Your Posts, Photos, and Videos.
- You’ll find all your posts, photos, and videos published till now on the right-side screen.
- You can either select all posts or simply select the posts you want to delete by clicking on the box.


- Finally, select the “Recycle bin” option at the top-right side.
4. Viola! You have successfully deleted the posts on your Facebook Page.
Method – 2: Via Facebook App (Profile Settings)
This method allows you to delete multiple posts (covering posts by date, other posts, or the one you tagged in) on your Facebook Page. Remember that this method works well only on the Facebook app (smartphones only).
- Open the Facebook app and tap on your profile picture.
- Go to the profile page and tap on the three dots (…) next to the Edit profile option.
- Under Profile Settings, you have to choose Manage Posts and tap on Filters.
- You need to adjust them as per your preferences.
- There, you can see all your previously posted posts
- Tick the small circle at the top-right corner of each post to select them.
- After it’s done, simply tap on the Trash icon at the bottom.
- Tap on Delete Posts and hit Delete Posts again to confirm it.
- You have successfully deleted the FB posts, either single or bulk posts.
FAQs:
No, they are quite different. Archiving a post will usually hide it from your profile (meaning it won’t be for public view). It only lets you see a post that you have archived. While deleting a post means you are moving it permanently to the trash/recycle bin. Simply click on the Archive to store them OR tap on the trash button to delete them on the Manage Posts page.
Yes, you can delete photos in an album that you have created and shared with others. But you can’t delete the albums that are created and shared by other people. All you need to do is just leave it. However, any photos you’ve shared in that album will remain there unless you delete it from your account.
No. Usually, the posts that are created will only be archived or deleted. Although you can easily remove the tag to make it disappear on your profile, rather than deleting those tagged posts.
The deletion option might be grayed out sometimes whenever you try to delete some posts, leaving you to select the hide option only. However, this occurs for specific posts like profile picture updates, posts that aren’t created by you, or posts with particular privacy settings. So, for this, you need to delete the post individually.
Conclusion
While a simple “delete all” button doesn’t exist on Facebook Pages, you can effectively remove all your posts by going to the “Manage Posts” section. This bulk selection method is the primary way Facebook allows you to clean your Page’s content. Just remember that these posts will stay in the bin for a month unless you choose to permanently delete them sooner through your activity log. We hope this guide helped you in deleting all posts on your Facebook Page. Feel free to share your queries with us in the comments section below. We’ll respond and resolve them promptly.
