In today’s digital-first world, having a strong social media presence is essential — and Facebook remains a cornerstone of that strategy. Whether you’re a small business owner, a freelancer, or part of a growing company (global brand), having a presence on Facebook is a powerful way to connect with your audience. A Facebook Business Page gives you the tools to build brand awareness & credibility, engage with customers, and grow your business — all in one place. This article will guide you through how to set up, manage, and optimize your Page so you can make the most of what Facebook has to offer.
Why Create a Facebook Business Page?
A Facebook Business Page gives your company a public presence on the world’s largest social network, allowing you to:
- Reach over a million daily active users
- Share updates, promotions, and events
- Engage with your audience
- Access advertising tools and analytics
- Sell products through Facebook Shops
#Video Tutorial – How To Create a Facebook Business Page:
How To Create A Facebook Business Page:
Here is a detailed guide with the step-by-step procedure that explains creating a FB Business Page…
1: Log In to Your Facebook Profile:
Before you can create a Business Page, you must have a personal Facebook account. This is simply a technical requirement — your personal information (like your posts or friends list) will not be visible to the public on your Business Page.

Facebook uses your personal profile to give you admin access to the Business Page. You can later assign roles to teammates or agencies without sharing your personal account.
2: Start Page Creation:
Whether it is on desktop or mobile, here is the procedure:
- On Desktop: Go to the Pages section from the left-hand menu or click the “+” Create icon in the top right. Select “Page” from the drop-down menu.
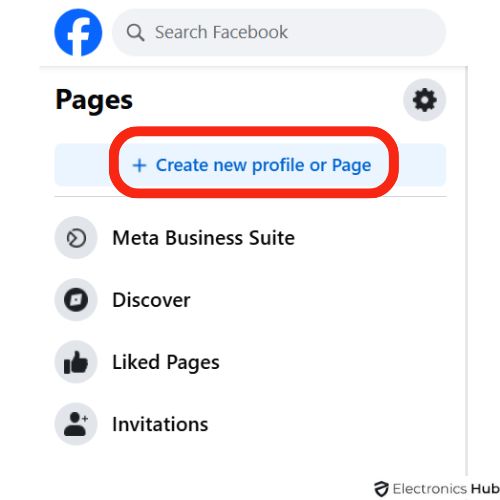
- On Mobile (Facebook App): Tap your profile picture or Menu (three lines). Select “Pages”, then tap “Create new profile or Page”.

Pro Tip: Creating your Page on desktop can be easier since you’ll have a full view of customization options and tools.


3: Add Business Information
This is the foundation of your Business Page, so take your time to fill it out accurately.
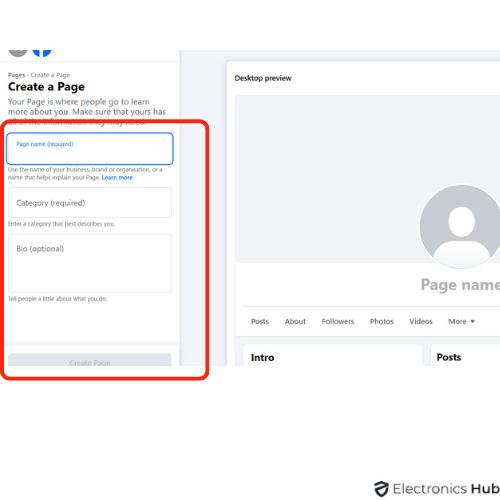
- Page Name: Use your exact business name so people can find you easily (search/navigation). If your brand has local variations, include a location (e.g., “Bloom Bakery – Chicago”).
- Category: Type keywords related to your business (e.g., “Coffee Shop,” “Marketing Agency”). You can select up to three relevant categories.
- Bio: Add a brief, clear description (101 characters max) of your business. Use it to say who you are and what you offer.
- Contact Info: Add a business email, phone number, and website link so customers can reach you.
- Location & Hours (optional but recommended): Add your address and business hours, especially if you’re a local business or offer in-person services.

Best Practice: Use consistent NAP (Name, Address, Phone Number) information across all platforms to improve local SEO.
4: Add Visual Branding
Your profile and cover photos are the first things visitors see. They should reflect your brand identity.
- Profile Photo: This should be your logo or brand mark — ideally 170 x 170 pixels (displays smaller on mobile).
- Cover Photo: Use an engaging image that represents your business/brand, your team, or a current promotion/campaign. Recommended size: 851 x 315 pixels.

Design Tip: Keep text minimal in cover photos. Use tools like Canva or Adobe Express to create Facebook-optimized visuals.
5: Customize Your Page
Now, tailor your Page experience to your business goals.

- Call-to-Action (CTA) Button: Choose from options like “Shop Now,” “Book Now,” “Contact Us,” or “Sign Up.” This is your main conversion point. Thus, it directs users to shop, call, or visit your website regularly.
- WhatsApp Integration (Optional): If you use WhatsApp for business, connect it so customers can chat with you directly from your Page.
- Invite Friends: Facebook lets you invite your existing friends to like your Page. This helps kick-start visibility and engagement.
Quick Win: Add a CTA that matches your goal (e.g., “Book Now” for services, “Learn More” for info-based businesses).
6: Set Notification Preferences
Manage how and when you receive updates about activity on your Business Page.
- Go to Settings -> Notifications.
- Choose what you want to be notified about — likes, comments, messages, etc.
- You can also adjust how you’re notified: via push, email, or SMS.
Time Saver: Set boundaries on alerts to avoid distractions while still staying informed.
7: Start Posting
Your Page is ready — now it’s time to bring it to life (share relevant content like updates, product news, or stories).

- Share business updates, product launches, customer testimonials, or behind-the-scenes content.
- Use Stories, Reels, Live videos, and polls to boost engagement.
- Post consistently — aim for a mix of promotional, educational, and entertaining content.
Content Tip: Use Facebook’s built-in scheduling tools or Meta Business Suite to plan posts in advance.
How To Manage Your Facebook Business Page
As the business grows, you might need to share Page responsibilities with a team, like a marketing agency or a freelancer. With varying levels of access, FB lets you assign different roles to protect your Page while allowing effective collaboration.
Here’s how to assign Page roles:
- Go to Your Facebook Business Page – Make sure you’re logged in with the account that owns the Page (the original creator or an admin).
- Access Page Settings – On desktop: Click on the “Settings” gear icon in the left menu. Then click “Page Access” (formerly called Page Roles or Settings > Page Roles).
- Choose “Add New” under the appropriate section – You’ll need the name or email address of the person you want to assign. Facebook may prompt you to enter your password to confirm the change.
Viewing and Managing Existing Roles
- In the Page Access section, you’ll see a list of people and their current roles.
- To remove or change a person’s role, click the three dots next to their name and select “Edit Access” or “Remove.”
Best Practices to Maintain and Optimize Your Page
Here are some of the best practices that help you to maintain and optimize your page.
- Stay Active – Post regularly (at least a few times per week), and respond to comments and messages promptly
- Keep Info Updated – Regularly review your business hours, contact info, and “About” section
- Create a Content Strategy – Align posts with business goals. Focus on what your audience wants (product info, deals, behind-the-scenes)
- Use Paid Promotion – Boost posts or create ads to reach a larger, targeted audience. Monitor ROI through Facebook Ads Manager or Meta Business Suite
- Monitor Analytics – Use track metrics like Follower growth, Post reach, Engagement rate, and Ad performance, as these insights are used to refine your strategy
- Create Events – Promote launches, sales, or webinars via Facebook Events. For this, go to “Events” on your Page and follow the prompts to publish.
Pro Tips to Create and Maintain the FB Business Page
- Pin important Posts, as they highlight your business offers or announcements.
- Use Facebook Stories to provide your users with time-sensitive updates.
- Build partnerships and increase visibility by engaging with other FB Pages.
- Optimize CTA Buttons to test different calls to action.
- Always use the “Best Time to Post” Tools to schedule content when your audience is most active.
FAQs:
Yes. A personal Facebook account is required to create and manage a Business Page. However, your personal profile information won’t be visible on the Business Page.
No, it’s completely free to create and use a Facebook Business Page. You only pay if you choose to run ads or promote posts.
Yes. A website is not required. You can add contact details, a description, and use Facebook as your main online presence.
A Profile is for individuals; a Page is for businesses, brands, or public figures. Pages offer tools for marketing, insights, ads, and customer engagement that profiles don’t.
There’s no official limit. You can create multiple Pages using the same personal account, though it’s best to only manage what you can handle effectively.
Yes. You can edit your Page name and @username under Page Settings. However, frequent or drastic changes may confuse your audience or be rejected by Facebook.
Yes. You can either: Unpublish it temporarily (so only admins see it), or permanently delete the Page from Page Settings > Facebook Page Information.
Conclusion
A Facebook Business Page is an essential tool for building your brand, connecting with your audience, and driving business results. With the right setup, ongoing strategy, and smart use of available tools, you can turn your page into a high-performing digital asset and build your own brand effectively. Do share your queries or thoughts with us in the comments section below. We will respond and resolve them promptly.
