Facebook Page can be a powerful tool for building communities, promoting businesses, and facilitating customer connections. Sometimes, a Page that once served its purpose may become outdated, irrelevant, or simply no longer necessary due to any changes in priorities/situations. Then it is essential to know how to manage your Page’s visibility (temporarily deactivate or permanently delete) to ensure you maintain flexibility to adjust and control your online presence.
It’s important to note that Facebook Pages operate independently and don’t affect your Personal profile or any other Pages. Deactivation “unpublishes” your Page, hiding it from public view while preserving your content for potential future reactivation. This guide will provide a detailed procedure on how to deactivate/hide/unpublish the Facebook Page.
What Happens When You Deactivate A Facebook page?
When you deactivate a Facebook Page, it becomes hidden from everyone except the administrators. People who previously liked or followed the Page will no longer see it. Simply, it’s like keeping the Page on hold (not visible), but it’s not gone, just temporarily unavailable until it is reactivated again. This is different from deleting a page, which is a permanent action that can’t be retrieved. Usually, deactivating a Page means it’s unpublished. This is helpful if you need to make changes or updates without the public seeing the Page. You can reactivate it at any time.
Deactivating offers a temporary solution, allowing you to revise and relaunch the Page later. Alternatively, deletion is permanent and irreversible, though you can download your Page’s data beforehand. Also, if there are multiple admins on the Page, any one of them can reactivate it, but you cannot delete it if you are not the sole admin. This is especially useful for Facebook Business Pages.
Choosing to deactivate is a good option if you want to take a break or make significant changes to the content on your Page. It allows you to work on the Page privately and then make it public again when you’re satisfied with the output.
How To Deactivate (or Hide or Unpublish) Your Facebook Page
Whether it is a business page, a personal fan, or a theme page, here’s the simple detailed procedure that lets you know how to temporarily deactivate it (or) How to hide/unpublish a Facebook Page.
Using Smartphone:
- Open the Facebook app on your phone (either iPhone or Android phone).
- Tap on the “Menu” option at the bottom-right corner of the screen for iPhones (OR) at the top-right corner (☰) of the screen for Android phones.
- Select the “Page” you want to deactivate and switch over to the Page.
- FB confirms that you switched to that particular Page.
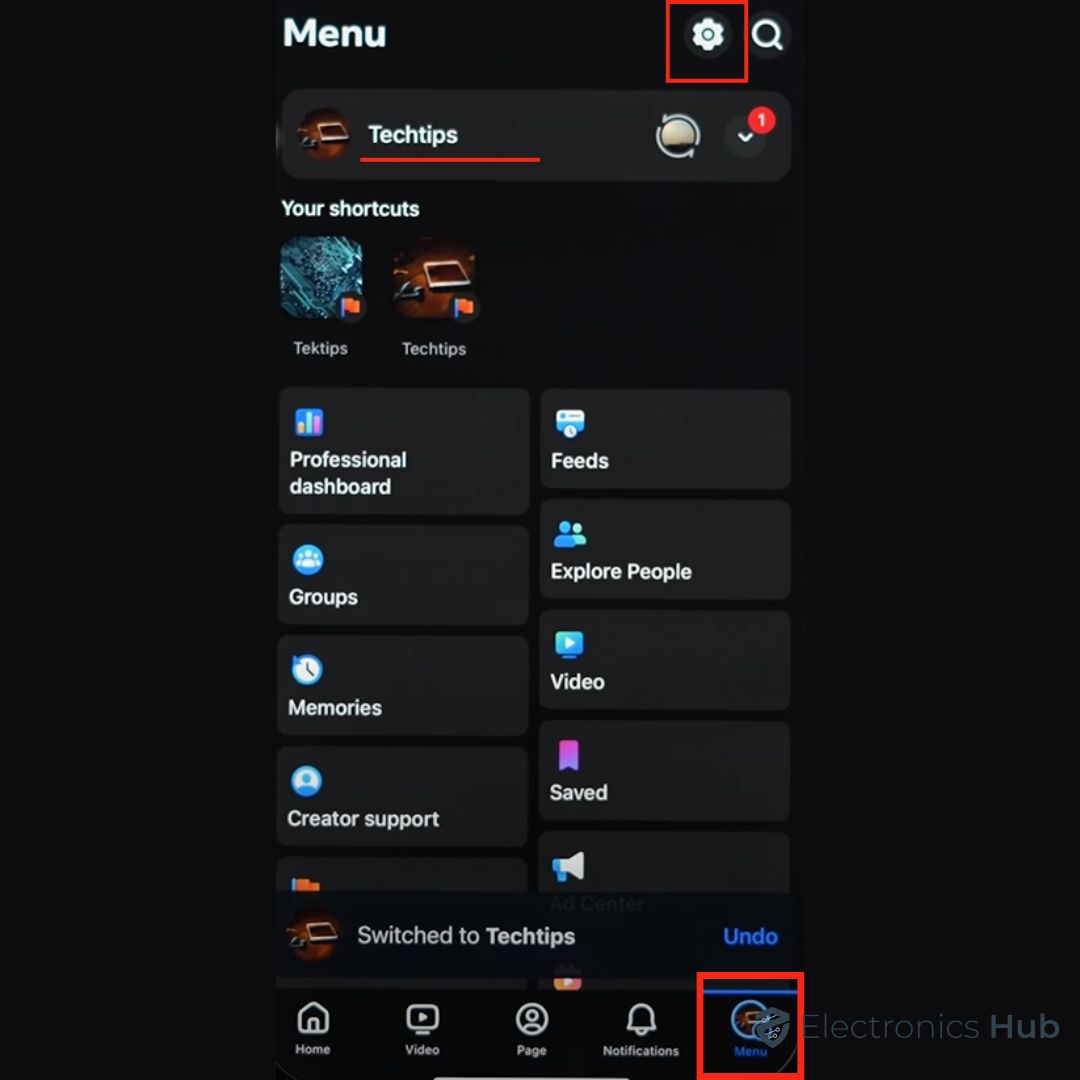
- Tap on the Menu option and scroll down to select “Setting & Privacy”.
- Then tap on “Settings” and scroll down till you find the “Your Information”

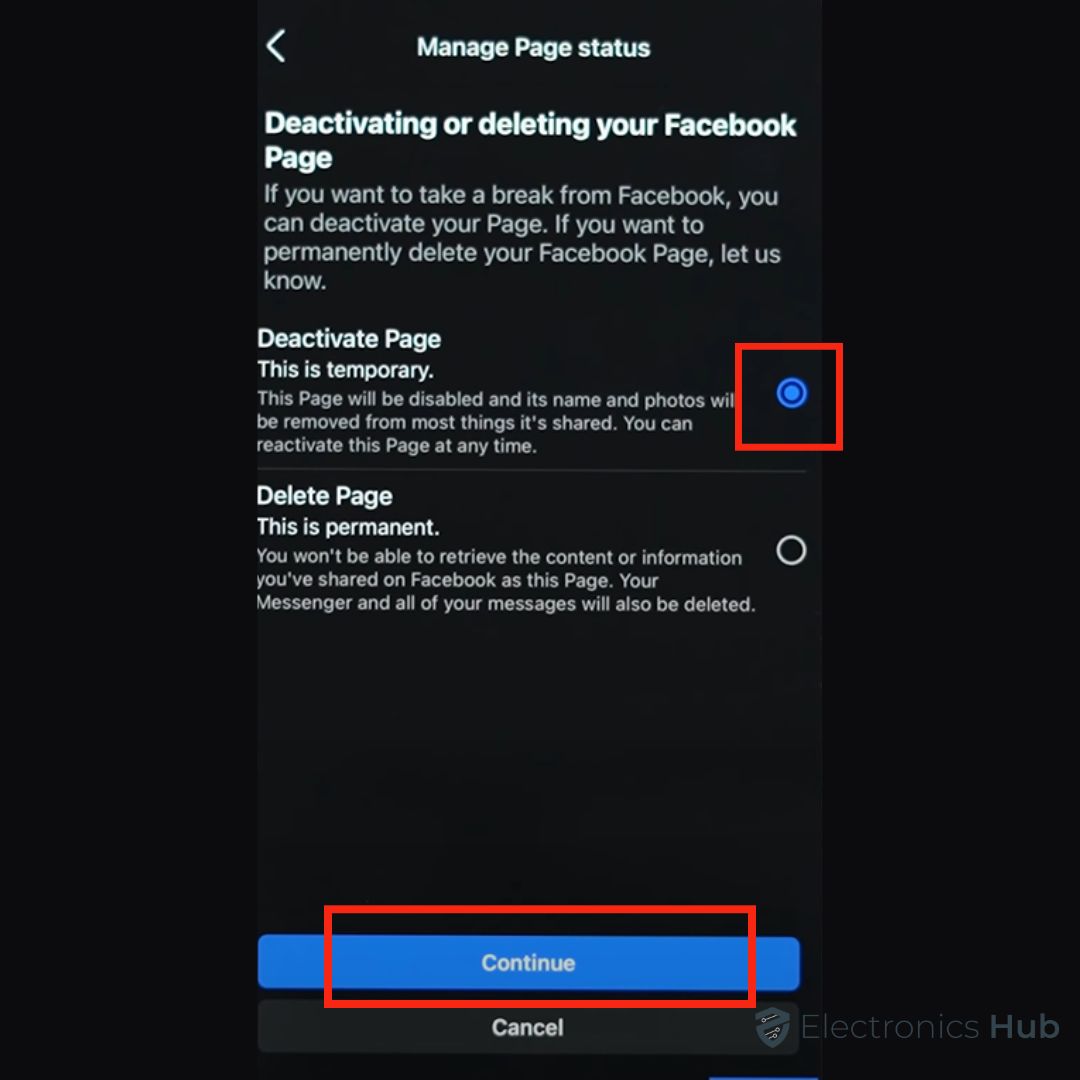
- Now tap on “Access and Control” and select “Deactivating or deleting your Facebook Page” (where you can temporarily deactivate or permanently delete your Page).
- Tap on the “Deactivate Page” and select ‘Continue’.
- FB asks you to enter your password for your security to confirm that it’s you who wants to deactivate the page.
- Tap on the “Continue” option and Facebook asks you to select the reason for Page deactivation (Tell us why).
- Select “Continue” and FB offers a few suggestions like do you want to log out instead?, save posts in your archive, or Auto-reactivate your account.
- Tap on the “Continue” option and tap on the “Deactivate Page”.
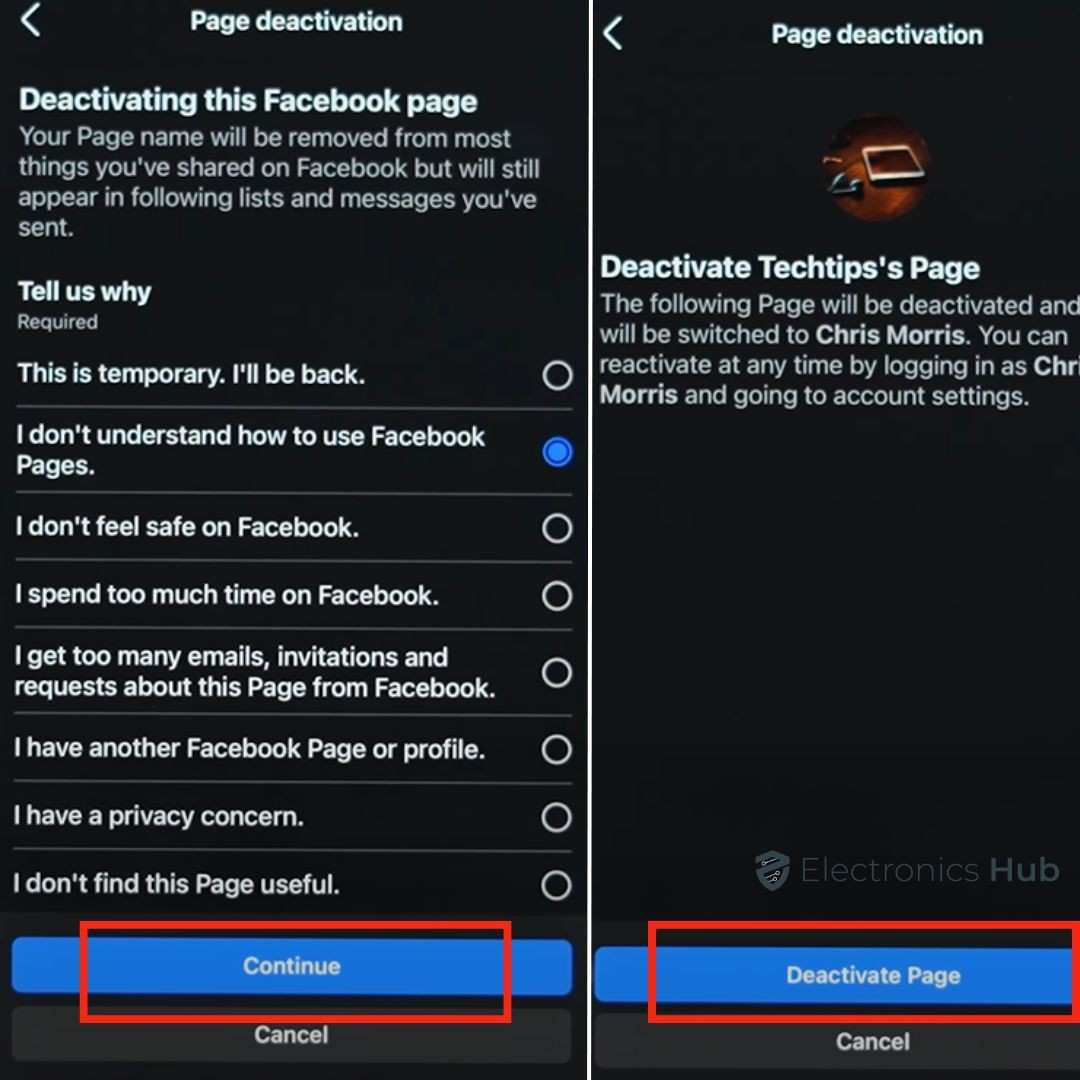
- Finally, Your Page is deactivated and can’t be shown on the profile.
Using Computer:
- Log into your Facebook account using your credentials.
- Click on the “Menu” (or account profile) on the top-right corner of the screen.
- Click “See all profiles” and select the particular Page you want to deactivate (OR) simply click on Pages in the left sidebar of your Facebook feed.
- Then it switches to that Page and then click on the “Account”
- Select “Settings” under the “Settings & Privacy”
- On the left side menu, scroll down to select “Access and Control” under the ‘Your Information’
- This is the place where you can manage your data, modify your legacy contact, delete your page, and more.
- There it redirects to deactivating or deleting your Facebook Page to take a break from Facebook.
- You can select either a temporary deactivating Page or a permanent deletion of the Page.
- Click on the “Deactivate Page” to disable the particular page and your name along with photos will be removed from most things you’ve shared, but still appear in friends lists and messages that you’ve sent.
- Now click on the “Continue”
- You will be redirected to the confirmation – ‘Are you sure that you want to deactivate your Page?’ And FB wants to know the reasons for your leaving.
- Select the appropriate reason and click on the “Deactivate”
- That’s it! The page is unpublished successfully and it isn’t available at the moment.
How To Reactivate Your Page?
In case you want to reactivate your deactivated Page on Facebook, you have to follow this procedure:
On Computer:
- Log into your Facebook to reactivate your account.
- Click the main ‘Menu’ (or Profile picture) on the Facebook app or website.
- Click on ‘Settings & Privacy’ and then select ‘Settings’.
- Scroll down to reach the ‘Your Information’ section and then click on ‘Reactivate a Page’.
- (OR) Select Access and Control -> Pages -> Page Settings -> View the deactivated Pages.
- Find the Page that you want to reactivate and click ‘Reactivate’ beside that particular Page.
On Smartphone:
- Open the Facebook app on your phone.
- Tap on the ‘Menu’ option and tap on the ‘See More’ option
- Then select the Pages icon and you will find a list of Deactivated Pages.
- Tap on the ‘Activate’ option beside the particular Page.
- FB asks for confirmation that the particular Page will be activated and it is visible to the public. People will be able to like this Page and share posts.
- Tap on the ‘Activate Page’ and FB confirms that your Page is reactivated and visible to the public.
- If your Page is deleted, then it has a 30-day window to reactivate, if not, the Page will be deleted permanently.
FAQs:
Deactivating a Page temporarily hides it from public view, which means you can reactivate it later. Deleting a Page permanently removes it, and you cannot recover it completely after 30 days.
Only Facebook Page admins with full control permissions can easily deactivate or delete a Page.
It depends on how Messenger is being used on the Page. If the Page was the only access point to Messenger, then no. If the admin also has a personal profile with Messenger, then they can still access it.
When you deactivate a Facebook Page, the process is generally very quick, essentially immediate. The Page is unpublished, meaning it’s hidden from public view, almost instantly.
No, when a FB Page is deactivated, it is taken down, and no one can see the Page or the content from that Page. However, all the Page’s content (photos, or posts) isn’t lost even when you deactivate it.
Conclusion
Deactivating a Facebook Page is a straightforward process that allows you to temporarily remove your Page from public view. It’s a useful option when you need to take a break, restructure your online presence, or simply step away from managing the Page for a while. We hope our guide will help you to deactivate your Facebook Page. In case of any further queries, feel free to share your queries with us in the comments section below. We will respond promptly and resolve them.
