In this DIY project, I will show you how to design and build a simple but effective Solar Battery Charger for 18650 batteries. Using this project, you can charge two 18650 Li-Ion batteries directly from solar without any wall adapter.
Introduction
The need for sustainable living has led to the increased usage of renewable energy. Keeping aside the efficiency numbers, Solar Energy is one of the convenient alternatives (when compared to other renewable energy sources such as wind) to the grid supply.
Now-a-days, large Solar Farms are being setup in acres of barren lands in many countries. But small-scale solar plants like on independent building rooftops and near small home communities are also becoming popular.
The setup of a Solar Power Plant. whether large or small, is fairly simple. Setup an array of Solar Panels on rooftop, connect them to a Solar Charge Controller and charge the batteries. From the batteries, you can run any mains appliances using appropriate inverters.
As a beginner’s solar project, I have designed a very simple Solar Battery Charger to charge 18650 Li-Ion batteries. Using these batteries, you can charge your mobile phones, tablets or use the batteries in LED Lamps, emergency lights etc.
Circuit Diagram
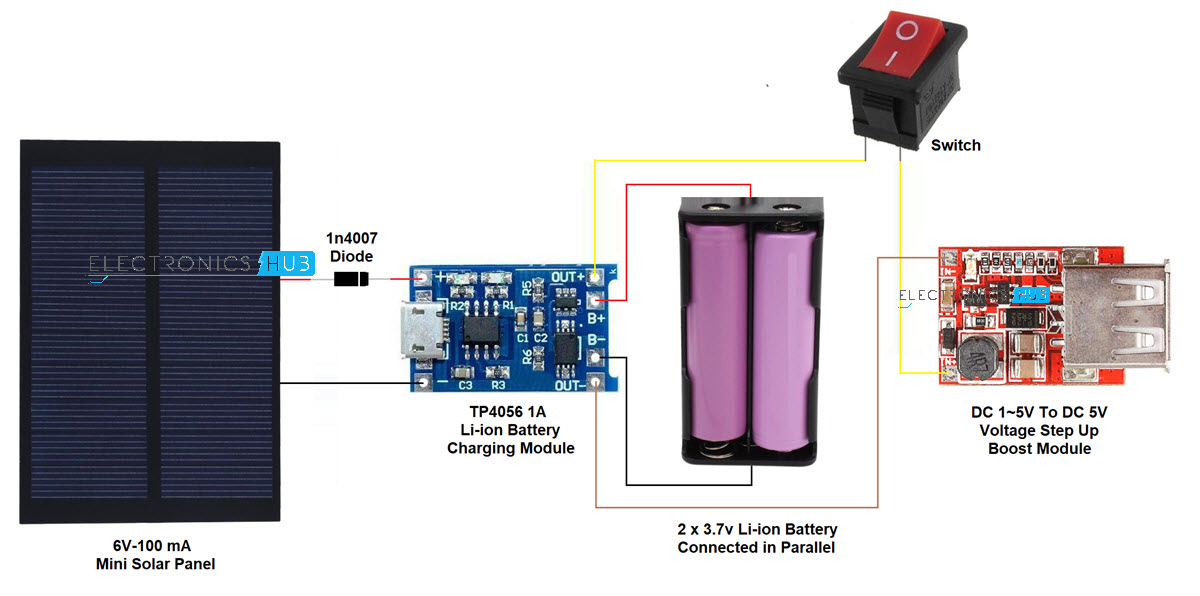
Let us dive into the project by taking a look at the circuit diagram or rather the connection diagram of this DIY Solar Battery Charger for 18650. All the components, which I will list out in the next section, are very easy to acquire and are easily available in local electronics stores (you can get them online as well).
Components Required
- 6V – 100mA Mini Solar Panel
- 2 x 18650 Li-Ion Batteries
- 18650 Battery Holders
- TP4056 Li-Ion Battery Charger Module with protection
- 1V to 5V Input to 5V Output Step-up Converter (Boost Converter)
- 1N4007 PN Junction Diode
- Switch (Push to ON and Push to OFF)
- Connecting Wires
For more information on TP4056 Li-Ion Battery Charger Module, read “TP4056 Lithium Ion Battery Charger“.
How to Setup DIY Solar Battery Charger for 18650?
First, I will explain the connections and the step by step setup of the Solar Battery Charger for 18650. Then we will understand the principle of operation.
Coming to the connections, the Mini Solar Panel has two wires coming from it. One is Red, which is the positive wire and the other is black (or brown in my case), which is the negative wire.
Now, take the TP4056 Li-Ion Battery Charger Module with battery protection. At the input side, it has two connections named IN+ and IN-. Take the Red wire from the solar panel and connect it to the anode of 1N4007 Diode.
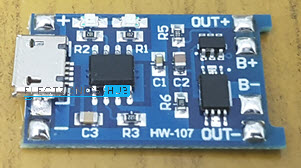
Connect the cathode of the diode to the IN+ terminal of the TP4056 Module and directly connect the black wire of the solar panel to the IN- terminal of TP4056. This completes the input section.
On the output side of the TP4056, there are four connections named B+, B-, OUT+ and OUT-. Take two 18650 Li-Ion batteries with holders and connect them in parallel i.e. both positive terminals of the batteries are common and both negative terminals are common.
Connect the common positive terminal of the batteries to B+ of TP4056. You may have to solder the wires on to the Li-Ion Charger board. Similarly, connect the common negative terminal of the batteries to the B- of TP4056.
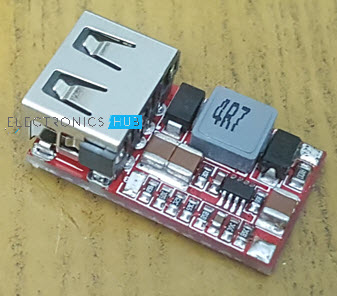
The final step of the constriction is to connect the output of the TP4056 to the 5V Boost Converter Module. The Step-up converter module has two input terminals named IN+ and IN-. Connect the OUT+ of TP4056 to IN+ of Boost Converter module and OUT- to IN- respectively.
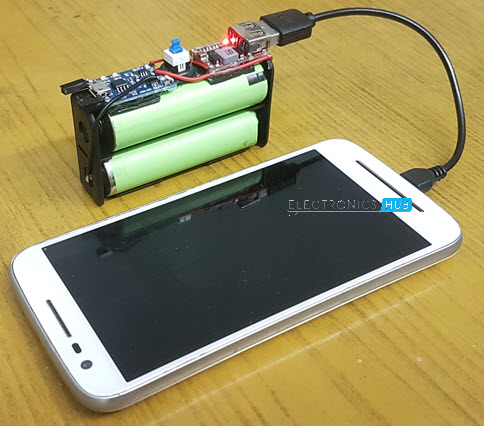
You can use a switch between TP4056 and Boost converter so that you can turn ON or OFF the output. I have glued the entire setup on to the battery holder case with a switch in the center and the USB port on the edge.
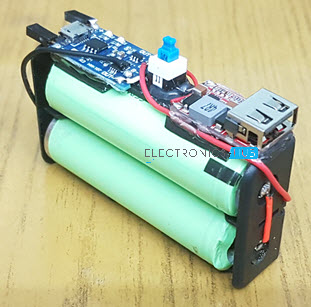
Principle of DIY Solar Battery Charger for 18650
The solar panel used in this project is small 6V panel with a small output of 100mA. The output of this solar panel will not be a constant 6V but it might fluctuate between 5V and 7.5V (as per its data sheet).
This voltage is given as input to the TP4056 Li-Ion Battery Charging Module, which in this scenario, acts as a Solar Charge Controller. The input to TP4056 can be in the range of 4V to 8V (which is the range of the output of the solar panel).
TP4056 then charges the battery from the solar power itself. If you only want to charge the batteries, then this is sufficient. But since our project also needs to charge a Mobile Phone, we need to have a 5V output and the output of the 18650 Li-Ion batteries is only 3.7V.

Here comes the Boost Converter to the rescue. The boost converter I have used is a 1V-5V input to 5V output step-up converter i.e. it takes an input anywhere between 1V and 5V and produces a constant 5V output. Also, this boost converter can support a current up to 1A, so the charging of mobile phone will not be that slow.
I have used the project to charge my mobile phone as well as to power up an Arduino board.

6 Responses
Isn’t it an issue to charge multiple batteries together? I had the feeling that Lipo battery cells should be charged individually for safety.
It’s very important that the batteries have almost the same voltage.
Otherwise, they could explode.
I think it’s important to check if the charging current that two batteries need is not greater than the capacity of the tp4056.
CAN A LDR BE USED TO REPLACE THE POWER SWITCH ?
I’m working on a project where I have a 6 volt solar panel which I would like to connect to a battery charger with the batteries connected to a step-down converter to 3 volts so they can power a 3 volt devise. This would be indoors and not exposed to very bright light so it will take time for the battery to charge but that is ok with me.
3 questions
1) Instead of a voltage booster can I use a Buck Adjustable Step-down Power Supply Converter Module so that I can output 3 volts?
2) Is it possible to connect to and operating the devise while the batteries are being charged?
3) Once the batteries ar fully charged do I have to disconnect them for the charger or can the just stay on the charger?
Hope I explained it well.
Thanks for any help. I’m not very knowledgeable about these things.
How do I know that the lithium battery is fully charged
I have in mind the construction of a solar power source for a Wyze camera that has no internal battery. I would mount the 18650 charger and batteries to the solar panel and plug in the camera (5V) do you think this is doable?