Microsoft Windows is one of the most popular and widely used operating systems in the world. While it offers many great features, it is still not an ideal OS as there are many recurring problems with it. If a certain process ends up using more than 60% of your CPU, you will feel lag and stutters in your system as the other processes will not be able to utilize your CPU efficiently.
Today, we will be looking at the Microsoft Compatibility Telemetry process in detail. We will try to understand the process itself and then discuss a handful of safe solutions for the problem. You must check out all of the solutions provided in this article to find out the most effective solution for this problem.
What is Microsoft Compatibility Telemetry?
Before we discuss how to fix high CPU usage problems caused by the Microsoft Compatibility Telemetry process, let’s try to understand the process itself and why it is active on your computer.
Microsoft Compatibility Telemetry is an official system process designed by Microsoft which operates in the background to collect the performance data of the operating system. The Microsoft Compatibility Telemetry process can be identified by its application name CompatTelRunner.exe in the task manager, and it has been a part of the Windows operating system since Windows 7.
With the help of this program, Microsoft can easily identify problems with the operating system and release updates to fix them. As the service is actively collecting and sending performance data to developers, it becomes possible for Microsoft to analyze the problems and design new updates to resolve them for all systems.
The CompatTelRunner.exe executable file has automatic startup enabled by default which means that it starts when you start your system automatically. You can find the executable file in the system drive of your computer. It is located inside the System32 folder available in the Windows folder.
Although, it is preferable to follow the solutions provided here to fix high CPU usage caused by Microsoft Compatibility Telemetry rather than interacting or deleting the process entirely.
Resolve Microsoft Compatibility Telemetry High CPU Usage
There have been a lot of complaints lately from Windows users about the Microsoft Compatibility Telemetry process. Most users have reported an exceedingly high CPU usage caused by the Microsoft Compatibility Telemetry process, making their system slow and incompatible with other programs. This problem majorly affects professional users that rely on high CPU performance for running heavy software. Even gamers can find this problem annoying as it would create a lot of stutters and lags in the game.
Also, the Microsoft Compatibility Telemetry process is a data collection service. Even though the process is only collecting data about the usage and performance of the operating system, we would recommend turning it off altogether to enhance the privacy levels of your system. To do that, we have gathered a handful of safe and proven solutions right here. Make sure you read the steps mentioned in every solution carefully before performing it on your system for the best results.
1. Disable Microsoft Compatibility Telemetry
There are many different ways you can disable the Microsoft Compatibility Telemetry on your system. You can disable the service from Windows settings, task scheduler, or simply delete the executable file by taking its ownership. Here’s how you can disable Microsoft Compatibility Telemetry completely.
Method 1: Disable The Service From Windows Settings
Windows offers you a simple option to disable the Microsoft Compatibility Telemetry from Windows settings. To use it, follow the steps given here:
- Press the “Windows+i” keys on your keyboard to open Windows settings.
- Here, you will find different tiles that are dedicated to different settings in Windows 10. Click on the “Privacy” option to continue.
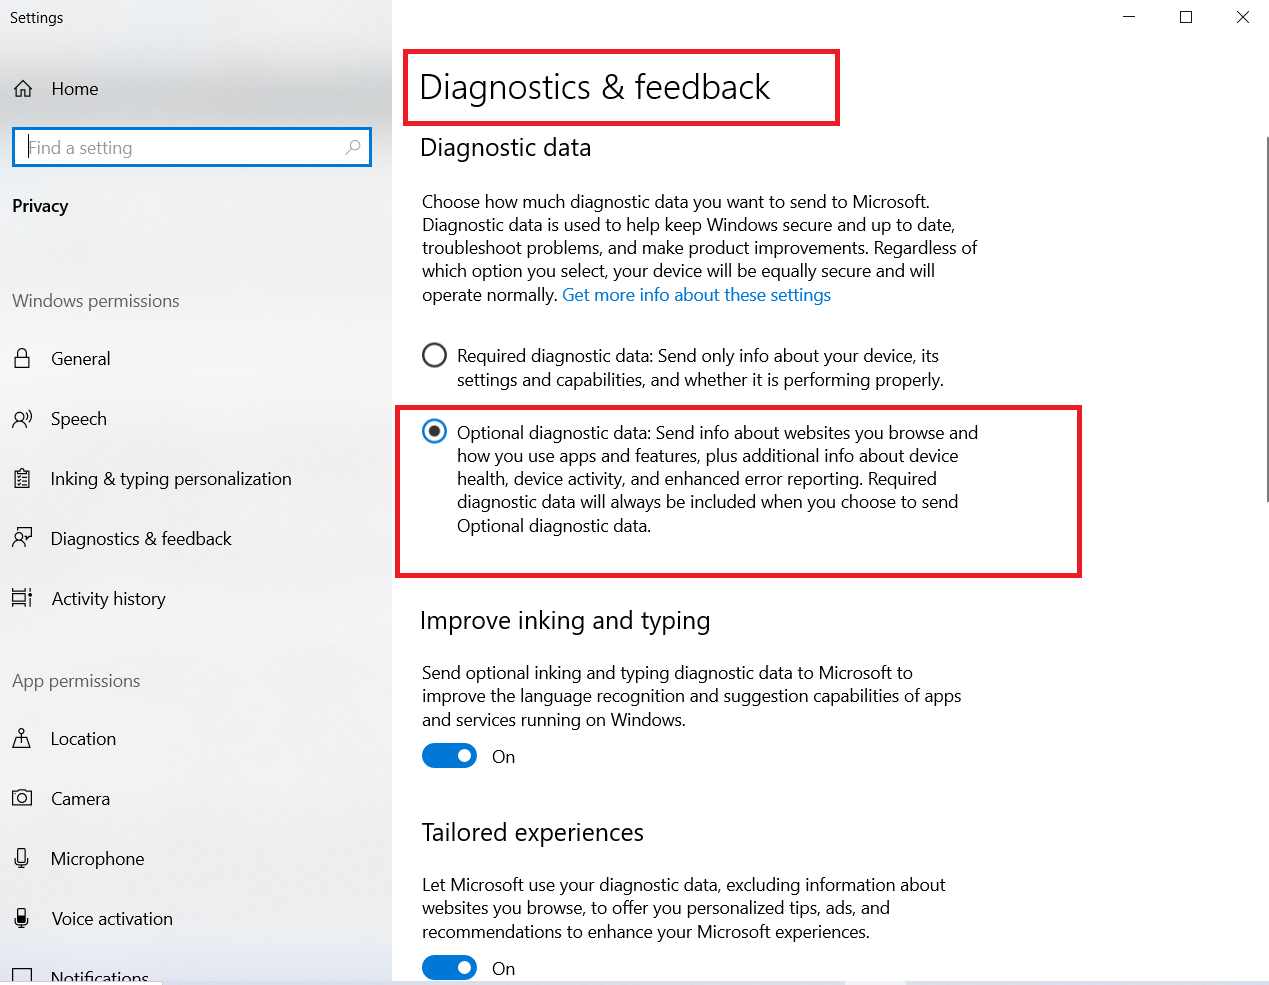
- Now, you can see the “Diagnostics & feedback” option on the left-hand column. This section includes the preference option regarding the privacy of your system.
- In the Diagnostics & feedback section, the first set is about the diagnostic data. If the “Optional diagnostic data” option is selected, kindly change it to “Required diagnostic data”. This way, the service will only collect limited data and possibly use lesser resources in your system.
Method 2: Use Task Scheduler To Disable The Process
In case you want to turn off the service completely, you will have to use one of the following solutions. Using the task scheduler has turned out to be very effective for many users in the past. Here’s how you can do it:
- Press “Windows+R” to open the “Run” window. Here, you can type the name or destination of service to launch it directly.
- Type “taskschd.msc” in the Run window, and press enter to open it.
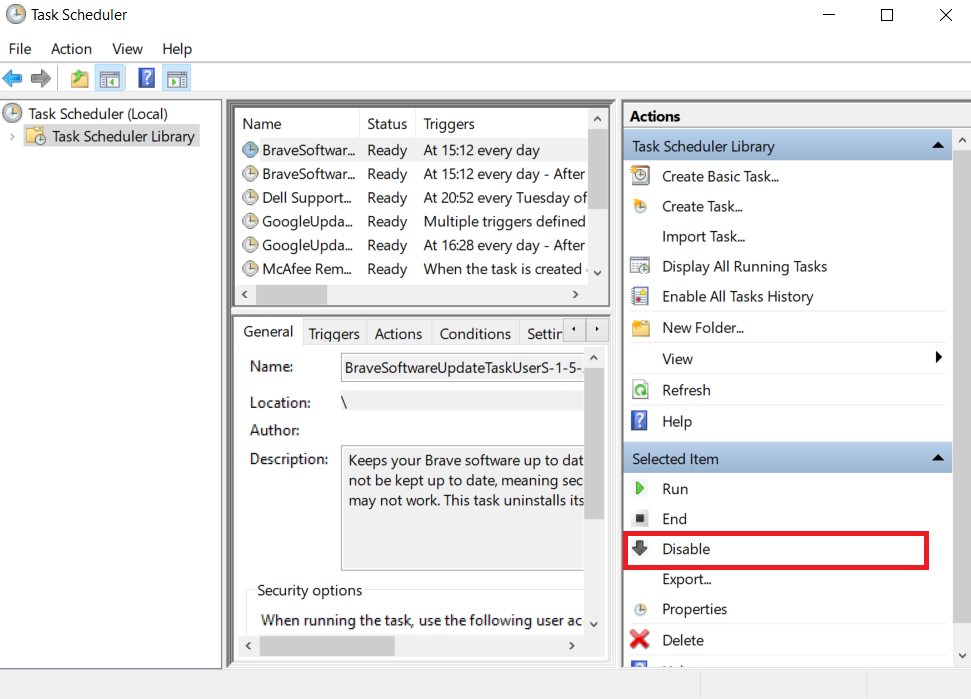
- In the task scheduler, follow the path provided here to get to the Microsoft Compatibility Telemetry service.
Task Scheduler Library/Microsoft/Windows/Application Experience - In this folder, you will find the Microsoft Compatibility Telemetry service on the top. Right, Click on it to change its parameters.
- In the drop-down menu, you will see the “Disable” option. Click on it to disable the Microsoft Compatibility Telemetry service
Method 3: Delete The CompatTelRunner.exe File
If the above solution did not work out for you, you can try to delete the executable file directly. Without the executable file, the service cannot start and won’t be able to consume your CPU. To delete the CompatTelRunner.exe file, follow the steps given here:
1. Open your system drive. Usually, it is the C drive on your hard disk.
2. Follow the path given here to get to the CompatTelRunner.exe file.
C: > Windows > System32
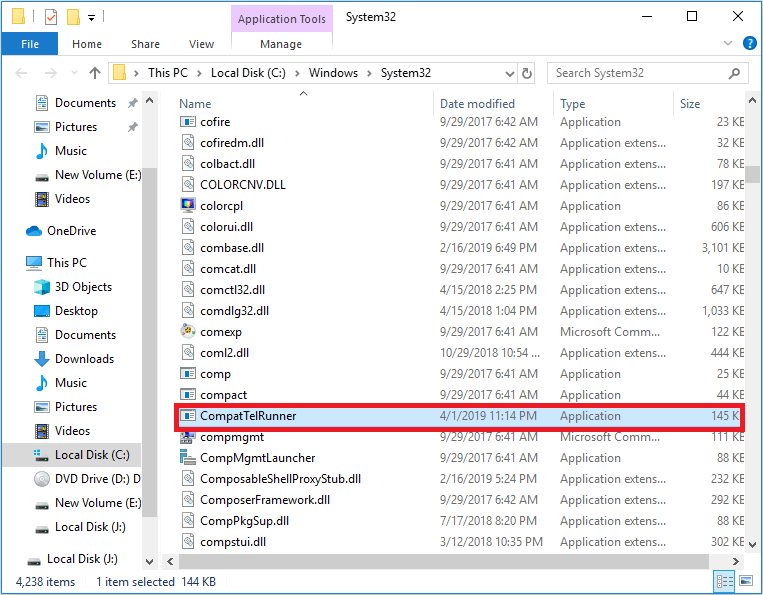
3. In this folder, there are a lot of files, so finding the CompatTelRunner.exe might be difficult. Simply, search the file name in the search bar present in the upper right corner to get to the file quickly.
4. Now, you will have to take ownership of the file before you can delete it. To do that, simply right-click and open the “Properties” page.
5. Then, click on the “Advanced” option available in the “Security” tab.
6. You can see the current owner of the file here, which would be “TrustedInstaller”. Click on the “Change” option provided on the right to change the owner.
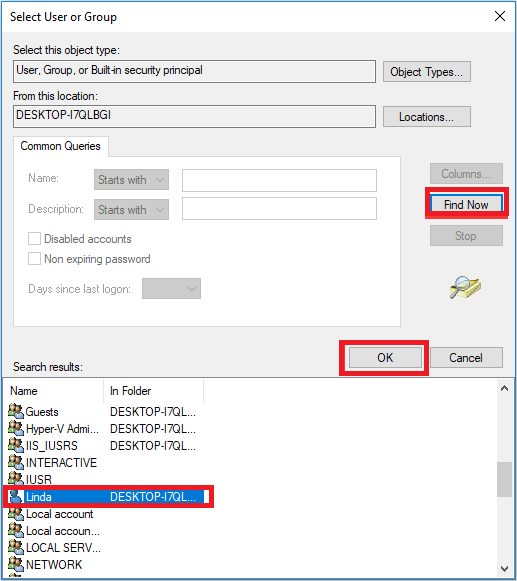
7. Here, you can either type your desktop name or search from available names. To be safe, simply run the “whoami” command in the command prompt and input the result in the space.
8. Once you have selected yourself as the owner, click “Ok” to close the dialog box.
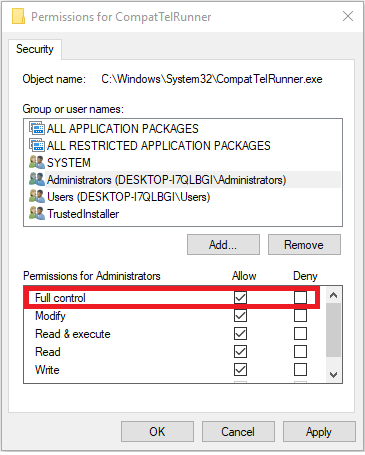
9. Now, you will be able to change permissions for the file. Select your profile name and grant “full control” for the file.
10. Once finished, close this window. Now, you can directly delete the CompatTelRunner.exe file from your computer. After deleting it, restart the system for changes to take effect.
Method 4: Disable The Service From GPedit
Aupdatesp policy editor is a helpful tool as it allows you to change many critical windows settings easily. Here’s how you can use the GPedit to disable Microsoft Compatibility Telemetry.
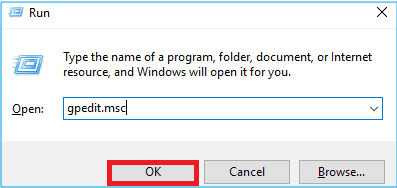
1. Open the “Run” window and input “gpedit.msc” to open the GPedit..
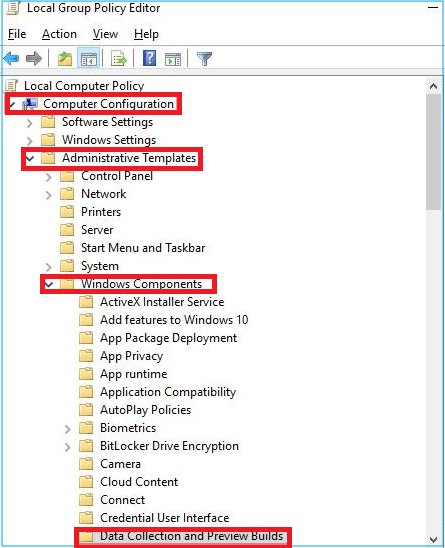
2. Now follow the path provided below to get to the Microsoft Compatibility Telemetry service.
Computer Configuration > Administrative Templates > Windows Components > Data Collection and Preview Builds
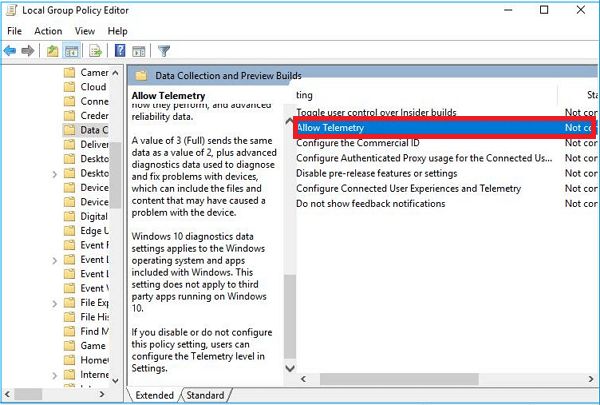
3. In the “Data Collection and Preview Builds” folder, you will find the “Allow telemetry “ option. Double click on it to change its state.
4. In the following window, click on the “Disabled” option and press “Ok” to disable the service completely.

5. By using any of the solutions provided above, you can solve the Microsoft Compatibility Telemetry high CPU usage problem by disabling the service completely. Although, if you wish to keep the service active and reduce the CPU usage, you can try one of the following options.
1. Restart Your System
The easiest and most effective solution for service-related problems is to restart your system. After restarting, all the processes in your computer will be restarted, including Microsoft Compatibility Telemetry. Thus, if it was bugged or encountered an error that was causing the high CPU usage, it will be resolved automatically.

2. Update Windows 10
In most cases, Microsoft includes solutions for recurring problems in the subsequent windows update. Thus, you should check if you have an update pending for your system and get it updated right away. Here’s how you can check that:
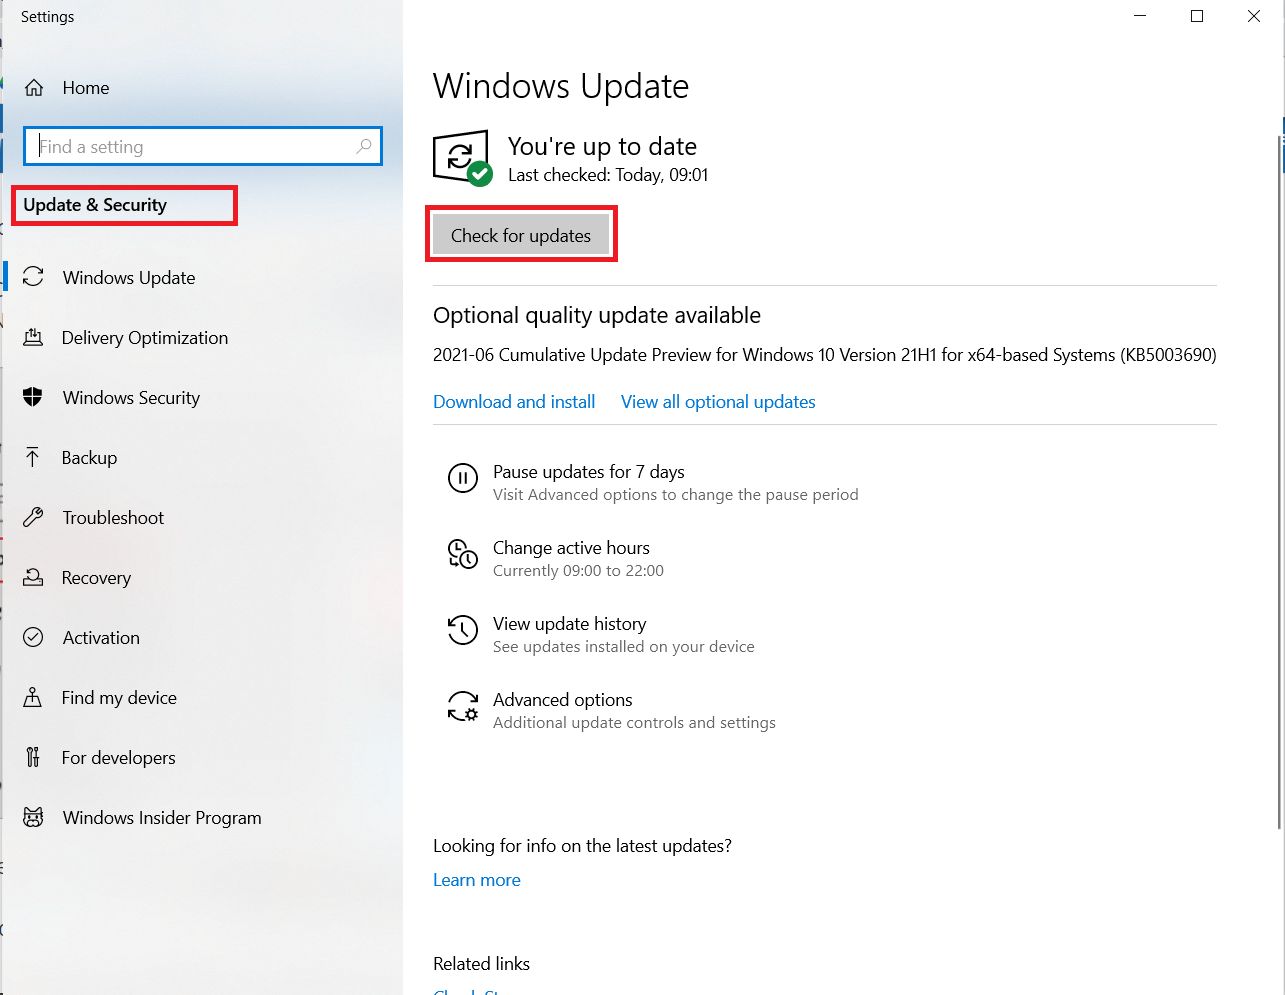
- Open windows settings by pressing “Windows+i”.
- Now, click on the “Update and Security” option.
- Here, you can see the “Check for the updates” option. Click on it to search for the latest update for your OS.
- If you find any updates, you should download them right away and install them when your system is idle.
3. Run the CHKDSK Command
High CPU usage can also be caused by damaged hard drives. Even if your hard drive is not physically damaged, it might generate bad sectors after years of usage, which can cause problems in your system. You can easily check the health of your drive by running the CHKDSK command.
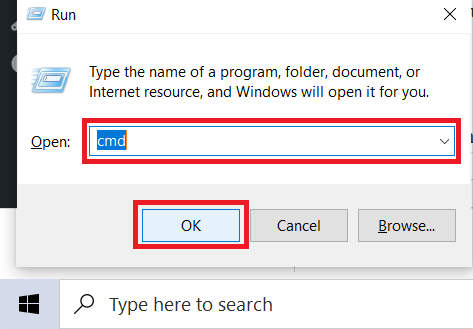
1. Search “CMD” in the Windows 10 search bar. Once you see the “Command prompt” in the results, right-click and select “Run as administrator”.
2. Once you are on the command prompt, copy the command given below and simply right-click in the command prompt window to paste it. Make sure you replace the letter “G” with the drive letter which you wish to scan.
chkdsk E: /f /r /x
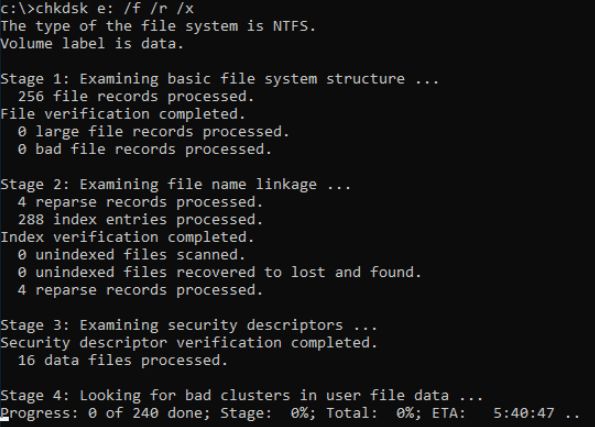
3. After entering the command, press enters to execute it. Be patient, as it might take 5 to 10 minutes, depending on your drive. Once the drive is scanned, the system will automatically try to resolve the problems with your drive.
4. After that, restart your computer and see whether the high CPU usage caused by Microsoft Compatibility Telemetry is resolved.
Conclusion
If you have reached the final part of our guide, you must have found the perfect solution to resolve the Microsoft Compatibility Telemetry high CPU usage problem in your system. If not, we will strongly recommend you to try all of the options available in our guide. Before you completely disable the service, you can also try the secondary solutions, which might limit the CPU usage even without disabling the service completely.
