Having a Static IP Address on the Raspberry Pi is very useful as it will make the SSH connection of the Raspberry Pi much simpler and easier. We have already see a tutorial on how to setup our Raspberry Pi in a headless way i.e. without using a monitor and a keyboard.
If you remember, we need to scan for the IP Address of the Raspberry Pi whenever we need to connect to it through SSH. If you try to login using an older IP Address, you will be denied access.
This is because, each time your Raspberry Pi boots (reboot), it will have a new IP Address assigned by the Router. This type of assigning IP Addresses is called Dynamic IP Address. Whenever we disconnect the Raspberry Pi from the network or turn down its power, the IP Address will change.
How to Setup Static IP Address on Raspberry Pi?
If you are tired of scanning the IP Address of your Raspberry Pi every time you want to login using SSH or remote connection, then assigning a Static IP Address to the Raspberry Pi would make your job easy.

Setting up a Static IP Address on a Raspberry Pi is very easy. In this tutorial, I’ll take you through a step – by – step process of assigning a Static IP Address for your Raspberry Pi. In order to proceed with this tutorial, you should have knowledge of how to setup a Raspberry Pi using SSH Connection which can be found here.
Before going in to the steps of setting up a Static IP Address on your Raspberry Pi, let us have a brief look in to both Static and Dynamic IP Addresses.
Static IP Address vs Dynamic IP Address
Static IP Address
Static IP Addresses are permanent IP Addresses assigned by the ISPs (Internet Service Providers). Static IP Address do not change over time (depending on the contract), even when you turn off your computer.
Usually, Static IP Address is given to servers like web servers, FTP servers, email servers, public organisations etc. where you need to use the same IP Address every time.
For small applications, Static IP Address is good if you are using services like VoIP, remote connections, weather monitoring stations etc.
Static IP Addresses are usually expensive and ISPs will charge more than Dynamic IP Address. Also, since we have a single, fixed IP address every time, the threat of hacking is huge.
Dynamic IP Address
In contrast to Static IP Address, a Dynamic IP Address is subject to frequent change by the ISP. This change happens dynamically and whenever you restart your PC or router, you will have a new IP Address assigned by your ISP. What we use in our daily life is a Dynamic IP Address.
Dynamic IP Address from ISP is a cheap and secure option. Always changing the IP Address (Dynamically, by the ISP) will give us more privacy and less threat to hacking. ISPs use DHCP Servers to assign IP Addresses using DHCP (Dynamic Host Configuration Protocol) Protocol.
Setting up Static IP Address on Raspberry Pi
We will see the steps to set a Static IP Address on our Raspberry Pi. By Static IP Address, we do not mean a dedicated Static IP Address from the ISP. We mean a permanent IP Address from our router.
In fact, the Router, which we use in our homes, acts as a DHCP Server as it assigns Dynamic IP Addresses to the devices connected to the network.
What we are going to do is, out of the possible IP Addresses, we are going to assign a Static IP Address (technically, two Static IP Addresses – one for Wired Connection and the other for WLAN) for our Raspberry Pi.
NOTE: For this setup, your Raspberry Pi should be installed with OS and connected to internet (Ethernet or WLAN).
Default Gateway
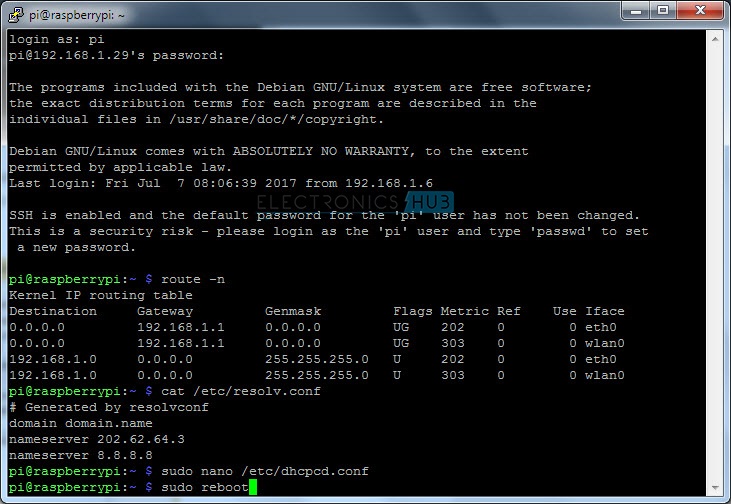
Initially, find out the Default Gateway of your network. Default Gateway is Local IP Address of the Router. There are many ways to find out the Default Gateway. If you are using Windows, go to command prompt and type the following command.
Depending on the type of your connection, the Default Gateway can be found in either Ethernet Adapter Local Area Connection or Wireless LAN adapter Wireless Network Connection.
You can find out the Default Gateway from your Raspberry Pi itself. From the SSH Terminal like Putty, type any one of the following commands.
or
In our case, the Default Gateway is 192.168.1.1. Take a note of this Default Gateway.
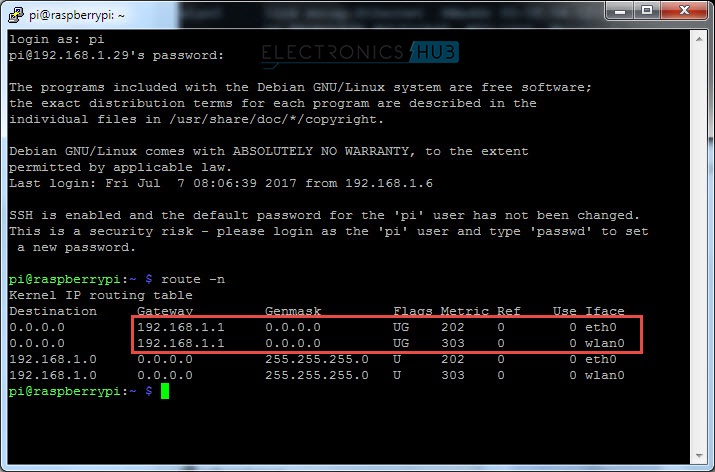
From this information we can gather some additional information like all the devices connected to the Router will be assigned IP Addresses in the range of 192.168.1.1 to 192.168.1.255 (depends on your router). If we observe in the above image, the IP Address of the Raspberry Pi (connected through cable) is 192.168.1.29.
If we want to set a Static IP Address to our Raspberry Pi, it should be in the above mentioned range. Also, the Static IP Address we assign shouldn’t be already assigned to any other device.
DNS Server List
After getting the Default Gateway, we must find out the list of DNS (Domain Name System) Servers. Again, we have several ways to find out the DNS Servers list. In Windows, you can use the following command in the Command Prompt and find out the DNS Servers.
In Raspberry Pi SSH Terminal (Putty) type the following command and hit enter. You will get a list of DNS Servers.
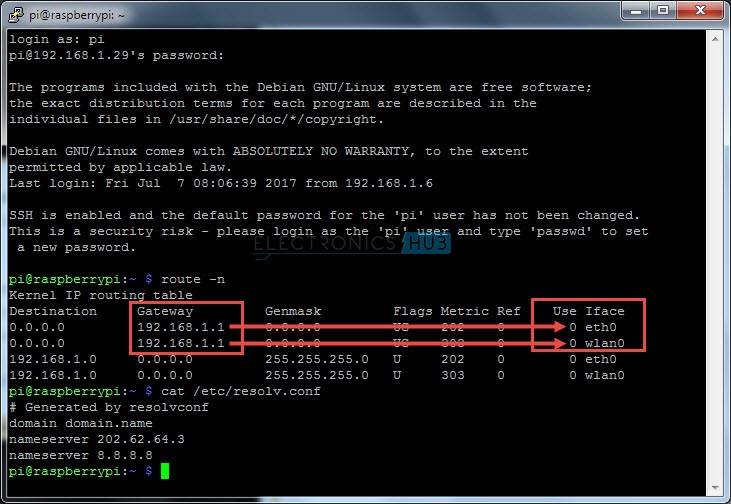
Note down these DNS Servers as well. In our case, we have the following DNS Servers.
202.62.64.3
8.8.8.8
Network Settings Configuration
Now, we will setup network settings. For that, we need to modify the dhccpcd.conf file. The dhcpcd is a DHCP Client that configures the system to work on a network. To open the dhcpcd file, type the following command and hit enter.
You will find several lines of code already present in the file. If you scroll down to the end of the file, you will find the line nohook lookup-hostname. Without making any changes to the existing commands (even if they are commented – starting with #), type the following code in the dhcpcd.conf file.
interface eth0
static ip_address=192.168.1.99
interface wlan0
static ip_address=192.168.1.100
static routers=192.168.1.1
static domain_name_servers=202.62.64.3 8.8.8.8
The file should look something like this.
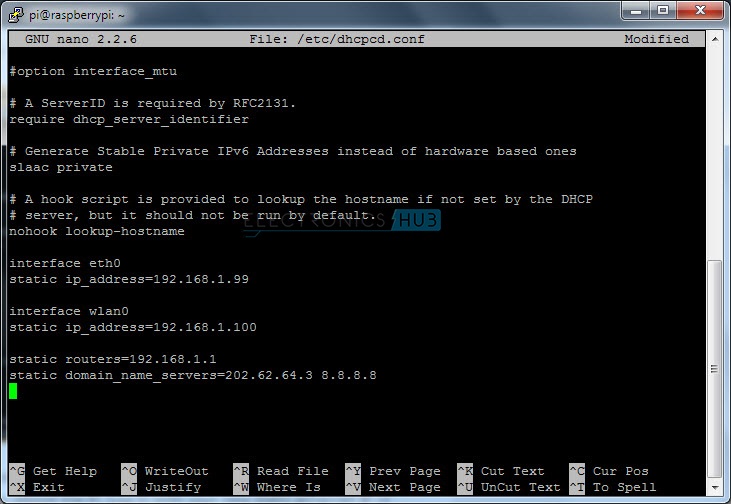
Here, in the static ip_address field, enter the Static IP Address you want to assign to your Raspberry Pi (one for wired connection and other for wireless connection). For this, you probably want to scan and gather the list of all the IP Addresses connected to your router.
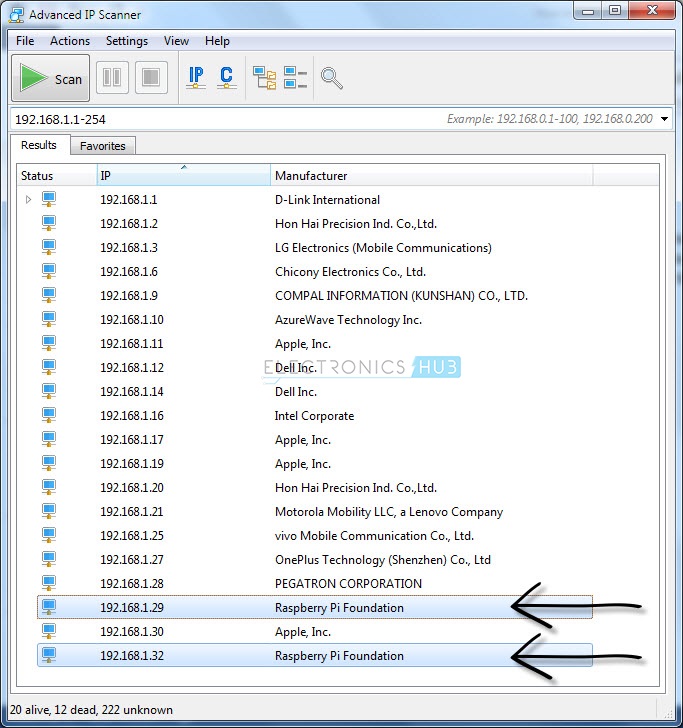
In our case, 192.168.1.29 and 192.168.1.32 are assigned to Raspberry Pi (one for Ethernet and the other for WLAN). So, for Static IP Address, I’ve assigned 192.168.1.99 for Ethernet and 192.168.1.100 for WLAN. You can notice this in the interface eth0 and interface wlan0 lines.
In the above command, static routers is the default gateway of the router and static domain_name_servers are the DNS Servers. In our case, the default gateway is 192.168.1.1 and the DNS Servers are 202.62.64.3 and 8.8.8.8.
After the above commands are typed, we need to save the file by pressing CTRL+x and then Y and finally hit enter.
Reboot and Test the Static IP Address
Once you are done with saving the file, you can reboot the Raspberry Pi using the following command.
Once the Raspberry Pi reboots, you can check the changes by using different methods. Use the following command to check the details of both Ethernet and WLAN.

To check a working network connection, you can use ping command.
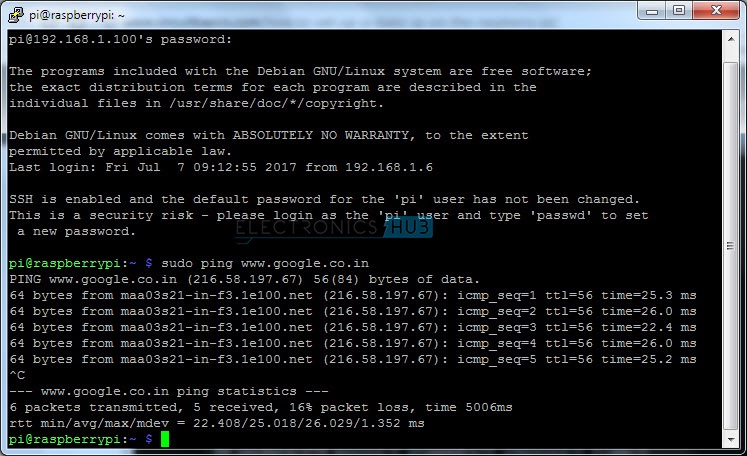
To come out of the ping, enter CTRL+c.
Another way to check is to scan for the IP Addresses.

You have successfully set a Static IP Address on your Raspberry Pi. With this, it will be easy for you to setup remote desktop connection over the internet.

3 Responses
Thank You Very much this was the simple & best steps to assign static IP address on raspberry pi
in my case there is only single ip present for both eth and wlan as shown by ip scanner and secondly after sudo nano /etc/dhcpcd.conf command wlan0 is not shown??
In my case domain_name_servers is not showing??